1. Einleitung
Thank you for choosing the MAC AUDIO Red Attack 4800 2-Channel Amplifier. Diese hohe Qualität amplifier is designed to enhance your car audio experience by providing powerful and clear sound reproduction. This manual provides essential information for proper installation, operation, and maintenance of your amplifier. Please read it thoroughly before use to ensure optimal performance and safety.
2. Sicherheitshinweise
Beachten Sie stets die folgenden Sicherheitsvorkehrungen, um Verletzungen oder Schäden zu vermeiden. ampVerstärker und Fahrzeug:
- Stromabschaltung: Before any installation or wiring, disconnect the vehicle's negative battery terminal to prevent electrical shorts.
- Professionelle Installation: If you are unsure about the installation process, seek assistance from a qualified professional car audio installer.
- Richtige Verdrahtung: Use appropriate gauge wiring for power, ground, and speaker connections as specified in this manual to prevent overheating and damage.
- Belüftung: Stellen Sie sicher, dass amplifier is mounted in a location with adequate ventilation to prevent overheating. Do not block cooling fins or vents.
- Feuchtigkeitseinwirkung: Setzen Sie die ampVerstärker gegenüber Feuchtigkeit, Wasser oder extremen Temperaturen.
- Absicherung: Always use the correct fuse rating as specified. Never replace a blown fuse with one of a higher ampära.
- Lautstärkepegel: Längerer Kontakt mit hohen Lautstärken kann zu Gehörschäden führen. Passen Sie die Lautstärke verantwortungsvoll an.
3. Produktüberschreitungview
The MAC AUDIO Red Attack 4800 is a robust 2-channel amplifier engineered for reliable performance in car audio systems. It features a durable design and essential controls for sound customization.
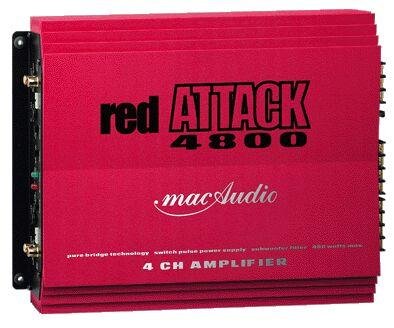
Abbildung 1: Vorderseite view of the MAC AUDIO Red Attack 4800 2-Channel Amplifier, showing input and output terminals, and control knobs.
Das amplifier is designed to deliver clean power to your speakers, enhancing the clarity and impact of your music. Its compact design allows for flexible installation options within your vehicle.
4. Einrichtung und Installation
Careful installation is crucial for the amplifier's performance and longevity. Follow these steps for a successful setup.
4.1. Montageort
- Wählen Sie einen trockenen, gut belüfteten Ort fern von direkter Sonneneinstrahlung und Wärmequellen.
- Sorgen Sie für ausreichende Luftzirkulation um das/die/den/das ampKühlkörper des Verstärkers.
- Montieren Sie die amplifier securely to a solid surface using appropriate screws to prevent movement during vehicle operation.
4.2. Kabelverbindungen
Before making any connections, ensure the vehicle's battery negative terminal is disconnected.
4.2.1. Strom- und Erdungsverkabelung
- Leistung (B+): Connect a heavy-gauge power cable (e.g., 8 AWG or 4 AWG depending on power requirements) directly from the positive terminal of the vehicle's battery to the amplifier's B+ terminal. Install an in-line fuse holder with the correct amperage fuse (refer to specifications) within 18 inches (45 cm) of the battery.
- Masse (GND): Connect a heavy-gauge ground cable of the same length and gauge as the power cable from the amplifier's GND terminal to a clean, unpainted metal surface on the vehicle's chassis. Ensure a good electrical connection by scraping away any paint or rust.
- Fernbedienung (REM): Connect a smaller gauge wire (e.g., 18 AWG) from the amplifier's REM terminal to the remote output of your car stereo or head unit. This wire turns the amplifier on and off with the stereo.
4.2.2. Audio Input Wiring
- Connect RCA cables from the pre-out outputs of your car stereo to the RCA input jacks on the amplifier. Ensure correct channel matching (Left to Left, Right to Right).
4.2.3. Speaker Output Wiring
- Verbinden Sie Ihre Lautsprecher mit dem amplifier's speaker output terminals. Observe correct polarity (+ to + and - to -) for each speaker. Incorrect polarity can lead to poor sound quality and reduced bass response.
- Ensure the total impedance of the connected speakers matches the amplifier's minimum impedance rating (refer to specifications).
4.3. Grundeinstellungen
After all wiring is complete and verified, reconnect the vehicle's negative battery terminal.
- Kontrolle erlangen: Start with the gain control set to minimum. Play a familiar piece of music at a moderate volume on your head unit. Slowly increase the amplifier's gain control until you hear distortion, then back it off slightly. This sets the ampDie Eingangsempfindlichkeit des Verstärkers muss mit der Ausgangsempfindlichkeit Ihres Autoradios übereinstimmen.
- Crossover-Einstellungen: Wenn Ihr amplifier has built-in crossover filters (e.g., Low Pass Filter, High Pass Filter), adjust them according to your speaker type and system configuration. For full-range speakers, you might use a high-pass filter to protect them from low frequencies. For subwoofers, a low-pass filter is essential.
5. Bedienung des Ampschwerer
Once installed and configured, operating your MAC AUDIO Red Attack 4800 amplifier is straightforward.
- Ein-/Ausschalten: Der amplifier will automatically turn on when your car stereo is powered on (via the remote wire) and turn off when the stereo is off.
- Lautstärkeregelung: Stellen Sie die Gesamtlautstärke des Systems mit dem Lautstärkeregler Ihres Autoradios ein. amplifier's gain control should only be used for initial level matching, not as a volume knob.
- Toneinstellungen: Fine-tune your sound using the crossover controls and any bass boost features available on the amplifier or your head unit. Make small adjustments and listen carefully to the changes.
6. Wartung
Regelmäßige Wartung gewährleistet die Langlebigkeit und optimale Leistung Ihres Geräts ampschwerer.
- Reinigung: Reinigen Sie regelmäßig die ampReinigen Sie die Außenseite des Verstärkers mit einem weichen, trockenen Tuch. Verwenden Sie keine scharfen Chemikalien oder Scheuermittel. Stellen Sie sicher, dass die Kühlrippen frei von Staub und Schmutz sind.
- Verbindungsprüfung: Occasionally check all wiring connections (power, ground, remote, RCA, speaker) to ensure they are secure and free from corrosion. Loose connections can cause performance issues or damage.
- Belüftung: Stellen Sie sicher, dass die ampDer Montageort des Verstärkers muss frei von Hindernissen sein, um einen ordnungsgemäßen Luftstrom zu gewährleisten.
7. Fehlerbehebung
Sollten Sie Probleme mit Ihrem ampBevor Sie sich an den Support wenden, konsultieren Sie bitte die folgende Anleitung zur Fehlerbehebung.
| Problem | Mögliche Ursache | Lösung |
|---|---|---|
| Amplifier schaltet sich nicht ein. | No power, poor ground, remote wire not connected or faulty, blown fuse. | Check power (B+) and ground (GND) connections. Verify remote (REM) wire connection to head unit. Check in-line fuse and amplifier's internal fuses. |
| Keine Tonausgabe. | RCA cables disconnected, speaker wires disconnected or shorted, amplifier in protection mode, head unit settings. | Check RCA input connections. Verify speaker wire connections and ensure no shorts. Check if protection LED is on. Confirm head unit output is active. |
| Verzerrter Ton. | Gain set too high, poor ground, speaker impedance mismatch, damaged speakers. | Reduce gain setting. Check ground connection. Verify speaker impedance. Inspect speakers for damage. |
| AmpDer Verstärker überhitzt. | Unzureichende Belüftung, zu niedriger Druck, anhaltend hohes Druckvolumen. | Sorgen Sie für ausreichende Luftzirkulation um das/die/den/das amplifier. Check speaker impedance. Reduce volume or operating time. |
8. Spezifikationen
The following are general specifications for the MAC AUDIO Red Attack 4800 amplifier. Specific performance figures may vary.
- Marke: MAC AUDIO
- Modellnummer: RED 4800 Attack
- Anzahl der Kanäle: 2
- Montageart: Freistehende
- Artikelgewicht: 10 g (Note: This weight seems unusually low for an amplifier and might be a data entry error. Please refer to product packaging for accurate weight.)
- GTIN: 04023037264807
- ASIN: B0000WR722
Note: For detailed power output ratings (RMS/Max power), frequency response, signal-to-noise ratio, and other electrical specifications, please refer to the official product packaging or manufacturer's webWebsite.
9. Garantie und Support
MAC AUDIO products are manufactured to high-quality standards. For information regarding warranty coverage, terms, and conditions, please refer to the warranty card included with your product or visit the official MAC AUDIO website. For technical support or service inquiries, please contact your authorized MAC AUDIO dealer or the manufacturer directly.
Bewahren Sie Ihren Kaufbeleg als Kaufnachweis für Garantieansprüche auf.


