
1. Einleitung
This manual provides detailed instructions for the proper installation, operation, and maintenance of your Lanzar RBHTG414 Heritage 600 Watt 4-Channel MOSFET AmpVerstärker. Um optimale Leistung und Sicherheit zu gewährleisten, lesen Sie diese Bedienungsanleitung bitte sorgfältig durch, bevor Sie versuchen, den Verstärker zu installieren oder in Betrieb zu nehmen. amplifier. Bewahren Sie dieses Handbuch zum späteren Nachschlagen auf.
2. Sicherheitshinweise
Beachten Sie bei der Installation und dem Betrieb stets die folgenden Sicherheitsvorkehrungen:
- Disconnect the vehicle's negative battery terminal before beginning any installation work to prevent electrical shorts.
- Achten Sie darauf, dass alle Kabel ordnungsgemäß verlegt und befestigt sind, um Beschädigungen durch scharfe Kanten oder bewegliche Teile zu vermeiden.
- Verwenden Sie für die Strom- und Erdungsanschlüsse die im Installationsabschnitt angegebenen Kabel mit dem entsprechenden Querschnitt.
- Installieren Sie die ampDer Verstärker sollte an einem Ort aufgestellt werden, der eine ausreichende Belüftung ermöglicht, um eine Überhitzung zu vermeiden.
- Vermeiden Sie die Montage der ampVerstärker in Bereichen, die Feuchtigkeit oder starken Vibrationen ausgesetzt sind.
- Versuchen Sie nicht, das ampVerstärken Sie sich selbst. Überlassen Sie alle Wartungsarbeiten qualifiziertem Fachpersonal.
3. Produktüberschreitungview
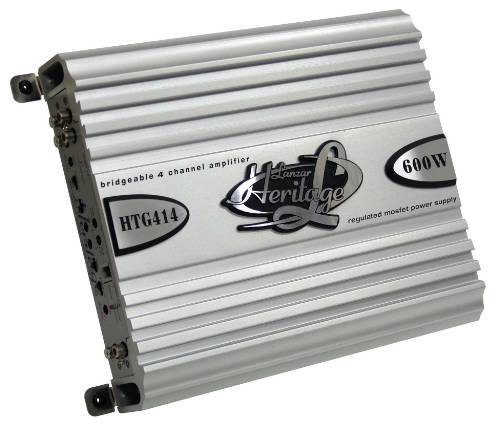
The Lanzar RBHTG414 Heritage amplifier is a 600 Watt, 4-channel MOSFET amplifier designed to deliver powerful and clear audio performance for your car audio system. It features a regulated MOSFET power supply and is bridgeable, offering flexible configuration options for various speaker setups.
4. Einrichtung und Installation
Eine fachgerechte Installation ist entscheidend für die Leistung und Langlebigkeit Ihres Produkts. amplifier. The Lanzar RBHTG414 is designed for surface mounting.
4.1 Checkliste vor der Installation
- Ensure you have all necessary tools and wiring kits (power wire, ground wire, remote turn-on wire, RCA cables, speaker wire, fuses, terminals).
- Choose a mounting location that is dry, well-ventilated, and secure.
- Plan your wiring routes to avoid interference and potential damage.
4.2 Kabelverbindungen
The following outlines general wiring procedures. Consult a professional installer if you are unsure about any steps.
- Power Connection (BATT+): Connect a heavy-gauge power cable (e.g., 8-gauge or 4-gauge depending on total system power) directly from the vehicle's positive battery terminal to the ampSchließen Sie den BATT+-Anschluss des Verstärkers an. Installieren Sie einen Inline-Sicherungshalter innerhalb von 45 cm (18 Zoll) von der Batterie.
- Erdungsanschluss (GND): Connect a heavy-gauge ground cable of the same length as the power cable from the ampVerbinden Sie den GND-Anschluss des Verstärkers mit einer sauberen, unlackierten Metalloberfläche am Fahrzeugchassis. Achten Sie auf eine sichere Verbindung mit niedrigem Widerstand.
- Ferneinschaltung (REM): Connect a smaller gauge wire (e.g., 18-gauge) from the amplifier's REM terminal to the remote turn-on output of your head unit. This wire signals the amplifier to turn on and off with your car's audio system.
- RCA-Eingangsanschlüsse: Connect RCA audio cables from your head unit's pre-amp Ausgänge zum amplifier's RCA input jacks. For 4-channel operation, use two pairs of RCA cables (Front L/R, Rear L/R).
- Lautsprecheranschlüsse: Connect your speakers to the ampLautsprecherausgangsanschlüsse des Verstärkers.
- 4-Channel Stereo Mode: Connect each speaker to its corresponding channel output (e.g., Front Left speaker to CH1+, CH1-, Front Right to CH2+, CH2-, etc.).
- Bridged Mode (2-Channel): For higher power output to subwoofers or a pair of speakers, the RBHTG414 can be bridged. Refer to the amplifier's terminal markings for specific bridged connection points (typically CH1+ and CH2- for one bridged channel, and CH3+ and CH4- for the second). Ensure your speakers are rated for the increased power output in bridged mode.
4.3 Montage
Befestigen Sie den amplifier to a solid surface using appropriate screws. Ensure there is sufficient space around the amplifier for air circulation, especially around the heat sink fins, to prevent thermal shutdown.
5. Bedienungsanleitung
Einmal installiert, die amplifier will turn on automatically with your head unit. Adjustments should be made carefully to achieve optimal sound quality.
- Kontrolle gewinnen: The gain control matches the amplifier's input sensitivity to the output level of your head unit. Start with the gain set to minimum, then slowly increase it until you hear distortion, then back off slightly. This is not a volume control.
- Crossover-Einstellungen: Wenn Ihr amplifier includes crossover controls (e.g., High-Pass Filter (HPF), Low-Pass Filter (LPF)), adjust them according to your speaker type. HPF is used for full-range speakers to block low frequencies, while LPF is used for subwoofers to block high frequencies.
- Bass Boost: Use the bass boost feature sparingly, if available, as excessive boosting can lead to distortion and potential speaker damage.
6. Wartung
Regelmäßige Wartung trägt dazu bei, die Langlebigkeit und Leistungsfähigkeit Ihres Geräts zu gewährleisten. ampschwerer.
- Reinigung: Reinigen Sie regelmäßig die amplifier's exterior with a soft, dry cloth. Ensure the heat sink fins are free of dust and debris to maintain proper cooling.
- Anschlüsse: Occasionally check all wiring connections for tightness and corrosion. Loose connections can cause poor performance or damage.
- Belüftung: Stellen Sie sicher, dass die amplifier's mounting location remains clear of obstructions that could impede airflow.
7. Fehlerbehebung
Wenn Sie Probleme mit Ihrem ampBevor Sie professionelle Hilfe in Anspruch nehmen, sollten Sie sich die folgenden häufigen Probleme und Lösungen ansehen.
| Problem | Mögliche Ursache | Lösung |
|---|---|---|
| Amplifier schaltet sich nicht ein | Blown fuse; loose power/ground/remote wire; no power from head unit remote output. | Prüfen Sie die Inline-Sicherung und amplifier fuses; verify all power, ground, and remote connections are secure; test remote wire for 12V when head unit is on. |
| Keine Tonausgabe | Loose RCA cables; incorrect gain setting; speaker wires disconnected; ampVerstärker im Schutzmodus. | Überprüfen Sie die RCA-Anschlüsse an beiden Seiten. amplifier and head unit; ensure gain is set correctly; verify speaker wire connections; check for protect light indicator. |
| Verzerrter Ton | Gain set too high; improper crossover settings; damaged speaker; poor ground connection. | Reduce gain setting; adjust crossover filters; inspect speakers for damage; ensure ground connection is solid. |
| Amplifier überhitzt | Insufficient ventilation; impedance mismatch; prolonged high-power operation. | Sorgen Sie für ausreichende Luftzirkulation um das/die/den/das amplifier; verify speaker impedance matches amplifier's rating; reduce volume or operating time. |
8. Spezifikationen
The following are key specifications for the Lanzar RBHTG414 Heritage AmpReiniger:
- Marke: Lanzar
- Modellnummer: RBHTG414
- Anzahl der Kanäle: 4
- Leistungsabgabe: 600 Watts (Peak)
- Amplifier-Klasse: MOSFET
- Montagetyp: Oberflächenmontage
- Produktabmessungen (L x B x H): 2 x 2 x 2 Zoll
- Artikelgewicht: 10.89 Pfund
- UPC: 068888725088
- Farbe: BLACK (Unit shown in image is silver, but product data indicates BLACK)
9. Garantie und Support
Lanzar products are designed for reliability and performance. For information regarding warranty coverage, technical support, or service, please refer to the warranty card included with your product or visit the official Lanzar website. Please have your model number (RBHTG414) and purchase information ready when contacting support.