
Einführung und Endeview
This manual provides comprehensive instructions for the safe and efficient assembly, operation, and maintenance of your celexon 104-inch Tripod Projector Screen. Please read this document thoroughly before attempting to set up or use the product to ensure proper functionality and longevity.
The celexon 104-inch Tripod Projector Screen offers a versatile and portable solution for various projection needs. Key features include:
- ViewBereich: 83 x 62 inches (211 x 160 cm) with a 4:3 aspect ratio.
- Portabilität: Designed as a mobile solution with a built-in carry handle for easy transport.
- Haltbarkeit: Features a robust and perfected design for reliable use.
- Verstellbarkeit: Offers adjustable screen height and a built-in keystone bracket for optimal setup in diverse environments.
- Optimale Projektion: Equipped with black borders for enhanced contrast and a specially designed 1.0 gain ultra-flat fabric to ensure a superior projection experience.
Installationsanweisungen
Follow these steps to correctly assemble and set up your tripod projector screen:
- Komponenten auspacken: Carefully remove all parts from the packaging. Ensure you have the screen housing, tripod stand, and any included accessories.
- Stativbeine ausziehen: Place the tripod stand on a flat, stable surface. Gently pull the tripod legs outwards until they are fully extended and locked into position. Ensure the tripod is stable and balanced.
- Anbringen des Bildschirmgehäuses: Locate the mounting point on top of the tripod stand. Align the screen housing with this point and securely attach it. Some models may require a simple clip or screw mechanism.
- Adjust Screen Height: Loosen the height adjustment knob on the tripod pole. Raise or lower the screen housing to your desired viewing height. Once set, tighten the knob firmly to secure the screen in place.
- Bildschirm erweitern: Gently pull the screen surface downwards from the housing. The screen will lock into place at various intervals. Pull it down to the desired viewing area. Ensure the screen is extended evenly to prevent wrinkles.

Figure 1: Installation in 3 Steps. This image illustrates the basic assembly process of the tripod projector screen.

Figure 2: Screen Dimensions and Adjustable Height. This diagram shows the viewing area dimensions and the overall adjustable height range of the screen.
Bedienungsanleitung
Once the screen is set up, follow these guidelines for optimal operation:
- Bildschirm erweitern: Gently pull the screen surface downwards from the center of the bottom bar. The screen will automatically lock into position at various desired lengths. Avoid pulling from the sides to prevent uneven extension.
- Bildschirm einfahren: To retract, pull the screen down slightly further (approximately 1-2 inches) to disengage the locking mechanism. Then, slowly and carefully guide the screen back into its housing. Do not release abruptly, as this can damage the retraction mechanism.
- Anpassen der Trapezkorrektur: If your projector creates a trapezoidal image (wider at the top or bottom), use the built-in keystone bracket on the screen's tripod to tilt the screen slightly. This can help correct the image geometry. Alternatively, adjust your projector's keystone correction settings.
- Positionierung: Für das Beste viewing experience, position the screen directly opposite your projector. Ensure the screen is level and stable.

Figure 3: Key Screen Features. This image highlights the screen's compatibility with 4K UHD, wide viewing angle, gain factor, and matte white surface.
Wartung
Durch sachgemäße Wartung wird die Langlebigkeit und optimale Leistung Ihrer Projektorleinwand gewährleistet.
- Reinigung der Bildschirmoberfläche: Benutzen Sie ein weiches, fusselfreies Tuch, dampened with water or a mild, non-abrasive soap solution. Gently wipe the screen surface from top to bottom. Avoid harsh chemicals, abrasive cleaners, or excessive scrubbing, as these can damage the screen material.
- Cleaning the Tripod and Housing: Wipe down the metal and plastic parts of the tripod and screen housing with a damp Tuch. Stellen Sie sicher, dass alle Teile vor der Lagerung trocken sind.
- Lagerung: When not in use, fully retract the screen into its housing. Store the screen in a dry, cool environment, away from direct sunlight and extreme temperatures. For transport, ensure the tripod legs are fully collapsed and secured.
- Regelmäßige Inspektion: Periodically check all moving parts, such as the tripod hinges, height adjustment mechanism, and screen retraction system, for any signs of wear, damage, or loose connections. Address any issues promptly.
Fehlerbehebung
In diesem Abschnitt finden Sie Lösungen für häufig auftretende Probleme.
| Problem | Mögliche Ursache | Lösung |
|---|---|---|
| Der Bildschirm fährt nicht reibungslos ein. | Obstruction in the housing or uneven retraction. | Ensure no objects are blocking the screen path. Pull the screen down slightly, then guide it back up evenly from the center. Do not force retraction. |
| Image appears trapezoidal (keystone effect). | Projector is not perpendicular to the screen, or screen is tilted. | Adjust the projector's position to be directly in front of the screen. Use the screen's built-in keystone bracket to tilt the screen if necessary, or adjust your projector's digital keystone correction. |
| Screen wobbles or is unstable. | Tripod legs not fully extended or placed on an uneven surface. | Ensure all tripod legs are fully extended and locked. Place the tripod on a flat, stable surface. Adjust leg positions for maximum stability. |
| Screen surface has minor wrinkles or creases. | Improper storage or uneven retraction over time. | Minor creases often smooth out with use. Ensure the screen is always retracted evenly and stored properly. Avoid folding or creasing the screen material. |
Technische Daten
| Modellnummer: | 1090020 |
| Marke: | celexon |
| Viewing Area (W x H): | 83 x 62 Zoll (211 x 160 cm) |
| Diagonale Größe: | 104 Zoll (ca. 264 cm) |
| Seitenverhältnis: | 4:3 |
| Bildschirmmaterial: | Fabric, Matte White (1.0 Gain) |
| Montageart: | Stativmontage |
| Produktabmessungen (zusammengeklappt): | 2.76 x 88.58 x 2.76 Zoll (ca. 7 x 225 x 7 cm) |
| Artikelgewicht: | 25.1 Pfund (ca. 11.4 kg) |
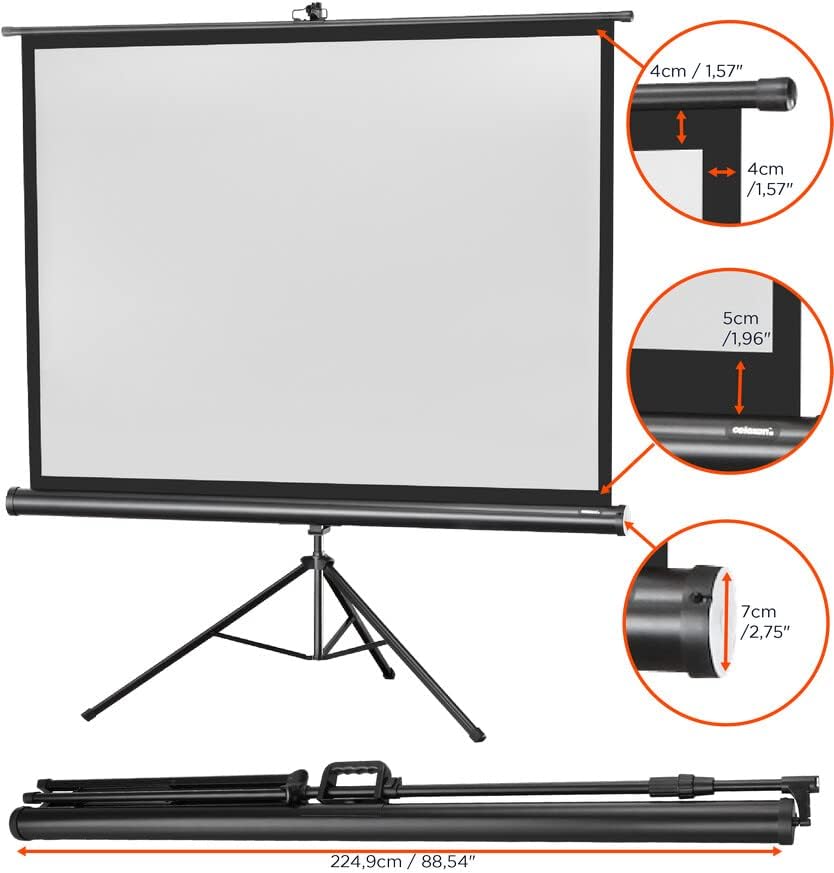
Figure 4: Detailed Product Dimensions. This image provides specific measurements for the screen's components and its collapsed form.
Garantie und Support
For detailed warranty information, product registration, or technical assistance, please visit the official celexon webBesuchen Sie die Website oder kontaktieren Sie direkt den Kundendienst. Bewahren Sie Ihren Kaufbeleg als Kaufnachweis für eventuelle Garantieansprüche auf.
celexon Official WebWebsite: Visit celexon on Amazon