
ECS Elitegroup P4M800-M7
ECS P4M800-M7 Motherboard User Manual
Model: P4M800-M7
Einführung
This manual provides detailed instructions for the installation, operation, and maintenance of the ECS P4M800-M7 motherboard. The P4M800-M7 is designed to support Socket LGA775 Intel Pentium 4 / Pentium D / Celeron D Processors with FSB 800/533 MHz and Hyper-Threading Technology.
Key features include 64-bit support, FSB 800MHz, RAID0, RAID1, and Serial ATA capabilities.
Produkt überview

Figure 1: ECS P4M800-M7 Motherboard Layout. This image displays the main components of the motherboard, including the CPU socket (LGA 775), two DDR RAM slots, PCI and AGP expansion slots, and various I/O ports.
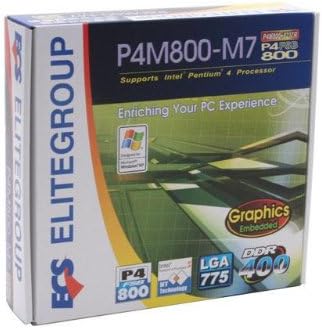
Figure 2: ECS P4M800-M7 Retail Box. The product packaging indicates support for Intel Pentium 4 processors, embedded graphics, and DDR400 memory, along with the LGA 775 socket type.
Setup und Installation
Follow these steps for proper installation of the ECS P4M800-M7 motherboard into your computer system.
1. Bereiten Sie Ihr System vor
- Stellen Sie sicher, dass Ihr Netzteil von der Wandsteckdose getrennt ist.
- Entladen Sie eventuell vorhandene statische Elektrizität durch Berühren eines geerdeten Metallgegenstands.
2. Installieren Sie die CPU
- Öffnen Sie den Hebel des CPU-Sockels.
- Carefully align the CPU (Intel Pentium 4 / Pentium D / Celeron D) with the socket, ensuring the notches match.
- Senken Sie die CPU vorsichtig in den Sockel ab. Wenden Sie keine Gewalt an.
- Schließen Sie den Sockelhebel, um die CPU zu sichern.
- Apply a thin layer of thermal paste to the CPU surface.
- Installieren Sie den CPU-Kühler gemäß den Anweisungen des Herstellers.
3. Install Memory Modules
The motherboard supports DDR memory. Insert DDR modules into the available memory slots (2 slots).
- Öffnen Sie die Klemmen an beiden Enden des DIMM-Steckplatzes.
- Richten Sie das Speichermodul am Steckplatz aus und achten Sie darauf, dass die Kerbe am Modul mit der entsprechenden Markierung im Steckplatz übereinstimmt.
- Drücken Sie beide Enden des Moduls fest nach unten, bis die Clips einrasten.
4. Das Motherboard montieren
- Install standoffs in your PC case that align with the motherboard's mounting holes.
- Carefully place the motherboard onto the standoffs, aligning the I/O shield with the case opening.
- Befestigen Sie das Motherboard mit Schrauben.
5. Connect Power and Peripherals
Connect the 20-pin ATX main power connector and the 4-pin ATX 12V power connector from your power supply to the motherboard. Connect SATA and IDE devices, front panel connectors, and expansion cards as needed.
Bedienungsanleitung
Once the motherboard is installed and all components are connected, you can proceed with system operation.
1. Erster Startvorgang
After connecting the power supply and monitor, power on your system. The system should display the BIOS POST screen. Press the designated key (usually DEL or F2) to enter the BIOS setup utility.
2. BIOS-Konfiguration
In the BIOS, you can configure various system settings, including boot order, date/time, and hardware parameters. Refer to the BIOS section of the full manual for detailed settings. Save changes and exit the BIOS to continue.
3. Installation des Betriebssystems
Insert your operating system installation media (e.g., Windows CD/DVD) and follow the on-screen prompts to install the OS. Ensure all necessary drivers (chipset, audio, network, graphics) are installed after the OS installation for optimal performance. Drivers are typically provided on a CD with the motherboard or can be downloaded from the ECS Elitegroup webWebsite.
Wartung
Durch sachgemäße Wartung wird die Langlebigkeit und der stabile Betrieb Ihres Motherboards sichergestellt.
- Staubentfernung: Reinigen Sie regelmäßig das Innere Ihres Computergehäuses, insbesondere Kühlkörper und Lüfter, mit Druckluft von Staub. Stellen Sie sicher, dass das System vor der Reinigung ausgeschaltet und vom Stromnetz getrennt ist.
- Kabelmanagement: Ensure internal cables are neatly routed to allow for proper airflow.
- BIOS-Updates: Periodically check the ECS Elitegroup website for BIOS updates. Only update the BIOS if necessary and follow the instructions precisely to avoid system instability.
- Treiber-Updates: Keep your device drivers updated to ensure compatibility and performance.
Fehlerbehebung
This section addresses common issues you might encounter with the ECS P4M800-M7 motherboard.
| Problem | Mögliche Ursache | Lösung |
|---|---|---|
| Das System lässt sich nicht einschalten. | Power cables not connected, faulty power supply, or short circuit. | Check all power connections (20-pin ATX, 4-pin 12V). Test power supply. Ensure no metal objects are touching the motherboard. |
| Kein Bild auf dem Monitor. | Monitor cable loose, faulty graphics card (if external), or RAM not seated correctly. | Verify monitor cable connection. Reseat RAM modules. If using an external graphics card, ensure it is properly seated and powered. |
| Das System friert ein oder stürzt ab. | Overheating, unstable drivers, or faulty RAM. | Check CPU and chipset temperatures. Update drivers. Test RAM modules individually. |
| Betriebssystem nicht gefunden. | Incorrect boot order in BIOS, or hard drive not detected. | Enter BIOS and set the correct boot order. Check SATA/IDE cable connections to the hard drive. |
Technische Daten
| Besonderheit | Detail |
|---|---|
| Hersteller | ECS |
| Modellnummer | P4M800-M7 |
| CPU-Sockel | LGA 775 |
| Kompatible Prozessoren | Intel Celeron D, Intel Pentium 4, Intel Pentium |
| Chipsatztyp | Intel |
| Verfügbare Speichersteckplätze | 2 |
| Unterstützter Systembusstandard | SATA 3 |
| FSB-Unterstützung | 800/533 MHz |
| Hyper-Threading-Technologie | Unterstützt |
| RAID-Unterstützung | RAID0, RAID1 |
| UPC | 881038001678 |
| Datum der ersten Verfügbarkeit | 5. April 2006 |
Garantie und Support
For warranty information and technical support, please refer to the documentation included with your purchase or visit the official ECS Elitegroup webDie Garantiebedingungen können je nach Region und Händler variieren.
Official ECS Elitegroup WebWebsite: ECS Elitegroup Store on Amazon (Note: This link directs to the brand's store page on Amazon, where further support information might be available.)
Ask a question about this manual
Ask about setup, troubleshooting, compatibility, parts, safety, or missing instructions. Manuals+ will review the question and use this page’s manual context to help answer it.