Einführung
Thank you for choosing the Technoline WT 182 Radio-Controlled Alarm Clock. This manual provides detailed instructions for the setup, operation, and maintenance of your new device. Please read this manual thoroughly before use and keep it for future reference. The WT 182 is designed to provide accurate time, indoor temperature, date, and day of the week, along with a reliable alarm function.
Sicherheitshinweise
- Setzen Sie das Gerät keinen extremen Temperaturen, direkter Sonneneinstrahlung oder hoher Luftfeuchtigkeit aus.
- Lassen Sie das Gerät nicht fallen und setzen Sie es keinen starken Stößen aus.
- Mischen Sie keine alten und neuen Batterien oder verschiedene Batterietypen.
- Entfernen Sie leere Batterien umgehend, um ein Auslaufen zu verhindern.
- Entsorgen Sie Batterien gemäß den örtlichen Vorschriften.
- Versuchen Sie nicht, das Gerät selbst zu zerlegen oder zu reparieren. Überlassen Sie alle Wartungsarbeiten qualifiziertem Fachpersonal.
Packungsinhalt
Bitte prüfen Sie, ob alle Artikel vorhanden und in gutem Zustand sind:
- Technoline WT 182 Radio-Controlled Alarm Clock Unit
- Benutzerhandbuch (dieses Dokument)
Notiz: 2 x AA Mignon LR06 batteries are required and are not included in the package.
Produkt überview
The Technoline WT 182 features a clear digital display showing time, date, day of the week, and indoor temperature. It includes an alarm with a snooze function and a backlight for easy viewbei schlechten Lichtverhältnissen.

Abbildung 1: Vorderseite view of the Technoline WT 182 alarm clock, displaying the current time, date, day of the week, and indoor temperature. The 'RADIO CONTROLLED' text is visible at the top, and 'techno line' branding is at the bottom.

Figure 2: Top-side view of the alarm clock, highlighting the 'SNOOZE LIGHT' button located on the top edge of the device. This button is used to activate the backlight and the snooze function.

Abbildung 3: Rückseite view of the alarm clock, showing the battery compartment cover and the product information label. The label includes manufacturer details and the model number WT 182.
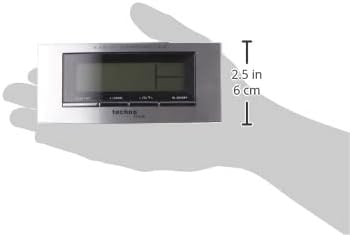
Figure 4: The alarm clock held in a hand, providing a visual reference for its compact dimensions (approximately 14 cm wide and 6 cm high).
Aufstellen
1. Einlegen der Batterie
- Open the battery compartment cover on the back of the unit (refer to Figure 3).
- Insert 2 new AA Mignon LR06 batteries, observing the correct polarity (+ and - markings).
- Schließen Sie den Batteriefachdeckel fest.
2. Initial Setup and Radio Control
Upon battery insertion, the clock will automatically start searching for the DCF-77 radio signal. This process can take several minutes. During this time, the radio control icon will flash on the display. Once the signal is received, the exact time will be set automatically, and the icon will become steady.
- Platzieren Sie die Uhr in der Nähe eines Fensters, um einen besseren Signalempfang zu erzielen.
- Vermeiden Sie es, es in der Nähe von elektronischen Geräten aufzustellen, die Störungen verursachen könnten.
3. Manual Time and Date Setting (if radio signal is unavailable)
If the radio signal cannot be received, or if you wish to set the time manually:
- Press and hold the 'MODE' button (usually located on the front or side) for a few seconds until the time display starts flashing.
- Use the '+' or '-' buttons (often labeled 'ADJ' or similar) to adjust the hour, then press 'MODE' to confirm and move to minutes.
- Wiederholen Sie dies für Minuten, Jahr, Monat und Tag.
- Press 'MODE' again to exit the setting mode.
4. Zeitzoneneinstellung
The clock allows for a time zone adjustment of ± 12 hours. This is useful if you are in a region where the DCF-77 signal is received but the local time zone differs from Central European Time.
- In normal time display mode, press and hold the 'ADJ' or similar button until the time zone offset starts flashing.
- Use the '+' or '-' buttons to adjust the offset.
- Press the 'ADJ' button again to confirm and exit.
Betrieb
1. Time Display (12/24 Hour Format)
The clock can display time in either 12-hour (with AM/PM indicator) or 24-hour format.
- To switch between formats, briefly press the 'ADJ' or a dedicated 12/24H button.
2. Date and Day of the Week Display
The display shows the current date (Month-Day) and the day of the week. The day of the week can be displayed in 5 different languages.
- To change the day of the week language, press the 'MODE' button repeatedly until the language setting flashes, then use '+' or '-' to select.
3. Anzeige der Innentemperatur
The clock continuously measures and displays the indoor temperature.
- The temperature is typically displayed in Celsius. There might be an option to switch to Fahrenheit by pressing a specific button (e.g., 'C/F' or 'ADJ' in temperature mode).
4. Alarmeinstellung
The WT 182 features a single alarm.
- Press the 'ALARM' button once to display the current alarm time.
- Halten Sie die Taste „ALARM“ gedrückt, bis die Alarmzeit zu blinken beginnt.
- Use the '+' or '-' buttons to set the desired alarm hour, then press 'ALARM' to confirm and move to minutes.
- Use the '+' or '-' buttons to set the desired alarm minutes, then press 'ALARM' to confirm and exit.
- To activate/deactivate the alarm, briefly press the 'ALARM ON/OFF' or 'ALARM' button. An alarm icon will appear/disappear on the display.
5. Schlummerfunktion und Hintergrundbeleuchtung
Wenn der Alarm ertönt:
- Press the 'SNOOZE/LIGHT' button (located on top, refer to Figure 2) to activate the snooze function. The alarm will pause for approximately 5 minutes and then sound again.
- To stop the alarm completely, press any other button (e.g., 'ALARM' or 'MODE'). The alarm will reset for the next day.
- To activate the backlight at any time, briefly press the 'SNOOZE/LIGHT' button. The backlight will illuminate for a few seconds.
Wartung
Reinigung
Wischen Sie das Gerät mit einem weichen, damp Verwenden Sie kein scheuerndes Reinigungs- oder Lösungsmittel, da diese das Display oder die Elektronik beschädigen können.asing.
Batteriewechsel
When the display becomes dim or the clock functions erratically, it is time to replace the batteries. Follow the battery installation steps in the 'Setup' section.
Fehlerbehebung
| Problem | Mögliche Ursache | Lösung |
|---|---|---|
| Keine oder nur schwache Anzeige | Die Batterien sind leer oder falsch eingelegt. | Ersetzen Sie die Batterien durch neue und achten Sie dabei auf die richtige Polarität. |
| Falsche Uhrzeit angezeigt | Poor radio signal reception or manual setting error. | Relocate the clock to an area with better signal. Perform manual time setting if radio signal is consistently poor. Check time zone setting. |
| Alarm ertönt nicht | Der Alarm ist nicht aktiviert oder falsch eingestellt. | Ensure the alarm icon is visible on the display. Re-check alarm time settings. |
| Hintergrundbeleuchtung funktioniert nicht | Batteries are low or exhausted. | Batterien ersetzen. |
Technische Daten
- Modellnummer:
- WT 182 (SMADH)
- Abmessungen (L x B x H):
- 140 x 35 x 63 mm (5.5 x 1.4 x 2.5 Zoll)
- Gewicht:
- 150 Gramm
- Energiequelle:
- 2 x AA Mignon LR06 Batterien (nicht im Lieferumfang enthalten)
- Anzeigetyp:
- Digitales
- Zeitformat:
- 12/24 Stunden wählbar
- Temperaturanzeige:
- Innentemperatur
- Besondere Merkmale:
- Radio-controlled time (DCF-77), Date and Day of Week display (5 languages), Alarm with Snooze, Backlight
- Material:
- Plastik
- Farbe:
- Silber/Schwarz
- Betriebsart:
- Digitales
- Bewegungsart:
- Quarz
- Verwendung im Innen-/Außenbereich:
- Innenbereich
- Hersteller:
- PK
- Ursprungsland:
- China
Garantie und Support
Technoline products are manufactured to high-quality standards. For information regarding warranty terms and conditions, please refer to the warranty card included with your purchase or visit the official Technoline website. For technical support or service inquiries, please contact your retailer or the manufacturer directly.
You can find more information and contact details on the official Technoline webWebsite: www.technoline.de