1. Einleitung
This manual provides instructions for the installation, configuration, and operation of your ASUS RT-N13U Wireless-N Router. The RT-N13U is a versatile networking device capable of functioning as a wireless router, an access point, or a wireless repeater. It also features a USB 2.0 port for enhanced functionalities such as printer sharing, FTP hosting, network storage, and direct BitTorrent downloading.
Bitte lesen Sie diese Bedienungsanleitung sorgfältig durch, bevor Sie das Gerät verwenden, um eine korrekte Einrichtung und optimale Leistung zu gewährleisten.
2. Produktüberschreitungview
2.1 Hauptmerkmale
- EZ All-in-One Printer Sharing: Utilize the USB port to share a printer across your network.
- EZ Switch: Easily switch between Router, Repeater, and Access Point modes with a single touch.
- Enhanced Download Master: Herunterladen files directly to a connected USB hard drive even when your computer is off.
- Wireless-N Connectivity: Supports 802.11b/g/n standards for high-speed wireless networking.
- 4 LAN Ports: Provides four 10/100 Mbps Ethernet ports for wired connections.
- Diagnostic and Bandwidth Management Tools: Includes Dr. Surf and EZQoS for network monitoring and quality of service management.
2.2 Packungsinhalt
- ASUS RT-N13U Wireless-N Router
- Netzteil
- Ethernet-Kabel
- Kurzanleitung
- Support-CD (mit Benutzerhandbuch und Hilfsprogrammen)
2.3 Hardware-Schnittstelle
Familiarize yourself with the ports, buttons, and LED indicators on your RT-N13U router.
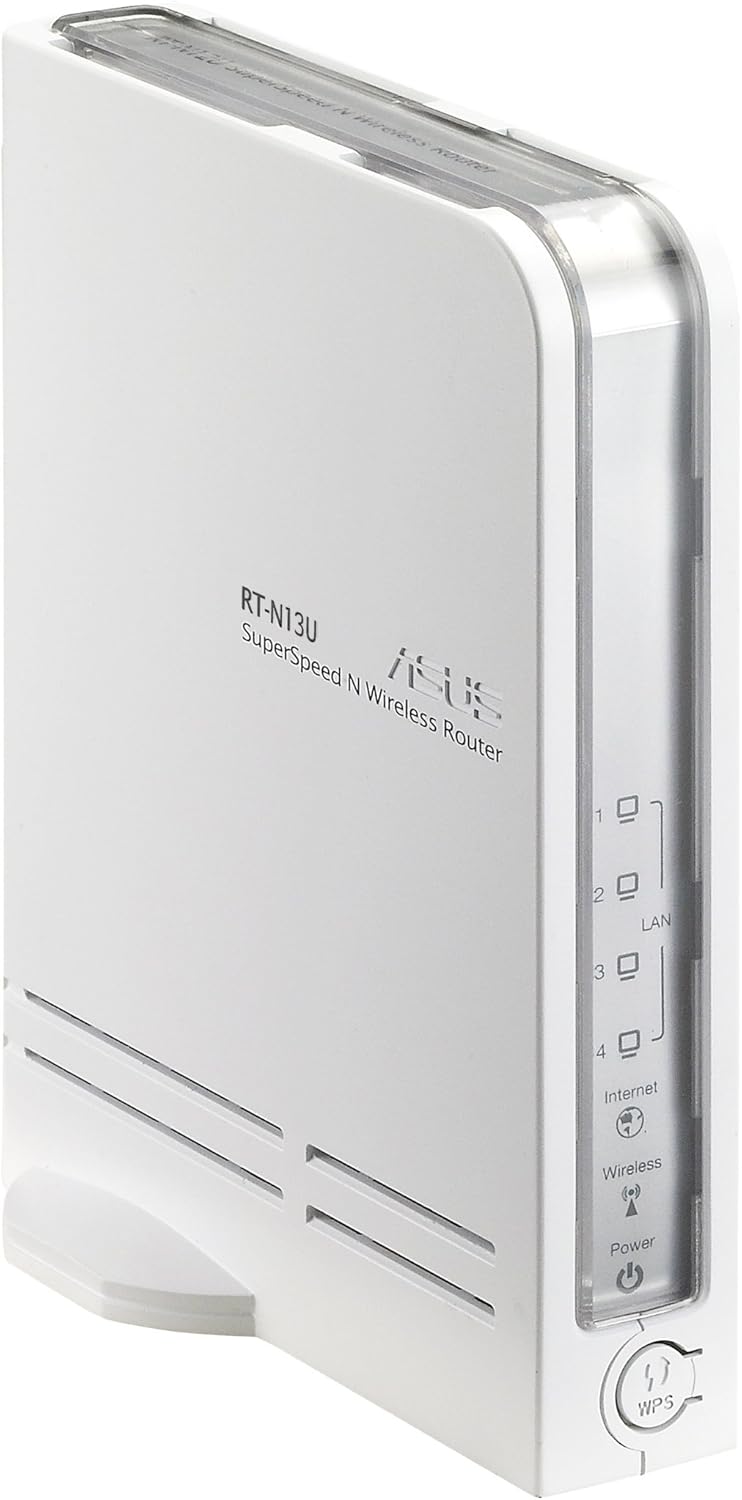
Abbildung 1: Vorne und seitlich View of the ASUS RT-N13U Router. This image shows the front panel with LED indicators for Power, Wireless, Internet, and LAN ports (1-4), along with the WPS button.

Abbildung 2: Hinteren View of the ASUS RT-N13U Router. This image displays the rear panel, including the USB 2.0 port, four LAN ports (yellow), one Internet (WAN) port (blue), and the power input port.
LED-Anzeigen:
- Betriebs-LED: Zeigt den Betriebszustand an. Dauerhaft grün für Normalbetrieb.
- Kabellose LED: Indicates wireless activity. Blinks when data is being transmitted wirelessly.
- Internet-LED: Indicates internet connection status. Solid green for connected, blinking for activity.
- LAN 1-4 LEDs: Indicate activity on the respective LAN ports. Solid green for connected, blinking for activity.
- WPS-LED: Zeigt den Status von Wi-Fi Protected Setup an.
Anschlüsse und Tasten:
- USB 2.0-Anschluss: For connecting USB devices such as printers or external storage.
- LAN-Ports (1-4): Connect wired devices like computers or gaming consoles.
- Internet-Anschluss (WAN): Verbindet sich mit Ihrem Modem für den Internetzugang.
- Stromanschluss: Wird an das mitgelieferte Netzteil angeschlossen.
- WPS-Taste: Startet Wi-Fi Protected Setup für eine einfache drahtlose Verbindung.
- Reset-Taste: (Typically a small pinhole button) Used to restore factory default settings.
- EZ Switch: A physical switch to change the device's operating mode (Router, AP, Repeater).
3. Einrichtung
3.1 Erster Hardwareanschluss
- Connect the power adapter to the router's Power port and plug it into a power outlet.
- Connect one end of the Ethernet cable to the Internet (WAN) port of the RT-N13U and the other end to your modem's Ethernet port.
- (Optional) For initial configuration, connect your computer directly to one of the LAN ports (1-4) on the router using an Ethernet cable.
- Power on your modem, then power on the RT-N13U router. Wait for the Power, Internet, and Wireless LEDs to stabilize.
3.2 Konfigurationsmodi
The RT-N13U supports three operating modes, selectable via the EZ Switch:
- Router-Modus: The default mode, where the device acts as a gateway for your network, providing internet access and managing local network traffic.
- Access Point (AP)-Modus: Extends an existing wired network by adding wireless connectivity. In this mode, internet features are typically disabled, and the device acts as a wireless hub.
- Repeater-Modus: Extends the range of an existing wireless network by receiving and re-transmitting the wireless signal.
Select the desired mode using the physical EZ Switch on the router before proceeding with software configuration.
3.3 Web Schnittstellenzugriff
- Öffnen Sie ein web browser (e.g., Chrome, Firefox, or IE8/Edge; IE9 beta may have compatibility issues).
- Geben Sie in der Adressleiste die Standard-IP-Adresse des Routers ein (üblicherweise 1234).
192.168.1.1orrouter.asus.com) und drücken Sie die Eingabetaste. - Geben Sie den Standardbenutzernamen und das Standardpasswort ein (normalerweise
adminfor both). Refer to the label on the bottom of your router if these defaults do not work. - Follow the on-screen setup wizard.
3.4 Internet Connection Setup (Router Mode)
If the EZ UI setup feature does not automatically configure your internet connection, manual steps may be required, especially for certain Internet Service Providers (ISPs).
- Informationen sammeln:
- Your computer's MAC address (Physical Address). On Windows, open Command Prompt and type
ipconfig /all. - Your ISP's DNS server addresses. If connected via Ethernet, use
ipconfig /allto find "DNS Servers".
- Your computer's MAC address (Physical Address). On Windows, open Command Prompt and type
- Access Network Map: Im Router web interface, navigate to the "Network Map" or "EZ-UI" section.
- Manuelle Konfiguration: If the connection fails, the system may prompt for manual configuration.
- Nutzen Sie die MAC-Klon feature. Some ISPs tie your internet service to a specific MAC address. Cloning your computer's MAC address to the router can resolve connectivity issues.
- Manually enter your ISP's DNS server addresses if required.
- Apply Settings and Restart: Apply the new settings. The router will restart. Your computer may temporarily lose connection. Reconnect to the router.
- Power Cycle (If Needed): If the internet connection is still not established:
- Power off the wireless router.
- Power off your modem/ISP's box.
- Warten Sie 5 Minuten.
- First, power on the modem/ISP's box and wait for it to fully boot.
- Then, power on the ASUS RT-N13U router.
- Check for internet connectivity.
Note: For optimal wireless performance, ensure the wireless radio is set to "N only" mode in the router's settings if all your devices support 802.11n.
4. Bedienung
4.1 Geräte anschließen
Kabelverbindungen:
Connect Ethernet-enabled devices (e.g., desktop computers, smart TVs, gaming consoles) to the yellow LAN ports (1-4) on the back of the router using Ethernet cables.
Drahtlose Verbindungen:
- Suchen Sie auf Ihrem drahtlosen Endgerät (Laptop, Smartphone, Tablet) nach verfügbaren WLAN-Netzwerken.
- Select the network name (SSID) of your ASUS RT-N13U (default SSID is usually "ASUS" or "ASUS_RT-N13U").
- Enter the network security key (password). This can be found on a label on the router or in the router's web Schnittstelle.
- Alternatively, press the WPS button on the router and then activate WPS on your wireless device within two minutes for a quick connection.
4.2 USB-Funktionen
The USB 2.0 port on the RT-N13U provides additional functionalities:
Druckerfreigabe:
Connect a compatible USB printer to the USB 2.0 port. Configure printer sharing through the router's web interface to allow multiple computers on your network to print to it.
Download Master:
Connect a USB storage device (e.g., external hard drive, flash drive) to the USB 2.0 port. The Download Master feature allows you to initiate downloads (including BitTorrent) directly to the connected storage device, even when your computer is turned off. This feature typically works only when the router is in Router Mode.
Note: Ensure the USB storage device is formatted correctly and recognized by the router. For BitTorrent downloads, you may need to provide the exact URL location for the downloader to function properly.
5. Wartung
5.1 Firmware-Updates
Regularly updating the router's firmware is crucial for performance improvements, security enhancements, and bug fixes. Visit the official ASUS support website for the RT-N13U model to download the latest firmware. Follow the instructions provided with the firmware update package carefully to avoid damaging the device.
Note: Firmware updates can resolve many common issues and improve compatibility with various devices and services.
5.2 Wiederherstellen der Werkseinstellungen
If you encounter persistent issues or forget your login credentials, you can restore the router to its factory default settings. This will erase all custom configurations.
- Bei eingeschaltetem Router suchen Sie die Reset-Taste (oft ein kleines Loch) am Gerät.
- Drücken und halten Sie die Reset-Taste mit einer Büroklammer oder einem ähnlichen spitzen Gegenstand etwa 5-10 Sekunden lang gedrückt.
- Release the button when the Power LED starts blinking rapidly or all LEDs briefly flash.
- The router will restart with factory default settings. You will need to reconfigure it from scratch.
6. Fehlerbehebung
6.1 Häufige Probleme und Lösungen
- Keine Internetverbindung:
- Check all cable connections (modem to router WAN port, router to computer LAN port).
- Perform a power cycle on both your modem and router (unplug, wait 5 minutes, plug modem first, then router).
- Verify your ISP settings in the router's web interface, especially if MAC cloning or specific DNS servers are required.
- Ensure the router is in the correct operating mode (Router Mode for internet access).
- Zugriff auf Router nicht möglich Web Schnittstelle:
- Stellen Sie sicher, dass Ihr Computer mit dem Router verbunden ist (per Kabel oder drahtlos).
- Verify the IP address (e.g.,
192.168.1.1) is correct. - Versuchen Sie eine andere web Browser.
- Deaktivieren Sie vorübergehend jegliche Firewall oder Antivirensoftware auf Ihrem Computer.
- Falls Sie das Passwort vergessen haben, führen Sie einen Werksreset durch (siehe Abschnitt 5.2).
- Langsame WLAN-Geschwindigkeit oder Verbindungsabbrüche:
- Stellen Sie sicher, dass die Firmware des Routers auf dem neuesten Stand ist.
- Check for wireless interference from other devices (cordless phones, microwaves).
- Adjust the wireless channel in the router settings.
- Position the router in a central location, away from obstructions.
- If all devices support 802.11n, set the wireless mode to "N only" for higher speeds.
- USB-Gerät nicht erkannt:
- Ensure the USB device is properly connected and powered (if external power is required).
- Überprüfen Sie den Router web interface for USB device status and configuration.
- Verify compatibility of the USB device with the router.
- Ensure the router is in Router Mode for USB features like Download Master.
6.2 Bedeutung der LED-Anzeigen
| LED-Anzeige | Status | Beschreibung |
|---|---|---|
| Leistung | Durchgehend grün | Das Gerät ist eingeschaltet und funktioniert einwandfrei. |
| Aus | Gerät ist ausgeschaltet. | |
| Kabellos | Durchgehend grün | Die Wireless-Funktion ist aktiviert. |
| Blinkt grün | Wireless data transmission is active. | |
| Internet | Durchgehend grün | Mit dem Internet verbunden. |
| Blinkt grün | Internet data transmission is active. | |
| Aus | Keine Internetverbindung. | |
| LAN 1-4 | Durchgehend grün | Ein Gerät ist mit dem entsprechenden LAN-Anschluss verbunden. |
| Blinkt grün | Data transmission is active on the corresponding LAN port. | |
| WPS | Blinkt | WPS connection process is active. |
7. Spezifikationen
| Besonderheit | Detail |
|---|---|
| Modellname | RT-N13U |
| Wireless-Standard | 802.11b/g/n |
| Frequenzband | Einzelband (2.4 GHz) |
| Konnektivitätstechnologie | Drahtlos, Ethernet |
| Ethernet-Anschlüsse | 4 x 10/100 Mbit/s LAN, 1 x 10/100 Mbit/s WAN |
| USB-Anschluss | 1 x USB 2.0 |
| Antennentyp | Intern |
| Besondere Merkmale | Access Point Mode, Repeater Mode, WPS, Printer Sharing, Download Master |
| Technische Daten | 10 x 8.88 x 3.75 Zoll |
| Artikelgewicht | 5.3 Unzen (ca. 150 Gramm) |
| Hersteller | ASUS |
| Erstes verfügbares Datum | 28. September 2009 |
8. Sicherheitshinweise
- Use only the power adapter provided with the device. Using an incompatible adapter may damage the device and void your warranty.
- Das Gerät darf weder Wasser, Feuchtigkeit noch extremen Temperaturen ausgesetzt werden.
- Stellen Sie das Gerät an einen gut belüfteten Ort, um eine Überhitzung zu vermeiden.
- Öffnen Sie das Gerät nicht.asing. Wartungsarbeiten dürfen nur von autorisiertem Personal durchgeführt werden.
- Halten Sie das Gerät von starken elektromagnetischen Feldern fern.
9. Garantie und Support
For warranty information, technical support, and further assistance, please visit the official ASUS support website or contact ASUS customer service. Details can typically be found on the ASUS webauf der Website oder in der Ihrem Produkt beiliegenden Dokumentation.
ASUS-Kundendienst WebWebsite: www.asus.com/support/