Einführung
The BRIO World - 33512 Travel Switching Set is a comprehensive wooden train toy designed to provide an engaging and educational play experience. This set encourages imaginative play and helps develop motor skills. It is compatible with all other BRIO railway toys, allowing for expanded play possibilities.
Recommended Age: 36 months - 6 years
Lieferumfang
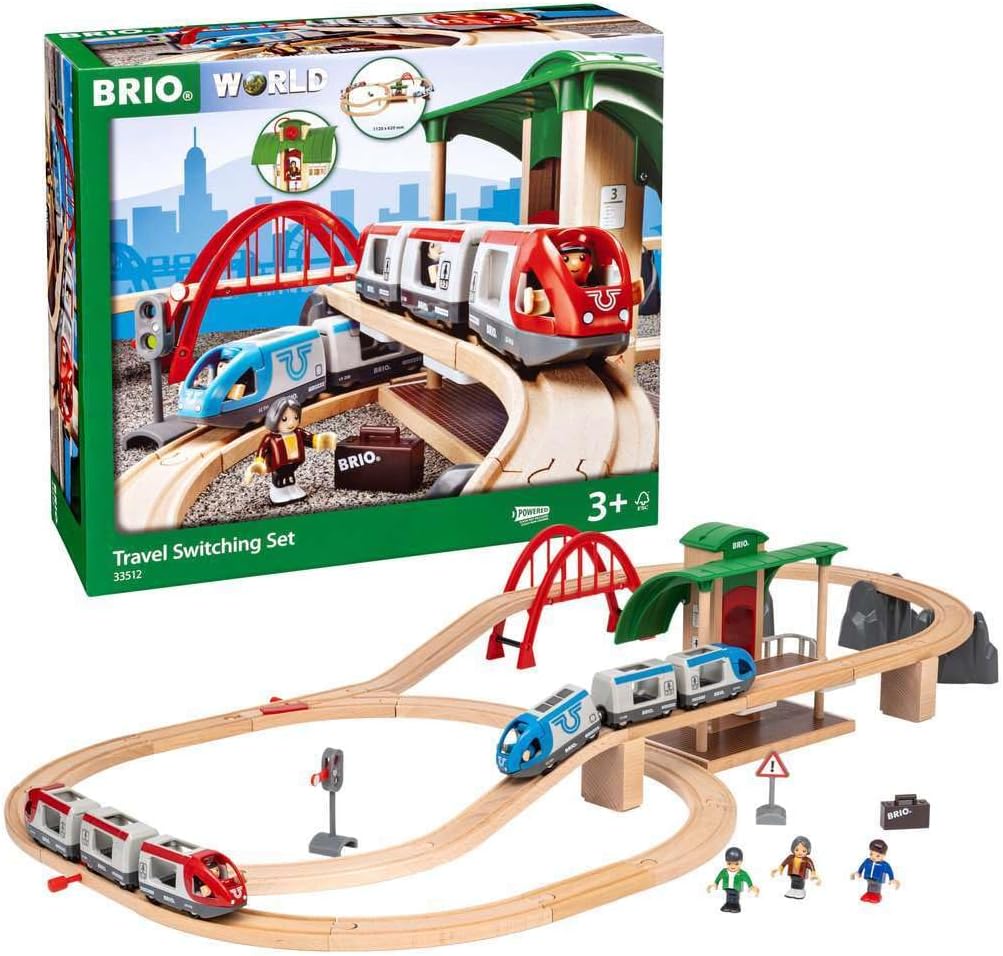
Your BRIO World - 33512 Travel Switching Set includes the following components:
- 1x Engine (battery-powered)
- 4x Passenger Cars (2 for battery train, 2 for free-wheeling train)
- 1x Train Station (with crank-operated lift)
- 21x Wooden Tracks (various shapes including straight, curved, ascending/descending)
- 2x Gleiswechsel
- 5x Play Figures
- 1x Red Bridge
- 3x Rock Supports
- 1x Warning Sign
- 1x Signal
- 1x Briefcase accessory

Aufstellen
- Komponenten auspacken: Carefully remove all pieces from the packaging. Verify that all 42 pieces listed in the "What's in the Box" section are present.
- Battery Installation (for motorized train):
- Locate the battery compartment on the underside of the blue motorized train engine.
- Öffnen Sie mit einem kleinen Schraubendreher die Abdeckung des Batteriefachs.
- Legen Sie 2 AAA-Batterien (nicht im Lieferumfang enthalten) ein und achten Sie dabei auf die richtige Polarität (+/-).
- Schließen Sie den Batteriefachdeckel sicher.
- Gleisplan zusammenstellen:
- Connect the wooden track pieces by aligning the male and female connectors. The set allows for various configurations.
- Place the red bridge and rock supports to create elevated track sections as desired.
- Integrate the train station into your layout, ensuring tracks connect to its upper and lower levels.
- Position the switching tracks, warning sign, and signal at strategic points.
- Place Trains and Figures: Place the trains on the tracks and the play figures in the station or around the layout to begin play.
Bedienungsanleitung
- Motorized Train (Blue):
- Press the forward arrow button on the top of the blue engine to make it move forward.
- Press the backward arrow button to make it move backward.
- Press the middle button to stop the train.
- Free-Wheeling Train (Red): This train is manually operated. Push it along the tracks to move it. Its passenger cars have opening and closing doors for figures.
- Train Station Lift: The station features a crank-operated lift. Turn the red knob on the station roof to raise or lower the lift, transporting figures between platforms.
- Switching Tracks: Use the red levers on the switching tracks to change the direction of the trains, guiding them onto different paths within your layout.
- Figuren und Zubehör: Place the five play figures in the trains or around the station. The briefcase accessory can be carried by figures.


Wartung
- Reinigung: Holz- und Kunststoffteile mit dem Mittel abwischenamp Mit einem Tuch reinigen. Nicht in Wasser eintauchen. Scharfe Reinigungsmittel vermeiden.
- Lagerung: Store the set in a dry place away from direct sunlight to prevent warping or fading of the wooden components.
- Batteriepflege:
- Remove batteries from the motorized train if it will not be used for an extended period to prevent leakage.
- Replace batteries when the train's movement becomes slow or inconsistent.
- Inspektion: Regularly inspect all pieces for any signs of damage or wear. Discontinue use if any part is broken or poses a safety risk.
Fehlerbehebung
- Train not moving (motorized):
- Prüfen Sie, ob die Batterien richtig eingesetzt und nicht entladen sind. Tauschen Sie sie gegebenenfalls aus.
- Ensure the train is properly seated on the tracks and the wheels are not obstructed.
- Tracks not connecting properly:
- Ensure the male and female connectors are fully inserted.
- Check for any debris in the connectors.
- Verify that the track pieces are laid on a flat, even surface.
- Lift not operating smoothly:
- Ensure the crank mechanism is free from obstructions.
- Check if the lift platform is correctly aligned within its guides.
Technische Daten
- Modellnummer: 33512
- Produktabmessungen: 47.24 x 24.41 x 0.01 Zoll (montiertes Layout)
- Artikelgewicht: 5.35 Pfund
- Hersteller: BRIO
- Empfohlenes Alter: 36 Monate – 6 Jahre
- Erforderliche Batterien: 2 AAA batteries (for motorized engine, not included)
- Material: FSC-certified wood, plastic
- Veröffentlichungsdatum: 15. Dezember 2016
Sicherheitshinweise
BRIO toys are designed with safety as a top priority. This product meets all safety standards. Please observe the following:
- Sorgen Sie beim Spielen für eine Aufsicht durch Erwachsene, insbesondere bei jüngeren Kindern.
- Kleinteile von Kindern unter 3 Jahren fernhalten, um Erstickungsgefahr zu vermeiden.
- Verwenden Sie keine beschädigten Teile.
- Follow battery installation guidelines carefully.
Garantie und Support
For warranty information, product support, or to purchase additional accessories, please visit the official BRIO website or contact their customer service. You can also find more information at the BRIO Store auf Amazon.