1. Einleitung
This manual provides essential instructions for the safe and effective use of your Leica V-LUX 20 digital camera. Please read it thoroughly before operating the camera and keep it for future reference. The Leica V-LUX 20 is a 12.1-megapixel digital camera featuring a 12x optical zoom lens and a 3.0-inch LCD, designed for high-quality photography and HD video recording.
2. Sicherheitshinweise
- Batteriesicherheit: Use only the specified Lithium-Ion battery and charger. Do not expose batteries to excessive heat, direct sunlight, or dispose of them in fire. Keep batteries out of reach of children.
- Wasserbeständigkeit: Diese Kamera ist nicht Wasserabweisend. Vor Wasser und hoher Luftfeuchtigkeit schützen.
- Linsenpflege: Do not touch the lens surface directly. Clean with a soft, lint-free cloth designed for optical lenses.
- Betriebsumgebung: Avoid using the camera in extreme temperatures, dusty environments, or near strong magnetic fields.
- Demontage: Versuchen Sie nicht, die Kamera zu zerlegen oder zu verändern. Überlassen Sie alle Wartungsarbeiten qualifiziertem Fachpersonal.
3. Erste Schritte und Einrichtung
3.1. Laden des Akkus
Insert the Lithium-Ion battery into the supplied charger and connect the charger to a power outlet. The charging indicator will show the charging status. Ensure the battery is fully charged before first use.
3.2. Einlegen der Speicherkarte
The camera supports SD, SDHC, and SDXC memory cards. Open the battery/card compartment cover. Insert the memory card into the slot with the contacts facing the correct direction until it clicks into place. Close the cover securely.
Note: A memory card is not included with the camera and must be purchased separately.
3.3. Erstes Einschalten und Einstellungen
Slide the ON/OFF switch to the ON position. Upon first power-on, you may be prompted to set the language, date, and time. Follow the on-screen instructions using the directional pad and MENU/SET button.

Bild: Spitze view of the Leica V-LUX 20 camera. This image displays the camera's top panel, highlighting the ON/OFF slide switch on the right, the shutter button, and the mode dial with various shooting options like P, A, S, M, SCN, MS1, MS2, and CUST. The zoom lever (W/T) is integrated around the shutter button.
4. Bedienung der Kamera
4.1. Kamerasteuerungview
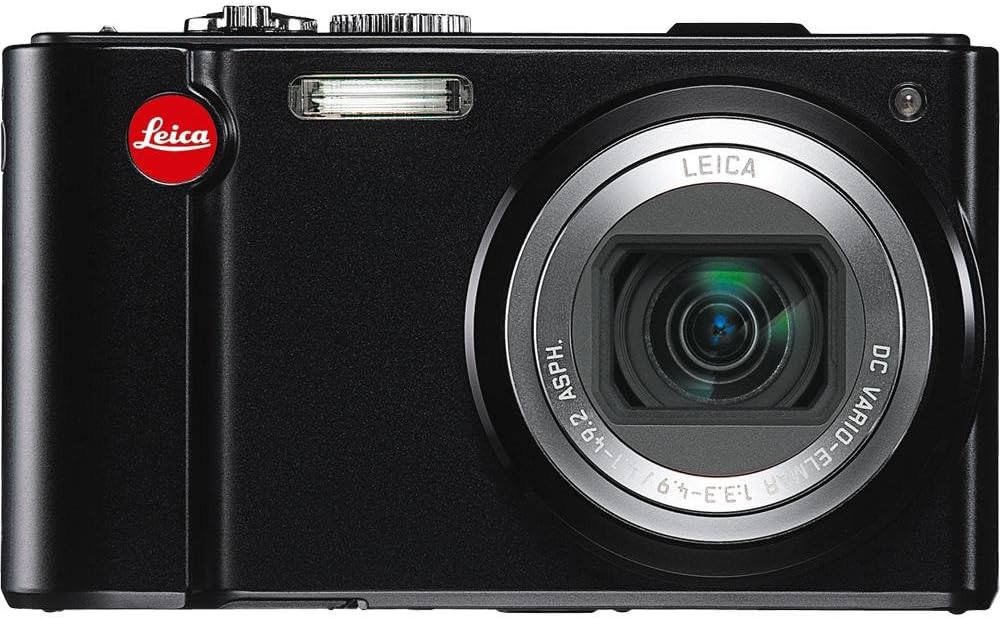
Bild: Hinteren view of the Leica V-LUX 20 camera. This image shows the 3.0-inch LCD screen, the exposure compensation button, the dedicated video record button, and the directional pad with MENU/SET, DISPLAY, and Q.MENU functions. The zoom controls are also visible on the right side of the screen.
Machen Sie sich mit den wichtigsten Bedienelementen vertraut:
- Ein / Aus Schalter: Located on the top panel, used to power the camera on or off.
- Auslöser: Zum Fokussieren halb durchdrücken, zum Fotografieren ganz durchdrücken.
- Zoomhebel (W/T): Surrounds the shutter button, used to adjust the 12x optical zoom (W for wide, T for telephoto).
- Modus-Wahlrad: Selects various shooting modes (Program, Aperture Priority, Shutter Priority, Manual, Scene, Custom).
- MENU/SET Button: Accesses the camera's menu system and confirms selections.
- Steuerkreuz: Navigates through menus and settings. Also controls flash, self-timer, and exposure compensation in shooting mode.
- DISPLAY/Q.MENU Button: Toggles display information or accesses the Quick Menu for common settings.
- Schaltfläche „Videoaufzeichnung“: Dedicated button for starting and stopping video recording.
4.2. Autofocus and Exposure
The camera features automatic exposure control and various autofocus modes including Multi, Center-weighted, and Spot metering. The autofocus system uses TTL (Through-The-Lens) detection with 11 autofocus points. For optimal focus, press the shutter button halfway until the focus indicator appears.
4.3. Blitzmodi
The built-in flash offers several modes, including Auto and scene-specific flash modes. Access flash settings via the directional pad or Quick Menu to select the appropriate mode for your lighting conditions.
5. Aufnahmemodi
The mode dial on the top of the camera allows you to select different shooting modes:
- Automatik-Modus: The camera automatically sets all parameters for optimal results.
- Programm AE (P): The camera sets aperture and shutter speed, but you can adjust other settings.
- Blendenpriorität AE (A): Sie stellen die Blende ein, die Kamera die Verschlusszeit.
- Blendenpriorität AE (S): Sie stellen die Verschlusszeit ein, die Kamera die Blende.
- Manuelle Belichtung (M): Sie haben die Kontrolle über Blende und Verschlusszeit.
- Szenenmodi (SCN): Pre-set modes for specific situations (e.g., Portrait, Landscape, Sports) to optimize settings automatically.
- Custom Modes (CUST, MS1, MS2): Allows you to save and quickly recall your preferred camera settings.
The camera captures images at 12.1 megapixels and supports JPEG file format. Optical Image Stabilization helps reduce blur from camera shake.
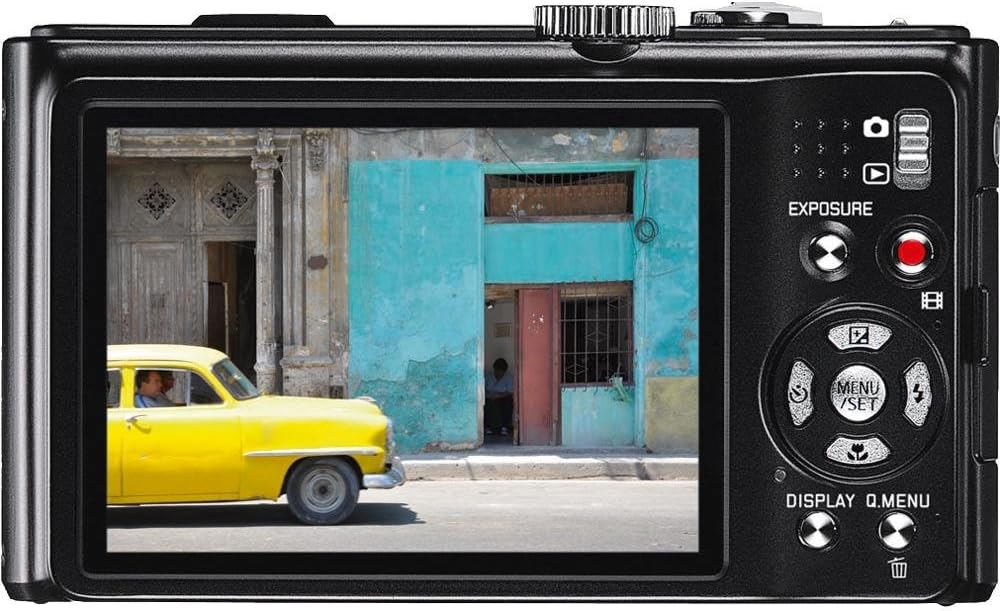
Bild: Front view of the Leica V-LUX 20 camera. This image showcases the camera's 12x Leica DC Vario-Elmar optical zoom lens, the built-in flash, and the Leica branding. The lens is shown in an extended position, indicating its zoom capability.
6. Videoaufnahme
The Leica V-LUX 20 can record high-definition video. To start recording, press the dedicated red video record button on the back of the camera. Press it again to stop recording.
- Videoauflösung: Supports 720p HD video at 60 frames per second (1280 x 720), as well as lower resolutions like 848 x 480 (30 fps), 640 x 480 (30fps), and 320 x 240 (30 fps).
- Zoom during Video: The 12x optical zoom can be used while recording video.
- File Format: Die Videos werden im MJPEG-Format gespeichert.
7. Wiedergabe
Zu view your photos and videos, slide the power switch to the 'Play' position (or press the playback button if available, though the review mentions a slide switch for viewing stored pictures). Use the directional pad to navigate through your captured media. You can zoom in on photos or play videos using the controls.
8. Verbindung mit anderen Geräten herstellen
8.1. USB-Verbindung
Connect the camera to a computer using a USB cable (not included) to transfer photos and videos. The camera is compatible with USB 2.0 devices. Your computer will recognize the camera as a removable storage device.
8.2. HDMI-Ausgang
Verwenden Sie ein HDMI-Kabel (nicht im Lieferumfang enthalten), um die Kamera an einen HDTV oder Monitor anzuschließen. viewing your media on a larger screen. The camera features a built-in HDMI port.
9. Wartung und Pflege
- Reinigung des Kameragehäuses: Wischen Sie das Kameragehäuse mit einem weichen, trockenen Tuch ab. Bei hartnäckigem Schmutz verwenden Sie ein leicht dämpfendes Tuch.amp Tuch ab und trocknen Sie es anschließend gründlich ab.
- Reinigung der Linse: Use a lens brush to remove dust, then gently wipe with a lens cleaning cloth. Avoid using abrasive materials.
- Reinigen des LCD-Bildschirms: Use a soft, dry cloth. For smudges, use a screen cleaner specifically designed for LCDs.
- Batteriespeicher: Wenn Sie die Kamera längere Zeit lagern, entfernen Sie den Akku. Bewahren Sie Akkus an einem kühlen, trockenen Ort auf.
- Lagerung: Bewahren Sie die Kamera an einem trockenen, gut belüfteten Ort, fern von direkter Sonneneinstrahlung und extremen Temperaturen auf.
10. Fehlerbehebung
| Problem | Mögliche Ursache/Lösung |
|---|---|
| Die Kamera lässt sich nicht einschalten. | Battery may be depleted. Recharge the battery. Ensure the battery is inserted correctly. |
| Ich darf keine Fotos machen. | Memory card may be full or not inserted correctly. Check card status or replace. Battery may be low. |
| Bilder sind verschwommen. | Ensure optical image stabilization is active. Check focus. Use a faster shutter speed in low light. |
| Der Blitz löst nicht aus. | Flash mode may be set to 'Off' or 'Red-eye Reduction' (which delays firing). Check flash settings. |
| Kann keine Verbindung zum Computer herstellen. | Ensure USB cable is securely connected. Check computer's USB port. Try a different USB cable. |
11. Spezifikationen
- Modellname: V-LUX 20
- Auflösung des Fotosensors: 12.1 Megapixel
- Sensortyp: CCD (1/2.33 inches)
- Optischer Zoom: 12x
- Linse: Leica DC Vario-Elmar 1:3.3-4.9 / 4.1-49.2mm ASPH (25-300mm equivalent in 35mm format)
- Bildstabilisierung: Optisch
- Bildschirmgröße: 3.0-Zoll-LCD (460,800 Bildpunkte)
- Unterstützt File Formate: JPEG (Stills), MJPEG (Video)
- Videoauflösung: Bis zu 1280 x 720 (60 fps)
- Speichermedien: SD/SDHC/SDXC cards
- Konnektivität: HDMI, USB 2.0
- Akku-Typ: Lithium-Ionen
- Artikelgewicht: 7.68 Unzen
- Besondere Merkmale: GPS module for geographical data registration.
12. Garantie und Support
For warranty information and technical support, please refer to the documentation provided at the time of purchase or visit the official Leica website. Contact Leica customer service for assistance with product issues or repairs.