
1. Einführung und Endeview
The Avision AV 320D2+ is a high-performance A3 document scanner designed for efficient and reliable document digitization. Featuring a 600 dpi optical resolution and USB connectivity, it is capable of handling a wide range of document sizes up to A3, making it suitable for various professional environments. This manual provides essential information for setting up, operating, maintaining, and troubleshooting your scanner.
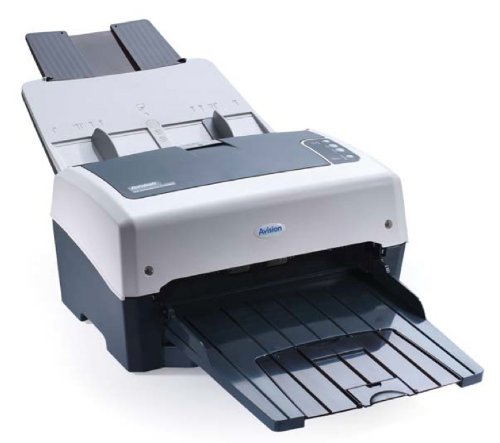
Figure 1: Avision AV 320D2+ A3 Document Scanner. This image displays the Avision AV 320D2+ A3 Document Scanner from a front-right perspective. The scanner is light grey and dark grey, featuring an automatic document feeder (ADF) at the top with paper guides visible, and an extended output tray at the front. The Avision logo is visible on the front panel.
2. Einrichtung
2.1 Auspacken
- Nehmen Sie den Scanner und sämtliches Zubehör vorsichtig aus der Verpackung.
- Prüfen Sie, ob alle in der Packliste aufgeführten Komponenten vorhanden sind.
- Remove all protective tapes and packing materials from the scanner, including any inside the document feeder and output tray.
2.2 Anschließen des Scanners
- Stellen Sie den Scanner auf eine stabile, ebene Fläche in der Nähe Ihres Computers.
- Schließen Sie das Netzteil an den Stromeingang des Scanners an und stecken Sie es dann in eine Steckdose.
- Connect one end of the supplied USB cable to the USB port on the scanner and the other end to an available USB port on your computer.
- Power on the scanner using the power button, typically located on the side or rear panel.
2.3 Softwareinstallation
Before using the scanner, you must install the necessary drivers and scanning software. Refer to the included software CD or visit the official Avision website for the latest drivers and utilities.
- Insert the software installation CD into your computer's CD/DVD drive, or download the software package from the Avision support webWebsite.
- Follow the on-screen instructions to install the scanner drivers and bundled scanning applications. It is recommended to install all provided software for full functionality.
- Starten Sie Ihren Computer neu, falls Sie nach Abschluss der Installation dazu aufgefordert werden.
3. Bedienung des Scanners
3.1 Dokumente laden
- Automatischer Dokumenteneinzug (ADF): Open the ADF input tray. Adjust the paper guides to fit the width of your documents. Place the documents face-down with the top edge first into the ADF. The standard sheet capacity is 50 sheets.
- Ensure documents are free of staples, paper clips, or any foreign objects that could damage the scanner.
- For mixed-size documents, ensure they are aligned properly to prevent skewing.
3.2 Basic Scanning Procedures
- Laden Sie Ihre Dokumente wie oben beschrieben in den automatischen Dokumenteneinzug (ADF) ein.
- Open your preferred scanning application (e.g., Avision Button Manager, TWAIN/ISIS compatible software).
- Select the Avision AV 320D2+ as your scanner.
- Choose your desired scanning settings (e.g., color mode, resolution, destination folder).
- Initiate the scan from the software interface. The scanner will automatically feed and scan the documents.
- Review Die gescannten Bilder und speichern Sie sie am gewünschten Speicherort.
3.3 Scan-Einstellungen
The scanner supports various settings to optimize scan quality and file Größe:
- Auflösung: Adjustable up to 600 dpi. Higher resolution provides better image quality but results in larger file Größen.
- Farbmodus: Options typically include Color, Grayscale, and Black & White (Binary).
- Duplex-Scannen: The AV 320D2+ supports duplex (two-sided) scanning, allowing you to capture both sides of a document in a single pass.
- Ausgabeformat: Common output formats include PDF, JPEG, TIFF, and searchable PDF.
4. Wartung
4.1 Reinigung des Scanners
Regelmäßige Reinigung gewährleistet optimale Leistung und verlängert die Lebensdauer Ihres Scanners.
- Exterieur: Wischen Sie die Außenflächen mit einem weichen, dampVerwenden Sie ein fusselfreies Tuch. Verwenden Sie keine Scheuermittel oder Lösungsmittel.
- Glasoberflächen: Verwenden Sie ein weiches Tuch dampened with a non-abrasive glass cleaner to clean the scanner's glass surfaces (if applicable).
- Rollen: Reinigen Sie die Einzugswalzen regelmäßig mit einem fusselfreien Tuch.ampAnschließend mit Isopropylalkohol abgewischt, um Papierstaub und Rückstände zu entfernen.
- Vor der Reinigung den Scanner immer ausschalten und vom Stromnetz trennen.
5. Fehlerbehebung
This section addresses common issues you might encounter with your Avision AV 320D2+ scanner.
| Problem | Mögliche Ursache | Lösung |
|---|---|---|
| Scanner vom Computer nicht erkannt | Loose USB cable, power off, driver issue | Prüfen Sie die USB-Verbindung, stellen Sie sicher, dass der Scanner eingeschaltet ist, und installieren Sie die Treiber neu. |
| Papierstaus | Falsch ausgerichtete Dokumente, abgenutzte Walzen, Fremdkörper | Remove jammed paper carefully, align documents properly, clean rollers. |
| Schlechte Scanqualität (Streifen, unscharfe Bilder) | Dirty glass, incorrect settings, worn rollers | Clean scanner glass and rollers, adjust resolution/color settings. |
| Documents not feeding | Incorrectly loaded, worn feed rollers | Ensure documents are loaded correctly, clean or replace feed rollers if worn. |
6. Spezifikationen
Key technical specifications for the Avision AV 320D2+ scanner:
- Produktart: Dokumentenscanner
- Papierformat: A3
- Auflösung: 600 dpi (optisch)
- Konnektivität: USB
- Farbe: Schwarz/Weiß
- Gewicht: Ungefähr 26.46 Pfund (12 kg)
- Energieverbrauch: 38.4 Watt
- Standard-Blattkapazität (ADF): 50 Blatt
- Optische Sensortechnologie: CMOS
- Modellname: AV320D2+
- Artikelmodellnummer: FT-0807H
7. Garantie und Support
7.1 Herstellergarantie
The Avision AV 320D2+ scanner typically comes with a 2 Jahr Herstellergarantie. This warranty covers defects in materials and workmanship under normal use. Please retain your proof of purchase for warranty claims. For specific terms and conditions, refer to the warranty card included with your product or visit the official Avision webWebsite.
7.2 Technischer Support
For technical assistance, driver updates, or further troubleshooting not covered in this manual, please contact Avision customer support. Support contact information can usually be found on the Avision official webauf der Website oder in der mit Ihrem Scanner gelieferten Dokumentation.
Note: Availability of spare parts and software updates may vary. Please check the manufacturer's official channels for the most current information.