
1. Einleitung
This manual provides detailed instructions for the installation, operation, and maintenance of the Supermicro CSE-827HD-R1400B 1400W 2U Rackmount Server Chassis. This high-performance chassis is designed to house server components, offering robust power delivery and efficient cooling for demanding applications. Please read this manual thoroughly before proceeding with installation or operation.
2. Sicherheitshinweise
Beachten Sie stets die folgenden Sicherheitsvorkehrungen, um Verletzungen und Schäden am Gerät zu vermeiden:
- Vor Beginn jeglicher Installations- oder Wartungsarbeiten muss die Stromversorgung unterbrochen sein.
- Wear anti-static wrist straps when handling internal components to prevent electrostatic discharge (ESD).
- Do not operate the chassis with the cover removed unless specifically instructed for troubleshooting.
- Sorgen Sie für eine ordnungsgemäße Erdung aller elektrischen Verbindungen.
- This chassis is heavy. Use appropriate lifting techniques or assistance when moving or installing it in a rack.
- Sorgen Sie für ausreichende Belüftung rund um das Chassis, um eine Überhitzung zu vermeiden.
3. Packungsinhalt
Überprüfen Sie, ob alle Artikel im Paket vorhanden sind:
- Supermicro CSE-827HD-R1400B 2U Rackmount Server Chassis
- 1400W High-Efficiency (1+1) Redundant Power Supply (pre-installed)
- 4x 80mm PWM Cooling Fans (pre-installed)
- Rack mounting rails (if included with your specific purchase)
- Accessory kit (screws, cables, standoffs)
- Kurzinstallationsanleitung (dieses Dokument)
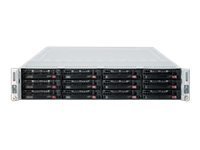
Abbildung 3.1: Supermicro CSE-827HD-R1400B 2U Rackmount Server Chassis. This image shows the front view of the server chassis, highlighting its rackmount design and general appearance.
4. Einrichtung und Installation
Follow these steps for proper installation of the server chassis and its components.
4.1. Rackmontage
- Attach the provided rack rails to the server chassis sides using the designated screws.
- Mount the other end of the rack rails to the server rack posts, ensuring they are securely fastened.
- Slide the chassis into the rack until it locks into place.
4.2. Motherboard-Installation
The chassis supports ATX motherboards.
- Remove the chassis top cover by unscrewing the retaining screws.
- Montieren Sie die I/O-Blende in der Rückwand des Gehäuses.
- Align the motherboard with the standoffs inside the chassis.
- Befestigen Sie das Motherboard mit den passenden Schrauben.
4.3. Festplatteninstallation
The chassis supports 3.5-inch hard drives.
- Locate the drive bays.
- Mount each 3.5-inch hard drive into a drive tray.
- Slide the drive tray with the installed hard drive into the designated bay until it clicks into place.
- Connect the SATA/SAS data and power cables to each hard drive.
4.4. Stromanschlüsse
- Connect the main 24-pin ATX power connector from the power supply to the motherboard.
- Verbinden Sie den 8-poligen (oder 4-poligen) CPU-Stromanschluss mit dem Motherboard.
- Ensure all peripheral power connectors (e.g., for GPUs, additional fans) are properly connected.
- Connect the AC power cords from the redundant power supplies to separate, grounded power outlets.
5. Bedienungsanleitung
5.1. Ein-/Ausschalten
- Einschalten: After all connections are secure, press the power button on the front panel. The power LED should illuminate.
- Normales Herunterfahren: Perform a graceful shutdown through the operating system.
- Herunterfahren erzwingen: Press and hold the power button for 5-7 seconds. Use only when necessary to prevent data loss.
5.2. LED-Anzeigen
Refer to your motherboard manual for specific LED indicator meanings. Common indicators on the chassis front panel include:
- Betriebs-LED: Indicates system power status (On/Off/Standby).
- HDD Activity LED: Flashes when hard drives are being accessed.
- Network Activity LED: Indicates network traffic (if integrated on the front panel).
6. Wartung
Regular maintenance ensures optimal performance and longevity of your server chassis.
- Staubentfernung: Periodically clean dust from the chassis interior, especially fan blades and heatsinks, using compressed air. Ensure the system is powered off and unplugged before cleaning.
- Lüfterinspektion: Check cooling fans for proper operation and excessive noise. Replace any failing fans promptly.
- Kabelmanagement: Ensure internal cables are neatly routed to avoid obstructing airflow.
7. Fehlerbehebung
In diesem Abschnitt werden häufig auftretende Probleme behandelt.
| Problem | Mögliche Ursache | Lösung |
|---|---|---|
| Das System lässt sich nicht einschalten. | Power cables disconnected, faulty power supply, faulty power button. | Check all power connections. Verify power supply status LEDs. Test power button functionality. |
| Zu lauter Lüfter. | Dust accumulation, failing fan bearing. | Clean fans. Replace noisy or failing fans. |
| Überhitzung des Systems. | Poor airflow, fan failure, dust buildup. | Ensure proper ventilation. Check fan operation. Clean dust from components. |
| Hard drives not detected. | Lose Daten-/Stromkabel, falsche BIOS-Einstellungen, defektes Laufwerk. | Verify all data and power cables are securely connected. Check BIOS/UEFI settings. Test drives in another system if possible. |
8. Spezifikationen
| Besonderheit | Detail |
|---|---|
| Marke | Supermicro |
| Modellname | CSE-827HD-R1400B |
| Formfaktor | 2HE Rackmontage |
| Motherboard-Kompatibilität | ATX |
| Stromversorgung | 1400W High-Efficiency (1+1) Redundant, 80 PLUS Gold Certified |
| Lüfter | 4x 80mm PWM |
| Formfaktor der Festplatte | 3.5 Zoll |
| Farbe | Schwarz |
| Artikelgewicht | 68 Pfund |
| Produktabmessungen (T x B x H) | 28.5"T x 28.5"B x 28.5"H |
| UPC | 672042062768 |
| ASIN | B005KFBPBS |
9. Garantie und Support
For warranty information, please refer to the documentation provided with your purchase or visit the official Supermicro website. For technical support, product inquiries, or to report issues, please contact Supermicro customer service through their official channels.
Online-Hilfe: www.supermicro.com/support
Kontaktinformationen: Siehe Supermicro webWebsite für regionale Kontaktdaten.