
Hardware Resources PDM45
Hardware Resources PDM45 Maple Pantry Door Mount Cabinet User Manual
Model: PDM45
Einführung
This manual provides detailed instructions for the installation, operation, and maintenance of your Hardware Resources PDM45 Maple Pantry Door Mount Cabinet. Please read this manual thoroughly before installation and use to ensure proper function and longevity of your product.
The PDM45 is a pre-assembled storage unit designed to mount inside hinged pantry doors, offering adjustable shelving for organized storage.
Sicherheitshinweise
Always follow basic safety precautions when installing or adjusting the cabinet. Ensure all mounting hardware is securely fastened to prevent injury or damage to the cabinet or door.
- Regale nicht überladen.
- Ensure the pantry door can fully close after installation.
- Halten Sie Kleinteile während der Installation von Kindern fern.
Packungsinhalt
Vergewissern Sie sich vor Beginn der Installation, dass alle Komponenten vorhanden sind.
- Pre-assembled PDM45 Cabinet Frame (1)
- Verstellbare Regalböden (3)
- Befestigungsmaterial (Schrauben usw.)
Note: Specific hardware quantities may vary. Refer to the packaging for exact counts.
Setup und Installation
The PDM45 cabinet ships pre-assembled for easy installation. This unit is designed to mount to the inside of hinged pantry doors.
Benötigtes Werkzeug:
- Maßband
- Bleistift
- Bohren
- Schraubendreher (Kreuzschlitz empfohlen)
Installationsschritte:
- Measure Door Clearance: Ensure your pantry door is a minimum of 48 inches tall and 13 inches wide to accommodate the cabinet. Verify there is sufficient depth clearance inside the pantry for the cabinet (4-7/8 inches).
- Positionieren Sie den Schrank: Hold the pre-assembled cabinet against the inside of the pantry door at the desired height. Use a pencil to mark the mounting screw locations through the pre-drilled holes on the cabinet frame.
- Vorbohrungen: Carefully pre-drill pilot holes at the marked locations on the pantry door. Use a drill bit slightly smaller than the mounting screws to prevent splitting the wood.
- Sichern Sie den Schrank: Align the cabinet with the pilot holes and use the provided mounting screws to securely attach the cabinet to the pantry door. Ensure all screws are tightened firmly.
- Regale installieren: Insert the adjustable shelves into the desired positions using the shelf pins. The cabinet features three adjustable middle shelves.
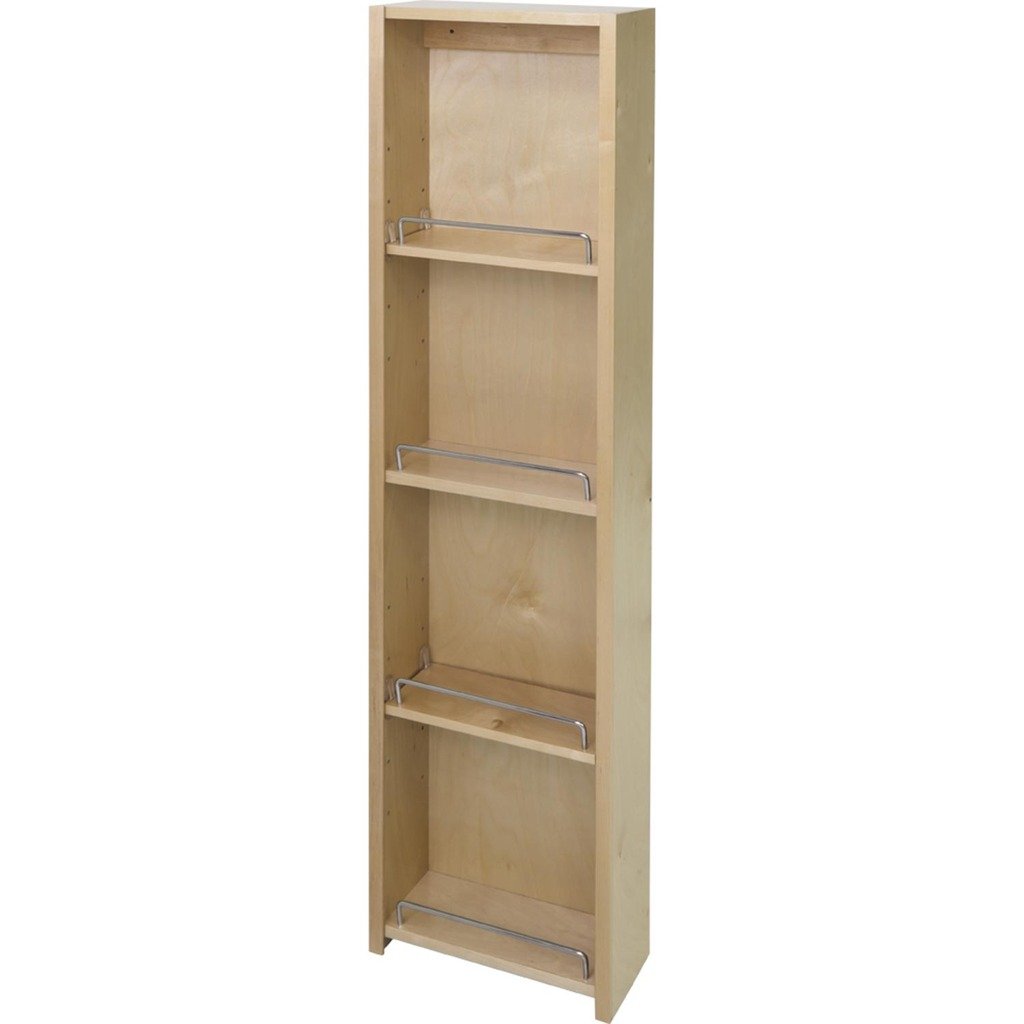
Image: The PDM45 Maple Pantry Door Mount Cabinet installed, showcasing its adjustable shelves. This image illustrates the typical appearance and functionality of the unit when mounted inside a pantry door.
Bedienung und Einstellung
The PDM45 cabinet is designed for straightforward use. Once installed, you can easily adjust the shelves to suit your storage needs.
Regale anpassen:
- Räumt das Regal aus: Nehmen Sie alle Gegenstände aus dem Regal, die Sie verstellen möchten.
- Regalstifte entfernen: Carefully lift the shelf and remove the four shelf pins supporting it.
- Stifte neu positionieren: Insert the shelf pins into the desired new holes along the cabinet sides. Ensure all four pins are at the same height to keep the shelf level.
- Regalplatz: Gently place the shelf onto the newly positioned pins, ensuring it sits securely.
Note: The cabinet features multiple pre-drilled holes for flexible shelf placement.
Pflege und Wartung
Proper care will ensure the longevity and appearance of your maple pantry door mount cabinet.
- Reinigung: Wischen Sie Oberflächen mit einem weichen, damp cloth. Avoid abrasive cleaners or harsh chemicals, as these can damage the clear UV finish.
- Verschüttungen: Verschüttete Flüssigkeiten sollten sofort aufgewischt werden, um Flecken oder Beschädigungen des Holzes zu vermeiden.
- Hardwareprüfung: Periodically check all mounting screws and shelf pins to ensure they remain tight. Tighten if necessary.
- Umgebungsbedingungen: Avoid exposing the cabinet to extreme humidity or temperature fluctuations, which can cause wood to warp or crack.
Fehlerbehebung
Hier finden Sie Lösungen für häufig auftretende Probleme:
| Problem | Mögliche Ursache | Lösung |
|---|---|---|
| Cabinet feels loose on door. | Befestigungsschrauben sind lose. | Ziehen Sie alle Befestigungsschrauben fest an. |
| Pantry door does not close properly. | Cabinet interferes with pantry interior or door frame. | Verify depth clearance (4-7/8 inches) and ensure no items on shelves protrude too far. Re-position cabinet if necessary. |
| Shelf is wobbly or uneven. | Die Regalstifte sind nicht richtig eingesetzt oder befinden sich auf unterschiedlichen Höhen. | Ensure all four shelf pins are fully inserted into corresponding holes at the same height. |
Technische Daten
| Besonderheit | Detail |
|---|---|
| Modellnummer | PDM45 |
| Marke | Hardware-Ressourcen |
| Material | Solid Birch and Birch Plywood (Hard Maple construction) |
| Beenden | Clear UV Finish |
| Abmessungen (B x H x T) | 12" x 45-5/8" x 4-7/8" (Product Dimensions: 4.88 x 12 x 45.63 inches) |
| Minimum Door Requirements | 48" Tall, 13" Wide |
| Anzahl der Einlegeböden | 3 (adjustable middle shelves) |
| Montage erforderlich | No (Ships pre-assembled) |
| Montagetyp | Door Mount (inside hinged pantry doors) |
| Artikelgewicht | 13.2 Pfund |
Garantieinformationen
Hardware Resources products are manufactured to high-quality standards. For specific warranty details, please refer to the warranty documentation included with your purchase or visit the official Hardware Resources webBewahren Sie Ihren Kaufbeleg für eventuelle Garantieansprüche auf.
Kundenservice
If you have any questions, require assistance with installation, or need to report a missing part, please contact Hardware Resources customer support. Contact information can typically be found on the product packaging or the manufacturer's official webWebsite.
Please have your model number (PDM45) and purchase date ready when contacting support.
Ask a question about this manual
Ask about setup, troubleshooting, compatibility, parts, safety, or missing instructions. Manuals+ will review the question and use this page’s manual context to help answer it.