
Einführung
Vielen Dank für Ihren Einkauf.asing the Edifier Tick Tock Retro Multifunctional Alarm Clock. This device combines a retro design with modern functionality, offering an alarm clock, FM radio, and media playback from SD cards, USB drives, and auxiliary input. This manual provides detailed instructions for setup, operation, and maintenance to ensure optimal performance and longevity of your device.
Produkteigenschaften
- SD card reader and USB input port for media playback.
- LCD display screen for time, date, alarm status, and input mode (SD/USB/FM/AUX).
- Alarm clock function with customizable audio sources: SD card, USB drive, FM radio, or Auxiliary input.
- Auxiliary 3.5mm input jack for connecting external audio devices.
- FM radio function with 24 preset channels for easy access to your favorite stations.
- Two 360° omni-directional full-range speakers for rich, multi-directional sound.
Kontrollen und Häfen
Anschlüsse auf der Rückseite
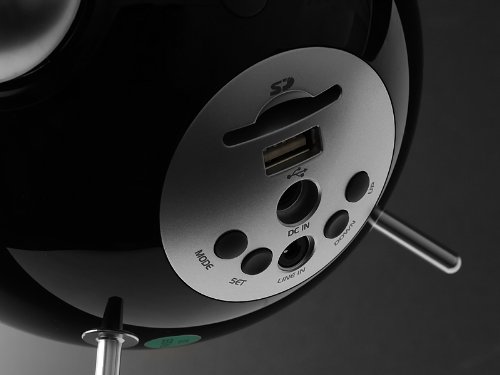
This image displays the rear panel of the Edifier Tick Tock alarm clock. Visible ports and buttons include:
- SD-Kartensteckplatz: Insert an SD card for music playback.
- USB-Anschluss: Connect a USB flash drive for music playback.
- DC IN: Stromanschluss für das mitgelieferte Netzteil.
- LINE IN (AUX): 3.5-mm-Audioeingang für externe Geräte.
- MODE-Taste: Cycles through input modes (SD, USB, FM, AUX).
- Set-Taste: Used for entering settings menus (e.g., time, alarm).
- AUF/AB-Tasten: Navigate menus, adjust volume, or change settings.
Bedienelemente auf der Oberseite
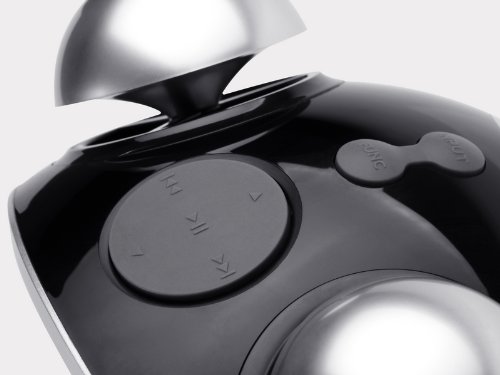
This image shows the top panel controls of the Edifier Tick Tock alarm clock. These include:
- Wiedergabe-/Pause-Taste: Startet oder pausiert die Medienwiedergabe.
- Schaltflächen für vorherigen/nächsten Titel: Skips to the previous or next track during media playback. Also used for tuning FM radio.
- Lautstärketasten: Regelt die Lautstärke des Audioausgangs.
- Schlummer-/Lichttaste: Activates snooze during an alarm or adjusts display brightness.
Aufstellen
- Auspacken: Carefully remove the alarm clock and all accessories from the packaging. Ensure all components are present: the alarm clock unit, AC power adapter, and this user manual.
- Stromanschluss: Connect the AC power adapter to the "DC IN" port on the rear of the alarm clock. Plug the adapter into a standard wall outlet. The display should illuminate.
- Erstes Einschalten: The unit should power on automatically. If not, press the power button (if available, otherwise it's always on when plugged in).
- Antenna (FM Radio): Extend the FM antenna located at the back of the unit for optimal radio reception.
Bedienungsanleitung
Einstellen von Uhrzeit und Datum
- Halten Sie die SATZ Drücken Sie die Taste, bis die Zeitanzeige zu blinken beginnt.
- Verwenden Sie die UP Und RUNTER Tasten zum Einstellen der Stunde. Drücken SATZ Zur Bestätigung und zum Minutenprotokoll wechseln.
- Minuten anpassen mit UP Und RUNTER. Drücken Sie SATZ zur Bestätigung.
- Continue this process to set the year, month, and day. Press SATZ to exit the time/date setting mode.
Einstellen des Alarms
- Drücken Sie die SATZ button once (do not hold) to enter alarm setting mode. The alarm time will flash.
- Verwenden Sie die UP Und RUNTER Tasten zum Einstellen der Weckzeit. Drücken SATZ Zur Bestätigung und zum Minutenprotokoll wechseln.
- Minuten anpassen mit UP Und RUNTER. Drücken Sie SATZ zur Bestätigung.
- Next, select the alarm source (FM, SD, USB, AUX). Use UP Und RUNTER to cycle through options. Press SATZ zur Bestätigung.
- If FM is selected, use UP Und RUNTER to select a preset FM station (P01-P24).
- If SD or USB is selected, ensure a card/drive with audio is inserted. The alarm will play the first track.
- If AUX is selected, ensure an external device is connected and playing audio.
- Drücken SATZ Um den Alarm erneut zu aktivieren, muss dieser erneut aufgerufen werden. Auf dem Display erscheint ein Alarmsymbol.
- To deactivate the alarm, press SATZ bis das Alarmsymbol verschwindet.
- Wenn der Alarm ertönt, drücken Sie die SNOOZE / LICHT button to activate snooze (typically 9 minutes). To turn off the alarm completely, press any other button.
FM-Radiobetrieb
- Drücken Sie die MODUS Drücken Sie die Taste wiederholt, bis „FM“ im Display erscheint.
- Auto Scan and Preset: Halten Sie die WIEDERGABE/PAUSE button. The radio will automatically scan for available stations and save them to presets (P01-P24).
- Manuelle Abstimmung: Verwenden Sie die VORHERIGER/NÄCHSTER TITEL Tasten zur Feinabstimmung der Frequenz.
- Voreinstellungen auswählen: Im FM-Modus kurz die Taste drücken VORHERIGER/NÄCHSTER TITEL Tasten zum Durchschalten der gespeicherten Sendervoreinstellungen.
- Stellen Sie die Lautstärke mit ein UP Und RUNTER buttons on the rear panel.
SD Card / USB Playback
- Insert an SD card into the SD card slot or a USB flash drive into the USB port on the rear panel.
- Drücken Sie die MODUS button repeatedly until "SD" or "USB" appears on the display. The device will automatically start playing audio files.
- Verwenden Sie die WIEDERGABE/PAUSE Taste, um die Wiedergabe anzuhalten oder fortzusetzen.
- Verwenden Sie die VORHERIGER/NÄCHSTER TITEL buttons on the top panel to skip tracks.
- Stellen Sie die Lautstärke mit ein UP Und RUNTER buttons on the rear panel.
Auxiliary Input (LINE IN)
- Connect an external audio device (e.g., smartphone, MP3 player) to the "LINE IN" (3.5mm) port on the rear panel using an audio cable (not included).
- Drücken Sie die MODUS Drücken Sie die Taste wiederholt, bis „AUX“ im Display erscheint.
- Starten Sie die Wiedergabe auf Ihrem angeschlossenen externen Gerät.
- Stellen Sie die Lautstärke mit ein UP Und RUNTER buttons on the rear panel, and also control volume from your external device.
Bildschirmhelligkeit
Drücken Sie kurz die SNOOZE / LICHT button on the top panel to cycle through different display brightness levels.
Wartung
- Reinigung: Reinigen Sie die Oberfläche des Weckers mit einem weichen, trockenen Tuch. Verwenden Sie keine Scheuermittel, Wachse oder Lösungsmittel.
- Platzierung: Place the unit on a stable, flat surface. Avoid direct sunlight, high temperatures, humidity, or dusty environments.
- Leistung: Trennen Sie den Netzadapter von der Steckdose, wenn das Gerät längere Zeit nicht benutzt wird.
Fehlerbehebung
| Problem | Mögliche Ursache/Lösung |
|---|---|
| Kein Strom / Display aus |
|
| Kein Ton von den Lautsprechern |
|
| Schlechter UKW-Radioempfang |
|
| Alarm does not sound or plays static |
|
| Display is too bright at night |
|
Technische Daten
| Marke | Erbauer |
| Modellnummer | MF240Reto |
| Anzeigetyp | LCD |
| Konnektivitätstechnologie | AUX, USB |
| Besondere Merkmale | Alarm, Radio, SD Card Reader, USB Playback |
| Stromquelle | Kabelgebundene Elektrik |
| Material | Plastik |
| Artikelgewicht | 0.74 Pfund (ca. 0.34 kg) |
| Hersteller | Edifier USA |
Garantie und Support
This Edifier product comes with a 2 Jahr Herstellergarantie. For warranty claims, technical support, or further assistance, please contact Edifier USA customer service. Please retain your proof of purchase for warranty validation.
For the most up-to-date support information, please visit the official Edifier webWebsite.