Utilitech 358707
Utilitech Mechanical Residential Plug-In Timer User Manual
Modell: 358707
Einführung
This manual provides detailed instructions for the safe and efficient operation of your Utilitech Mechanical Residential Plug-In Timer. Please read this manual thoroughly before use and retain it for future reference.
The Utilitech Mechanical Residential Plug-In Timer is designed to automate the on/off cycles of electrical devices, helping to conserve energy and enhance convenience. It features up to 48 on/off settings per day and includes 4 outlets for connecting multiple devices.
Produkt überview
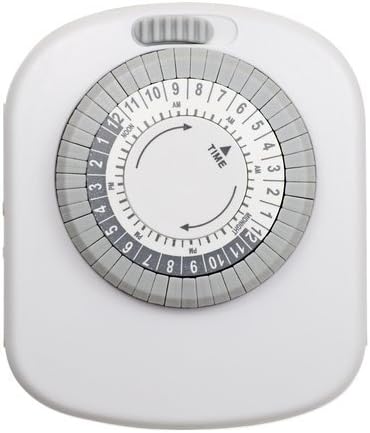
Abbildung 1: Vorderseite view of the Utilitech Mechanical Residential Plug-In Timer, showing the central dial with time markings and surrounding pins.
The timer features a circular dial with hour markings (AM/PM) and a series of push-down pins around its circumference. These pins control the on/off cycles. A manual override switch is typically located on the top or side of the unit.
Hauptmerkmale:
- Up to 48 on/off settings per 24-hour period.
- Non-removable pins for easy programming.
- Designed for energy saving.
- Equipped with 4 outlets for multiple device connections.
- Simple plug-in installation.
Aufstellen
Ersteinrichtung:
Den Timer auspacken: Carefully remove the timer from its packaging. Inspect for any damage.
Einstecken: Plug the timer into a standard 120V AC wall outlet. Ensure the outlet is easily accessible.
Charge Battery (if applicable): Although this model does not require batteries for operation, some timers may have an internal battery for timekeeping during power outages. If so, allow it to charge for at least 30 minutes before programming.
Aktuelle Uhrzeit einstellen: Rotate the entire dial clockwise until the current time aligns with the "TIME" arrow indicator on the timer's face. The dial is marked with AM and PM hours (e.g., 12 PM for Noon, 12 AM for Midnight).
Figure 2: Detail of the timer dial, highlighting the "TIME" arrow and the 24-hour markings for setting the current time.
Bedienungsanleitung
Programmierzeiten (Ein/Aus):
The timer uses push-down pins around the dial to set the on/off intervals. Each pin represents a 30-minute segment.
Pins identifizieren: Locate the small, grey pins around the outer edge of the dial. Each pin corresponds to a 30-minute interval.
Set "ON" Times: Push down the pins corresponding to the time periods you want the connected device to be ON. When a pin is pushed down, it activates the power during that 30-minute segment as the dial rotates.
Set "OFF" Times: Leave the pins in the "up" position for the time periods you want the connected device to be AUS. When a pin is in the up position, it deactivates the power during that 30-minute segment.
Abbildung 3: Ausführlich view of the timer's outer ring with individual pins, illustrating how to push them down for "ON" periods.
Manueller Überbrückungsschalter: The timer typically has a manual override switch (often a slider or button) located on the top or side. This switch allows you to bypass the programmed settings and keep the device either continuously ON or OFF. Ensure this switch is in the "Timer" or "Auto" position for programmed operation.
Gerät verbinden: Plug the device you wish to control into one of the 4 outlets on the timer. Ensure the device's own power switch is set to the "ON" position.
Example Programming:
To turn a lamp on from 6:00 PM to 10:00 PM:
- Locate the 6 PM mark on the dial.
- Push down all pins from 6 PM to 10 PM.
- Ensure all other pins are in the "up" position.
- Set the current time on the dial.
- Stecken Sie denamp into the timer.
Wartung
The Utilitech Mechanical Residential Plug-In Timer requires minimal maintenance.
Reinigung: Vor der Reinigung den Timer vom Stromnetz trennen. Die Außenseite mit einem weichen, trockenen Tuch abwischen. Keine flüssigen Reiniger oder Scheuermittel verwenden.
Lagerung: Wenn Sie den Timer über einen längeren Zeitraum lagern, stellen Sie sicher, dass er sauber und trocken ist. Bewahren Sie ihn an einem kühlen, trockenen Ort fern von direkter Sonneneinstrahlung und extremen Temperaturen auf.
Inspektion: Periodically inspect the timer and its cord for any signs of damage, such as frayed wires or cracked casing. Sollten Beschädigungen festgestellt werden, ist die Nutzung sofort einzustellen und das Gerät zu ersetzen.
Fehlerbehebung
| Problem | Mögliche Ursache | Lösung |
|---|---|---|
| Device does not turn ON/OFF as programmed. |
|
|
| Der Timerknopf dreht sich nicht. |
|
|
| Timer makes a rattling or loud noise. |
|
|
Technische Daten
| Attribut | Detail |
|---|---|
| Modellnummer | 358707 |
| Teilenummer | TM20DHBL |
| Marke | Utilitech |
| Typ | Mechanical Residential Plug-In Timer |
| Anzahl der Verkaufsstellen | 4 |
| Daily Settings | Up to 48 on/off settings (30-minute intervals) |
| Montagetyp | Steckhalterung |
| Farbe | Weiß |
| Artikelgewicht | 6.4 Unzen |
| Verpackungsabmessungen | 6.7 x 4.1 x 2.1 Zoll |
| Batterien erforderlich | NEIN |
| UPC | 070686507131 |
Sicherheitshinweise
Bitte lesen und befolgen Sie alle Sicherheitshinweise, um Verletzungen oder Schäden zu vermeiden.
Nur zur Verwendung im Innenbereich: This timer is designed for indoor use in dry locations only. Do not expose to water or moisture.
Elektrische Wertung: Do not exceed the electrical rating of the timer. Overloading can cause overheating and fire.
Erdung: Ensure the timer is plugged into a properly grounded outlet if applicable. This model is a 2-prong device.
Kinder und Haustiere: Außerhalb der Reichweite von Kindern und Haustieren aufbewahren.
Trennung: Always unplug the timer from the wall outlet before cleaning or when not in use for extended periods.
Reparieren: Versuchen Sie nicht, den Timer selbst zu öffnen oder zu reparieren. Überlassen Sie alle Wartungsarbeiten qualifiziertem Fachpersonal.
Garantie und Support
For warranty information or technical support, please refer to the product packaging or contact Utilitech customer service. Keep your purchase receipt for warranty claims.
Note: Specific warranty terms and contact information may vary. Please consult the documentation included with your product.
Ask a question about this manual
Ask about setup, troubleshooting, compatibility, parts, safety, or missing instructions. Manuals+ will review the question and use this page’s manual context to help answer it.