
1. Einleitung
Thank you for choosing the Cameo Light CLMPAR2 Compact LED Light System. This manual provides essential information for the safe and efficient operation of your device. Please read it thoroughly before initial use and keep it for future reference.
The CLMPAR2 is a versatile lighting solution featuring four flat PAR cans, each equipped with 7 super bright 3-watt TRI LEDs. It offers various control modes including DMX, master/slave, and standalone operation, making it suitable for a wide range of applications.
2. Sicherheitshinweise
Beachten Sie stets die folgenden Sicherheitsvorkehrungen, um Stromschläge, Brände oder Verletzungen zu vermeiden:
- Lesen Sie alle Anweisungen sorgfältig durch, bevor Sie das Gerät in Betrieb nehmen.
- Stellen Sie sicher, dass die Stromversorgungslautstärketage entspricht den auf dem Gerät angegebenen Anforderungen.
- Das Gehäuse darf nicht geöffnet werden. Es enthält keine vom Benutzer wartbaren Teile. Alle Wartungsarbeiten dürfen nur von qualifiziertem Fachpersonal durchgeführt werden.
- Vermeiden Sie den direkten Augenkontakt mit der Lichtquelle.
- Das Gerät sollte vor Feuchtigkeit, Regen und Flüssigkeiten geschützt werden.
- Sorgen Sie für ausreichende Belüftung rund um das Gerät, um eine Überhitzung zu vermeiden.
- Montieren Sie das Gerät sicher mit geeigneter Hardware.
- Disconnect from the mains power before cleaning or maintenance.
3. Packungsinhalt
Prüfen Sie beim Auspacken, ob alle Artikel vorhanden und in gutem Zustand sind:
- 4 x Flat PAR Cans with TRI LEDs
- 1 x Light Bar
- 1 x Transport Bag/Case
- 1 x Bedienungsanleitung (dieses Dokument)
- Stromkabel
- Mounting Hardware (e.g., tripod mount adapter)

Image: The Cameo Light CLMPAR2 system neatly packed within its dedicated transport case, showcasing the four PAR cans, the light bar, and accessories.
4. Produktüberschreitungview
The Cameo Light CLMPAR2 system consists of a central light bar with four adjustable PAR cans. Each PAR can features 7 x 3W TRI LEDs, capable of producing a wide spectrum of colors.
4.1-Vorderseite View

Bild: Vorderseite view of the Cameo Light CLMPAR2 LED system. Four individual PAR cans are attached to a horizontal bar, each emitting a different color (yellow, blue, green, purple), demonstrating the TRI-LED capabilities.
4.2 Rückseite View und Anschlüsse

Bild: Rückseite view of the Cameo Light CLMPAR2 LED system. The central light bar features the control panel with an LCD display, DMX input/output ports, and power connections. The back of the four PAR cans are also visible.
The rear panel provides access to the control interface and various input/output connections:
- Leistungsaufnahme: Connects to mains power.
- DMX-IN/OUT: 3-pin XLR connectors for DMX control.
- Kontrollanzeige: LCD screen for menu navigation and settings.
- Bedientasten: MODE, ENTER, UP, DOWN for navigating the menu and adjusting settings.
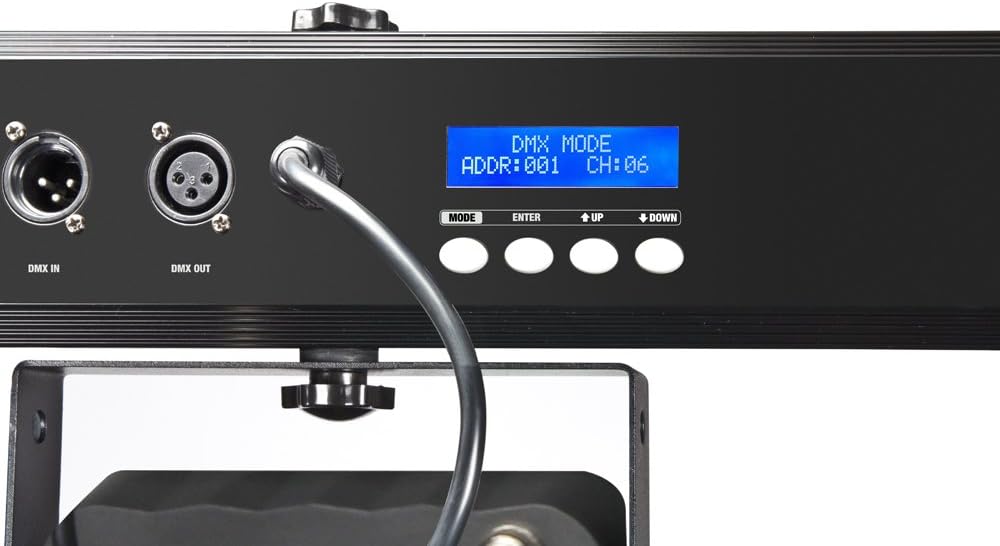
Bild: Nahaufnahme view of the control panel on the Cameo Light CLMPAR2. The LCD display shows "DMX MODE ADDR:001 CH:06", indicating DMX address and channel settings. Buttons for MODE, ENTER, UP, and DOWN are clearly visible.
5. Einrichtung
5.1 Montage
The CLMPAR2 system is designed for easy mounting on a standard lighting tripod or truss system. It includes a tripod mount adapter compatible with 28mm TV outlets.
- Attach the light bar securely to a stable tripod or truss using the provided mounting hardware.
- Ensure all connections are tight and the system is balanced.
- Adjust the angle of each PAR can as desired.

Image: The Cameo Light CLMPAR2 system is shown mounted on a tall, silver tripod. The four PAR cans are illuminated with different colors. A foot controller is visible on the ground, connected to the system.
5.2 Stromanschluss
Connect the supplied power cable to the power input on the rear of the light bar, then plug it into a suitable mains power outlet.
6. Bedienung
The CLMPAR2 offers multiple operating modes:
6.1 Standalone-Modus
In standalone mode, the system operates using its internal programs without external control. Use the MODE, ENTER, UP, and DOWN buttons on the rear panel to select desired programs, colors, or sound-activated modes.
- Drücken Sie die MODUS button to cycle through available standalone programs.
- Verwenden Sie die UP Und RUNTER buttons to adjust parameters (e.g., speed, sensitivity).
- Drücken EINGEBEN um die Auswahl zu bestätigen.
6.2 Master/Slave-Modus
Connect multiple CLMPAR2 units using DMX cables. Set one unit as the "Master" and others as "Slave" units. The slave units will mirror the master's operation.
- Verbinden Sie den DMX OUT der Master-Einheit mit dem DMX IN der ersten Slave-Einheit.
- Daisy-chain subsequent Slave units by connecting DMX OUT to DMX IN.
- Configure the Master unit to its desired standalone program.
- Set all Slave units to "Slave" mode via their control panels.
6.3 DMX-Steuerungsmodus
For advanced control, connect the CLMPAR2 to a DMX controller. The system supports various DMX channel modes.
- Connect the DMX OUT of your DMX controller to the DMX IN of the CLMPAR2.
- If using multiple DMX devices, daisy-chain them: DMX OUT of the first device to DMX IN of the next.
- Set a unique DMX start address for each CLMPAR2 unit using the control panel (refer to the display image in Section 4.2).
- Select the desired DMX channel mode (e.g., 3-channel, 6-channel) on the CLMPAR2 control panel to match your DMX controller's settings.
- Consult your DMX controller's manual for specific programming instructions.
7. Wartung
Regular maintenance ensures optimal performance and longevity of your CLMPAR2 system.
- Reinigung: Disconnect the unit from power. Use a soft, lint-free cloth to wipe the exterior. For lenses, use a specialized lens cleaner and cloth. Do not use abrasive cleaners or solvents.
- Inspektion: Periodically check cables, connectors, and mounting hardware for any signs of wear or damage. Replace damaged components immediately.
- Lagerung: When not in use, store the system in its transport case in a dry, dust-free environment.
8. Fehlerbehebung
| Problem | Mögliche Ursache | Lösung |
|---|---|---|
| Kein Strom | Power cable disconnected; faulty outlet | Überprüfen Sie den Anschluss des Stromkabels; testen Sie die Steckdose mit einem anderen Gerät. |
| Die Beleuchtung reagiert nicht auf DMX. | Incorrect DMX address; wrong DMX mode; faulty DMX cable; DMX controller issue | Verify DMX address and mode settings; check DMX cable connections; test with a different DMX controller or cable. |
| Lights flickering or inconsistent | Loose connections; power fluctuations; DMX signal interference | Check all power and DMX connections; ensure stable power supply; use DMX terminator if necessary. |
| Überhitzung | Blocked ventilation; prolonged use in high ambient temperature | Ensure clear airflow around the unit; operate in a cooler environment if possible. |
9. Spezifikationen
| Marke | Miniatur |
| Modellnummer | CLMPAR2 |
| Hersteller | Cameo-Licht |
| Lichtquelle | 28 x 3W TRI Colour LEDs (7 LEDs per PAR can) |
| Gesamt Wattage | 3 Watts (per LED, total system wattage not specified but implied by 28x3W) |
| Steuerungsmodi | DMX control, Standalone, Master/Slave |
| Material | Aluminium |
| Stromquelle | Netzbetrieben |
| Montagetyp | Rack mounting, Tripod mount (28mm TV outlets) |
| Artikelgewicht | 10 Kilogramm |
| Verpackungsabmessungen | 110.4 x 37.2 x 17 cm |
| ASIN | B007IFHXV4 |
| Datum der ersten Verfügbarkeit | 8. August 2012 |
10. Garantie und Support
For warranty information and technical support, please refer to the documentation provided with your purchase or visit the official Cameo Light webBewahren Sie Ihren Kaufbeleg für Garantieansprüche auf.
Hersteller: Cameo-Licht
WebWebsite: www.cameolight.com (Examp(der tatsächliche Link kann abweichen)