
1. Einleitung
This manual provides detailed instructions for the safe and effective operation of the KAISE SK-7720 Clamp Meter. The SK-7720 is a versatile instrument designed for accurate electrical measurements in automotive and mechanical maintenance applications. It features a current and voltage double display, True RMS measurement for distorted waveforms, and functions such as Peak Hold, Max/Min recording, and deviation measurement. The main case is designed with dustproof and splash-proof characteristics for enhanced durability.
2. Sicherheitshinweise
Always observe the following safety precautions to prevent electric shock or personal injury, and to avoid damage to the meter or the equipment under test.
- Read and understand all instructions in this manual before using the meter.
- Verwenden Sie das Messgerät nicht, wenn es beschädigt erscheint oder die Isolierung beeinträchtigt ist.
- Ensure the rotary switch is in the correct position for the measurement being performed.
- Die maximalen Eingangsgrenzen für keine Funktion dürfen überschritten werden.
- Seien Sie vorsichtig beim Arbeiten mit VolumentagEs liegt über 30 V AC RMS, 42 V Spitze oder 60 V DC. Diese SpannungentagEs besteht die Gefahr eines Stromschlags.
- Tauschen Sie die Batterie sofort aus, sobald die Anzeige für niedrigen Batteriestand erscheint, um genaue Messwerte zu gewährleisten.
- Das Messgerät darf nicht in explosionsgefährdeten Bereichen mit Gasen, Dämpfen oder Stäuben betrieben werden.
3. Produktkomponenten und -merkmale
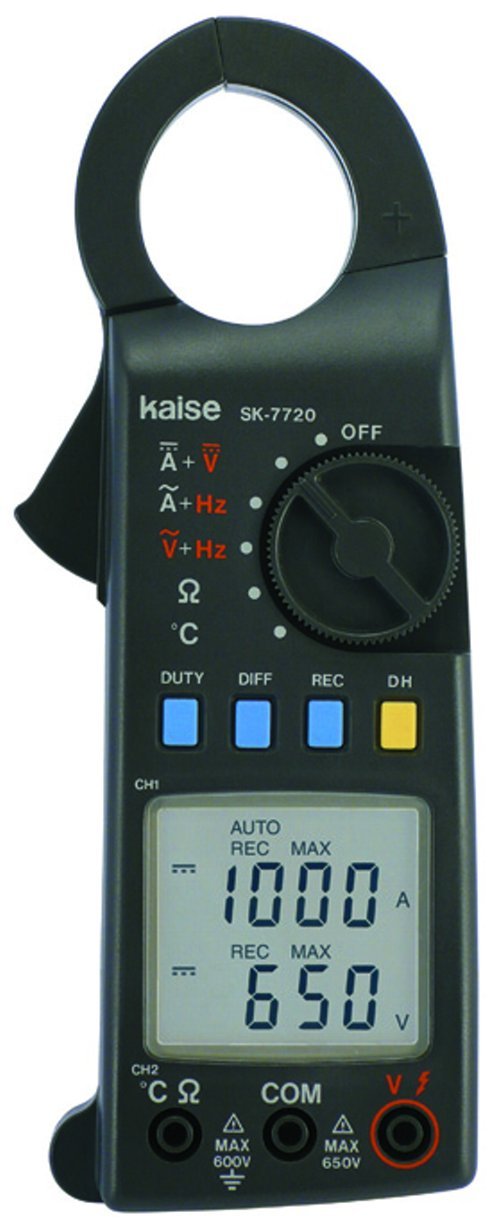
Figure 1: KAISE SK-7720 Clamp Meter überview
This image displays the KAISE SK-7720 Clamp Meter. It features a black body with a large clamp jaw at the top for non-contact current measurement. The front panel includes a rotary switch for function selection (OFF, DC Current + DC Voltage, AC Current + Frequency, AC Voltage + Frequency, Resistance, Temperature), four blue buttons (DUTY, DIFF, REC), and one yellow button (DH for Data Hold). A clear LCD screen shows measurement values, such as '1000 A' and '650 V'. Below the screen are input terminals labeled CH2 (°C Ω), COM (Common), and VΩ, with maximum voltage ratings indicated (MAX 600V, MAX 650V).
Hauptmerkmale:
- Clamp Kiefer: For non-contact measurement of AC/DC current.
- Drehschalter: Selects measurement functions (OFF, A+V, A+Hz, V+Hz, Ω, °C).
- LCD Anzeige: Digital readout of measurements, including dual display for current/voltage.
- Funktionstasten:
- PFLICHT: Duty Cycle measurement.
- DIFF: Differential measurement.
- REC: Record function (Max/Min).
- DH: Datenaufnahme.
- Eingangsklemmen: Für voltage, resistance, and temperature probe connections.
4. Einrichtung und Batterieinstallation
4.1 Einlegen der Batterie
- Stellen Sie sicher, dass der Zähler ausgeschaltet ist.
- Suchen Sie die Abdeckung des Batteriefachs auf der Rückseite des Messgeräts.
- Verwenden Sie einen Schraubendreher, um die Schraube zu entfernen, mit der die Batterieabdeckung befestigt ist.
- Insert one 9V 6F22 battery, observing the correct polarity (+/-).
- Bringen Sie die Batterieabdeckung wieder an und sichern Sie sie mit der Schraube.
4.2 Erstes Einschalten
Turn the rotary switch from the "OFF" position to any measurement function. The LCD display will illuminate, indicating the meter is ready for use. If the display does not light up, check the battery installation or replace the battery.
5. Bedienungsanleitung
The KAISE SK-7720 offers various measurement modes. Always select the appropriate function before connecting the meter to a circuit.
5.1 Current Measurement (A)
Zur Messung von Wechsel- oder Gleichstrom:
- Drehen Sie den Drehschalter auf die A+V (Gleichstrom) oder A+Hz (Wechselstrom) Position.
- Öffne dieamp Kiefer durch Drücken des Hebels.
- Schließen Sie nur einen Leiter des Stromkreises in die Klemme ein.amp jaw. Ensure the jaw is fully closed. The maximum measurement conductor diameter is 36 mm (1.4 inches).
- Lesen Sie den aktuellen Wert auf dem LCD-Display ab.
5.2 Voltage-Messung (V)
Zur Messung von AC- oder DC-Voltage:
- Schließen Sie das schwarze Messkabel an das an COM Klemme und die rote Messleitung an die VΩ Terminal.
- Drehen Sie den Drehschalter auf die A+V (DC-Voltage) oder V+Hz (AC Voltage) Position.
- Schließen Sie die Messleitungen parallel an den Stromkreis oder das Bauteil an, das Sie messen möchten.
- Lesen Sie den Bandtage-Wert auf dem LCD-Display.
5.3 Widerstandsmessung (Ω)
Widerstand messen:
- Schließen Sie das schwarze Messkabel an das an COM Klemme und die rote Messleitung an die CH2 (°C Ω) Terminal.
- Drehen Sie den Drehschalter auf die Ω Position.
- Ensure the circuit or component under test is de-energized before connecting the test leads.
- Verbinden Sie die Testleitungen an der Komponente.
- Lesen Sie den Widerstandswert auf dem LCD-Display ab.
5.4 Frequenzmessung (Hz)
Frequency can be measured in conjunction with AC Current or AC Voltage:
- For AC Current frequency, select A+Hz.
- Für AC Voltage frequency, select V+Hz.
- The frequency value will be displayed on the secondary display or indicated by a specific symbol.
5.5 Temperaturmessung (°C)
So messen Sie die Temperatur:
- Connect a compatible temperature probe (not included) to the CH2 (°C Ω) Und COM Klemmen.
- Drehen Sie den Drehschalter auf die °C Position.
- Place the temperature probe at the desired measurement point.
- Lesen Sie den Temperaturwert auf dem LCD-Display ab.
5.6 Funktionstasten
- PFLICHT: Press to measure the duty cycle of a signal.
- DIFF: Activates differential measurement mode. Refer to the full manual for detailed usage.
- REC: Press to activate the recording function, allowing the meter to capture maximum and minimum readings. Press again to cycle through MAX, MIN, and current readings.
- DH (Data Hold): Drücken Sie, um den aktuellen Messwert auf dem Display einzufrieren. Drücken Sie erneut, um die Anzeige freizugeben.
6. Wartung
6.1 Reinigung
Löschen Sie den Fall mit Anzeigeamp Mit einem Tuch und mildem Reinigungsmittel reinigen. Keine Scheuermittel oder Lösungsmittel verwenden. Vor Gebrauch sicherstellen, dass das Messgerät vollständig trocken ist.
6.2 Batteriewechsel
Replace the 9V battery when the low battery indicator appears on the display. Refer to Section 4.1 for battery installation instructions.
6.3 Speicherung
If the meter is not used for an extended period, remove the battery to prevent leakage and damage. Store the meter in a cool, dry place away from direct sunlight.
7. Fehlerbehebung
| Problem | Mögliche Ursache | Lösung |
|---|---|---|
| Das Messgerät lässt sich nicht einschalten. | Batterie defekt oder falsch eingebaut. | Prüfen Sie die Batteriepolarität oder tauschen Sie die 9V-Batterie aus. |
| Ungenaue Messwerte. | Low battery, incorrect function selected, or external interference. | Replace battery, verify function setting, move away from strong electromagnetic fields. |
| „OL“ oder „OVER“ wird angezeigt. | Die Messung überschreitet den Messbereich des Messgeräts. | Select a higher range if available, or ensure the input is within specifications. |
8. Technische Daten
- Modell: SK-7720
- Messart: Clamp Meter (Ammeter, Voltmeter, Ohmmeter, Frequency, Temperature)
- Current Frequency Response (ACA): 40Hz - 400Hz
- Bandtage Frequency Response (ACV): 40Hz - 400Hz
- Batterie: 1 x 9V 6F22 (included)
- Abmessungen: 200 x 64 x 33 mm (7.9 x 2.5 inches)
- Gewicht: 310 Gramm
- Measurement Conductor Diameter: 36 mm (1.4 Zoll)
- Merkmale: True RMS, Peak Hold, Max/Min, Deviation Measurement, Dustproof and Splash-proof (main case).
9. Garantieinformationen
This KAISE SK-7720 Clamp Meter is covered by a standard manufacturer's warranty against defects in materials and workmanship. The warranty period typically begins from the date of purchase. Please retain your proof of purchase for warranty claims. This warranty does not cover damage caused by misuse, accident, unauthorized repair, or normal wear and tear. For specific warranty terms and conditions, please refer to the documentation provided with your purchase or contact Kaise customer support.
10. Kundendienst
For technical assistance, troubleshooting, or service inquiries regarding your KAISE SK-7720 Clamp Meter, please contact your local distributor or the manufacturer's customer support. You may find contact information on the product packaging or the official Kaise webWebsite.
Hersteller: Kaise