1. Einleitung
This manual provides detailed instructions for the safe and efficient operation of your VOLTCRAFT 8210 Function Generator. The 8210 is a versatile instrument combining a sweep function, function generator, pulse generator, and frequency counter into a single unit. It is designed for professional use, generating various waveforms with precision.
2. Sicherheitshinweise
Please read these safety instructions carefully before operating the device to prevent injury and damage. Keep this manual for future reference.
- Schließen Sie das Gerät immer an eine geerdete Steckdose an.
- Betreiben Sie das Gerät nicht bei Nässe oder damp Bedingungen.
- Sorgen Sie für ausreichende Belüftung, um eine Überhitzung zu vermeiden.
- Öffnen Sie das Gerät nicht.asing; Im Inneren befinden sich keine vom Benutzer wartbaren Teile. Wartungsarbeiten dürfen nur von qualifiziertem Fachpersonal durchgeführt werden.
- Vor der Reinigung oder dem Transport des Geräts die Stromzufuhr unterbrechen.
- Vermeiden Sie die Anwendung von Voltages exceeding the specified maximum input ratings.
3. Produktüberschreitungview
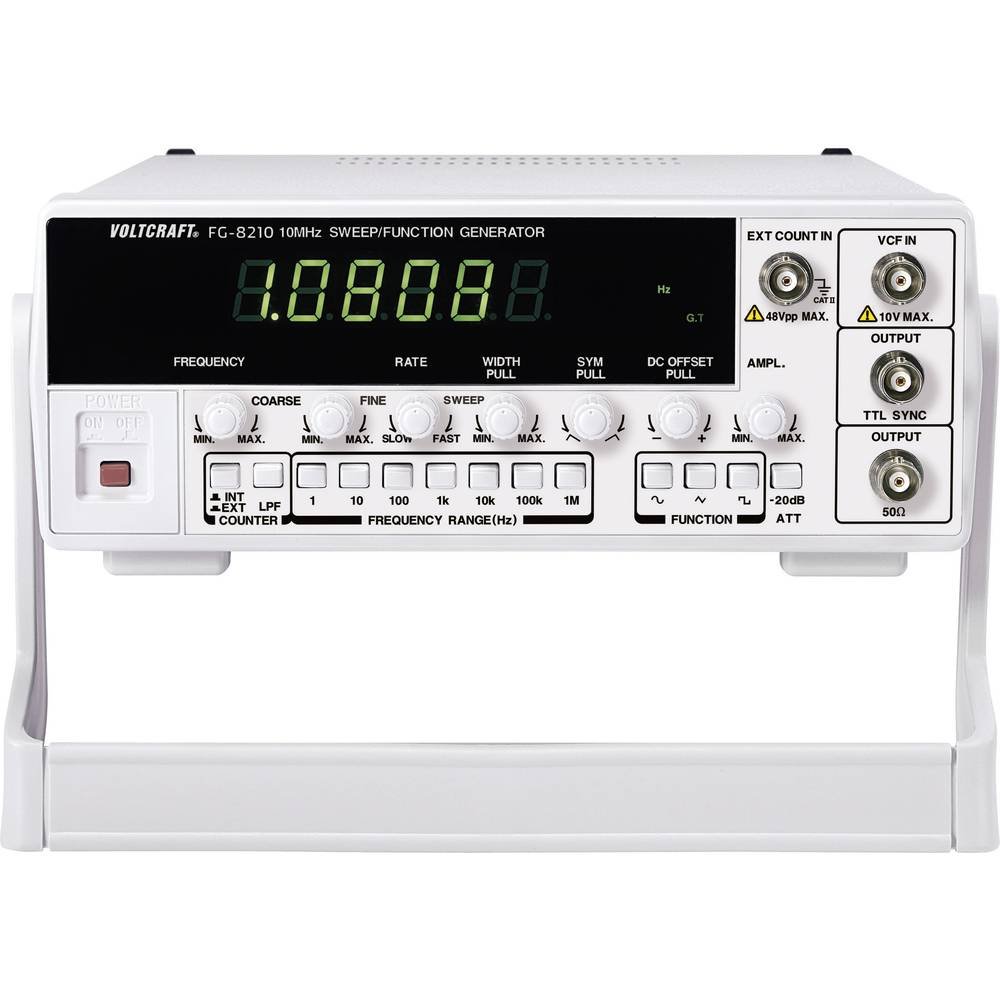
The VOLTCRAFT 8210 is a versatile 4-in-1 instrument designed for various electronic testing and development applications. It integrates the functionalities of a sweep function generator, a standard function generator, a pulse generator, and a frequency counter.
Hauptmerkmale:
- Four-in-one functionality: Sweep function, function generator, pulse generator, and frequency counter.
- Frequenzbereich: Generates signals from 0.1 Hz to 10 MHz.
- Frequenzzähler: Measures frequencies from 2 Hz to 100 MHz.
- Wellenformerzeugung: Produces professional-grade rectangular, triangular, and sawtooth signals.
- Ausgabe AmpBreite: Maximal amplitude of 20 Vpp (10 Vpp into 50 ohms).
Produktbilder:


Offizielle Produktvideos:
Derzeit stehen keine offiziellen Produktvideos des Verkäufers zum Einbetten zur Verfügung.
4. Einrichtung
- Auspacken: Carefully remove the function generator from its packaging. Inspect the unit for any signs of damage during transit. Retain the packaging for future storage or transport.
- Platzierung: Place the unit on a stable, flat surface with adequate ventilation around it. Avoid placing it near heat sources or in direct sunlight.
- Stromanschluss: Connect the provided power cord to the power input on the rear panel of the 8210 and then to a suitable grounded AC power outlet. Ensure the power switch is in the OFF position before connecting.
- Erstes Einschalten: Flip the power switch to the ON position. The display should illuminate, indicating the unit is receiving power.
- Ausgangsverbindungen: Connect your test leads or cables to the appropriate output terminals (e.g., BNC connectors for main output, TTL output) on the front panel, depending on your application.
5. Bedienungsanleitung
This section details the basic operation of the VOLTCRAFT 8210 for its primary functions.
5.1. Function Generator Mode
- Wellenform auswählen: Use the dedicated buttons (e.g., Sine, Square, Triangle) on the front panel to select the desired output waveform.
- Frequenz einstellen: Adjust the frequency using the frequency control knob and range buttons. The display will show the current frequency.
- Anpassen AmpBreite: Verwenden Sie die amplitude knob to set the desired output voltage peak-to-peak (Vpp). Monitor the output with an oscilloscope for precise adjustment.
- DC-Offset: If available, use the DC offset control to add a DC bias to the output signal.
- Ausgang anschließen: Connect the main output (e.g., BNC) to your circuit or device under test.
5.2. Sweep Function Mode
The sweep function allows the output frequency to vary automatically over a specified range.
- Activate Sweep: Press the "Sweep" button to enable this mode.
- Set Start/Stop Frequencies: Use the frequency controls to define the lower and upper limits of the sweep range.
- Adjust Sweep Rate: Set the sweep duration or rate using the dedicated control.
- Monitorausgang: Observe the sweeping signal on an oscilloscope to verify the settings.
5.3. Frequency Counter Mode
The built-in frequency counter measures external signals.
- Select Counter Input: Connect the external signal to the designated frequency counter input terminal.
- Activate Counter: Press the "Counter" or "Freq. Meas." button to switch to frequency measurement mode.
- Read Frequency: The display will show the frequency of the input signal.
6. Wartung
Proper maintenance ensures the longevity and accuracy of your VOLTCRAFT 8210.
- Reinigung: Reinigen Sie die Außenseite des Geräts mit einem weichen, trockenen Tuch. Bei hartnäckigem Schmutz kann ein leicht feuchtes Tuch hilfreich sein.amp Ein Tuch mit mildem Reinigungsmittel kann verwendet werden. Achten Sie darauf, dass keine Flüssigkeit in das Gerät gelangt. Verwenden Sie keine Scheuermittel oder Lösungsmittel.
- Lagerung: When not in use for extended periods, store the unit in a dry, dust-free environment, preferably in its original packaging.
- Kalibrierung: Periodic calibration by qualified service personnel is recommended to maintain measurement accuracy, especially for critical applications.
7. Fehlerbehebung
If you encounter issues with your VOLTCRAFT 8210, refer to the following common problems and solutions:
| Problem | Mögliche Ursache | Lösung |
|---|---|---|
| Kein Strom/Display aus | Power cord disconnected, power switch off, faulty outlet. | Überprüfen Sie den Anschluss des Netzkabels, stellen Sie sicher, dass der Netzschalter eingeschaltet ist, und testen Sie die Steckdose mit einem anderen Gerät. |
| Kein Ausgangssignal | Output cable disconnected, amplitude set to zero, incorrect function selected. | Verify output cable connection, increase amplitude, ensure correct waveform/function is selected. |
| Incorrect frequency reading (counter) | Signal too weak, incorrect input range, noisy signal. | Ensure signal amplitude is sufficient, check input range settings, use shielded cables. |
Sollte das Problem nach Ausprobieren dieser Lösungsansätze weiterhin bestehen, wenden Sie sich bitte an den Kundendienst.
8. Spezifikationen
The following are the technical specifications for the VOLTCRAFT 8210 Function Generator:
- Hersteller: VOLTCRAFT
- Modellnummer: 8210
- Artikelgewicht: 3 Kilogramm
- Number of items in package: 1
- Im Lieferumfang enthaltene Batterien: NEIN
- Erforderliche Batterien: NEIN
- ASIN: B00EPLFP46
- First Available Date on Amazon.fr: 15. Februar 2014
- Ersatzteilverfügbarkeit: Informationen zu Ersatzteilen sind nicht verfügbar.
9. Garantie und Support
Information regarding specific warranty terms and conditions for the VOLTCRAFT 8210 Function Generator is not available in the provided product data. Please refer to the documentation included with your purchase or contact VOLTCRAFT customer support directly for warranty details and technical assistance.
For further support, visit the official VOLTCRAFT webBesuchen Sie die Website oder wenden Sie sich an deren autorisierte Servicezentren.