
1. Einleitung
This manual provides comprehensive instructions for the installation, operation, and maintenance of your Weiser Augusta/Troy Single Cylinder Handleset. This handleset is designed for residential and light commercial applications, offering security and durability with an ANSI Grade 2 rating. Please read all instructions carefully before beginning installation to ensure proper function and safety.
2. Sicherheitshinweise
- Tragen Sie während der Installation stets geeignete Schutzausrüstung, wie z. B. eine Schutzbrille.
- Halten Sie Kleinteile von Kindern fern, um Erstickungsgefahr vorzubeugen.
- Use only the tools specified or recommended in this manual.
- Ensure all screws are tightened securely, but do not overtighten, as this may damage components.
- If you are unsure about any part of the installation process, consult a qualified locksmith or professional installer.
3. Packungsinhalt
Vergewissern Sie sich vor Beginn der Installation, dass alle Komponenten vorhanden sind:
- Exterior Handleset Assembly (Augusta/Troy Trim)
- Interior Knob Trim
- Riegelverriegelung
- Federriegel
- Strike Plates (Full Lip)
- Befestigungsschrauben
- Schlüssel
- Installationsvorlage (falls enthalten)
4. Installation
Erforderliche Werkzeuge: Phillips head screwdriver, tape measure, pencil, drill (optional for new installations).
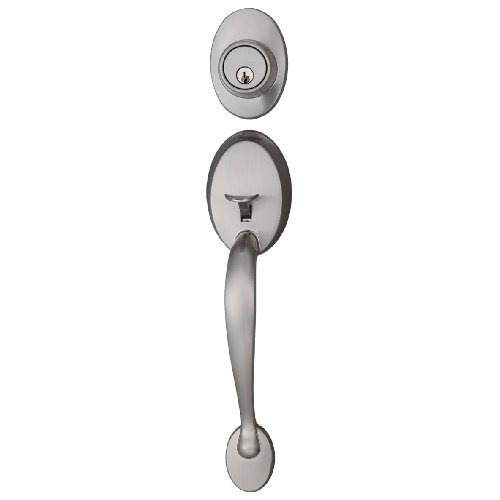
Abbildung 1: Überview of the Weiser Augusta/Troy Single Cylinder Handleset components, including the exterior handle, interior knob, and associated hardware.
- Bereiten Sie die Tür vor: Ensure your door has the correct bore holes and backset. This handleset is designed for doors with a 2-1/8 inch cross bore and an adjustable backset of 2-3/8 inches or 2-3/4 inches.
- Einbau des Riegelschlosses: Insert the deadbolt latch into the edge bore hole, ensuring the bolt faces the correct direction. Secure it with the provided screws.
- Install the Spring Latch: Insert the spring latch into the lower edge bore hole, ensuring the bevel faces the door frame. Secure it with the provided screws.
- Install the Exterior Handleset: Place the exterior handleset assembly onto the door, aligning the posts with the bore holes.
- Install the Interior Knob Trim: Attach the interior knob trim to the exterior handleset, ensuring the spindle engages with the spring latch mechanism. Secure with the long mounting screws, tightening evenly.
- Testbetrieb: Before closing the door, test the deadbolt and spring latch mechanisms to ensure smooth operation. The deadbolt should extend and retract fully with the key from either side. The lower trim is non-locking.
- Schließbleche montieren: Mark and chisel out recesses for the strike plates on the door frame, aligning them with the latches. Secure the strike plates with the provided screws.
5. Bedienung
- Verriegeln des Riegels: Insert the key into the exterior cylinder and turn to extend the deadbolt. From the interior, turn the thumbturn to extend the deadbolt.
- Entriegeln des Riegels: Insert the key into the exterior cylinder and turn to retract the deadbolt. From the interior, turn the thumbturn to retract the deadbolt.
- Operating the Lower Latch: The lower handle operates a spring latch for entry and exit. This latch does not lock and is always accessible from both sides.
6. Wartung
- Reinigung: Clean the handleset with a soft, damp Mit einem Tuch abwischen. Vermeiden Sie Scheuermittel, Lösungsmittel oder aggressive Chemikalien, da diese die Oberfläche beschädigen können.
- Schmierung: Periodically apply a small amount of graphite lubricant or a silicone-based spray to the keyway and internal mechanisms to ensure smooth operation. Do not use oil-based lubricants.
- Inspektion: Regularly check all screws for tightness and ensure the handleset operates smoothly. Tighten any loose screws as needed.
7. Fehlerbehebung
- Handleset is stiff or difficult to operate:
- Check if mounting screws are overtightened. Loosen slightly if necessary.
- Apply lubricant to the latch and cylinder mechanisms.
- Ensure the door is properly aligned and not binding against the frame.
- Deadbolt does not extend or retract fully:
- Verify the strike plate alignment. Adjust if the deadbolt is hitting the frame or strike plate.
- Check for obstructions in the door frame.
- Der Schlüssel lässt sich schwer einführen oder drehen:
- Apply graphite lubricant to the keyway.
- Stellen Sie sicher, dass der Schlüssel nicht verbogen oder beschädigt ist.
8. Spezifikationen
| Modellnummer | A9470A/T17AB |
| Marke | Weiser |
| Material | Zinc (Handle), Nickel (Finish) |
| Beenden | Antikes Nickel |
| Sperrtyp | Einzelzylinder-Schlüsselschloss |
| Zurücksetzen | Verstellbar 2-3/8" oder 2-3/4" |
| ANSI Rating | Klasse 2 |
| Im Lieferumfang enthaltene Komponenten | Knob, Latch, Lock |
9. Garantie und Support
Weiser products are manufactured to the highest standards and are backed by a limited lifetime warranty on mechanical components and finish. For detailed warranty information, technical support, or to purchase replacement parts, please visit the official Weiser webBesuchen Sie die Website oder kontaktieren Sie den Kundendienst. Bewahren Sie Ihren Kaufbeleg für Garantieansprüche auf.