1. Einführung und Endeview
This manual provides detailed instructions for the safe installation, operation, and maintenance of your ET2 Harmony E24506-91PC LED Pendant Light. Please read all instructions carefully before beginning installation and retain this manual for future reference.
The ET2 Harmony pendant light features multiple bubble glass balls, each illuminated by an integrated LED. The individual pendants are suspended by adjustable cables, allowing for customization of the fixture's overall design and drop height. The fixture is designed for indoor use and is fully dimmable.

Image 1.1: The ET2 Harmony E24506-91PC LED Pendant Light, showcasing its design with multiple bubble glass spheres.
2. Sicherheitshinweise
WARNING: RISK OF ELECTRIC SHOCK. Ensure power is turned off at the circuit breaker or fuse box before installation, servicing, or changing any components. Consult a qualified electrician if you are unsure about the installation process.
- Dieses Produkt muss gemäß den geltenden Installationsvorschriften von einer Person installiert werden, die mit der Konstruktion und Bedienung des Produkts und den damit verbundenen Gefahren vertraut ist.
- Use only UL Listed wire connectors.
- Überschreiten Sie nicht das angegebene Volumentage (120 Volt).
- Die Vorrichtung darf in keiner Weise verändert werden.
- Keep combustible materials away from the light fixture.
- Tragen Sie während der Installation Schutzbrille und Handschuhe.
3. Packungsinhalt
Carefully unpack the fixture and check that all components are present and undamaged. Retain all packaging materials until installation is complete.
- Pendant Light Fixture (Canopy with integrated LED pendants)
- Mounting Hardware (Mounting plate, screws, wire nuts)
- Bedienungsanleitung (Dieses Dokument)
4. Einrichtung und Installation
Installation should be performed by a qualified electrician or a person with experience in electrical wiring.
4.1 Benötigtes Werkzeug (nicht im Lieferumfang enthalten)
- Kreuzschlitzschraubendreher
- Schlitzschraubendreher
- Abisolierzange
- Isolierband
- Leiter
4.2 Installationsschritte
- Strom ausschalten: Suchen Sie den Sicherungsautomaten oder den Sicherungskasten, der die Stromversorgung des Installationsortes steuert, und schalten Sie den Strom ab. Überprüfen Sie mit einem Spannungsprüfer, ob der Strom tatsächlich abgeschaltet ist.tage Tester.
- Montagefläche vorbereiten: Ensure the junction box is securely mounted and capable of supporting the fixture's weight (approximately 11.07 pounds).
- Montageplatte anbringen: Secure the fixture's mounting plate to the junction box using the provided screws.
- Elektrische Verbindungen herstellen:
- Verbinden Sie den blanken Kupferdraht oder den grünen Erdungsdraht der Leuchte mit dem Erdungsdraht der Anschlussdose mithilfe einer Drahtklemme.
- Verbinden Sie den weißen (Neutral-)Draht der Leuchte mit dem weißen (Neutral-)Draht der Anschlussdose mithilfe einer Drahtklemme.
- Verbinden Sie den schwarzen (stromführenden) Draht der Leuchte mit dem schwarzen (stromführenden) Draht der Anschlussdose mithilfe einer Drahtklemme.
- Stellen Sie sicher, dass alle Verbindungen sicher sind und isolieren Sie sie gegebenenfalls mit Isolierband.
- Secure Fixture Canopy: Carefully push the wired connections into the junction box. Align the fixture canopy with the mounting plate and secure it using the provided screws.
- Anhängerlängen anpassen: The individual pendant cables are adjustable. To adjust, gently push the cable into the canopy's cable grip and pull to the desired length. Ensure all pendants are securely set before proceeding.
- Install Glass Balls: The bubble glass balls are pre-installed with LED bulbs. Ensure they are securely attached to their respective pendant cables.
- Strom wiederherstellen: Sobald die Installation abgeschlossen und alle Verbindungen sicher hergestellt sind, schalten Sie die Stromversorgung am Leistungsschalter wieder ein.
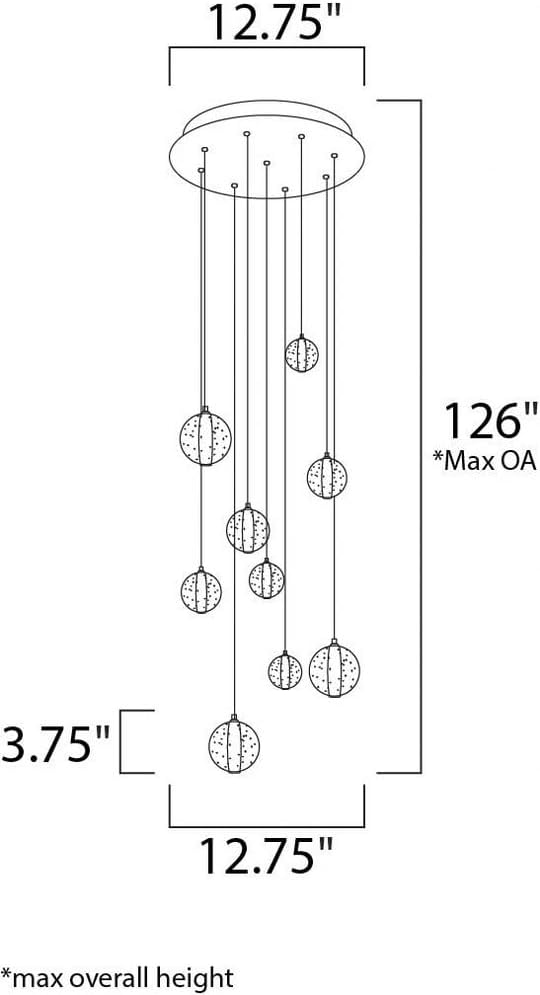
Image 4.1: Dimensional drawing of the ET2 Harmony E24506-91PC, indicating a 12.75-inch width and a maximum overall height of 126 inches.
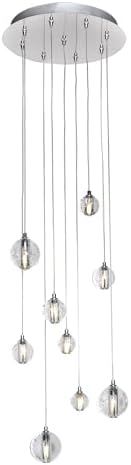
Image 4.2: Detail of the fixture's polished chrome canopy and the attachment points for the adjustable pendant cables.
5. Bedienungsanleitung
The ET2 Harmony E24506-91PC LED Pendant Light is designed for simple operation.
- Ein-/Ausschalten: Die Leuchte wird über einen handelsüblichen Wandschalter gesteuert, der an den Stromkreis der Leuchte angeschlossen ist.
- Dimmfunktion: This fixture is fully dimmable. For optimal performance, use with a compatible LED dimmer switch. Consult your electrician for dimmer compatibility.
6. Wartung
Regelmäßige Wartung trägt dazu bei, das Aussehen und die Funktionalität Ihrer Pendelleuchte zu erhalten.
- Reinigung: Vor der Reinigung den Strom abschalten. Verwenden Sie ein weiches, trockenes oder leicht angefeuchtetes Tuch.amp cloth to wipe the polished chrome finish and glass spheres. Do not use abrasive cleaners, solvents, or polishes as they may damage the finish.
- LED-Ersatz: The integrated LED bulbs are designed for long life. If replacement is ever needed, contact ET2 customer support for guidance on obtaining compatible replacement parts. Do not attempt to replace LEDs with standard bulbs.
7. Fehlerbehebung
If you experience issues with your pendant light, refer to the following troubleshooting guide:
| Problem | Mögliche Ursache | Lösung |
|---|---|---|
| Licht geht nicht an | Kein Strom am Gerät Wackelkontakt Defekter Wandschalter | Prüfen Sie den Leitungsschutzschalter/die Sicherung. Stellen Sie sicher, dass der Strom eingeschaltet ist. Prüfen Sie bei ausgeschaltetem Strom, ob alle Drahtverbindungen fest sitzen. Test wall switch or replace if necessary. |
| Das Licht flackert oder dimmt sich unregelmäßig | Inkompatibler Dimmerschalter Wackelkontakt | Ensure an LED-compatible dimmer switch is used. Prüfen Sie alle Drahtverbindungen (bei ausgeschalteter Stromversorgung). |
| Pendants are not level | Cable lengths are uneven | Adjust individual pendant cable lengths as described in Section 4.2. |
If the problem persists after attempting these solutions, contact ET2 customer support.
8. Spezifikationen
| Besonderheit | Detail |
|---|---|
| Marke | ET2 |
| Modellnummer | E24506-91PC |
| Abmessungen (L x B x H) | 12.75" x 12.75" x 3.75" (Canopy) Max Overall Height: 126" |
| Artikelgewicht | 11.07 Pfund |
| Material | Glas, Stahl |
| Ausführung | Polished Chrome / Bubble Glass |
| Lichtquellentyp | LED |
| Anzahl der Lichtquellen | 9 |
| Wastage | 13.5 W (Gesamt) |
| Bandtage | 120 Volt |
| Helligkeit | 945 Lumen |
| Lichtfarbe | Warmweiß (3000K) |
| Farbwiedergabeindex (CRI) | 80+ |
| Installationstyp | Semi Flush Mount / Ceiling Mount |
| Besonderheit | Dimmable, Adjustable Cables |
| Verwendung im Innen- und Außenbereich | Innenbereich |
| Zertifizierung | UL-zertifiziert |
| Montage erforderlich | Ja |
9. Garantie und Support
9.1 Garantieinformationen
This ET2 Harmony E24506-91PC LED Pendant Light is covered by a 1 Jahre eingeschränkte Herstellergarantie Diese Garantie gilt ab Kaufdatum und deckt Material- und Verarbeitungsfehler bei normalem Gebrauch ab. Sie deckt keine Schäden ab, die durch unsachgemäße Installation, Unfälle, Missbrauch, unsachgemäße Verwendung oder unbefugte Änderungen entstehen.
9.2 Kundendienst
For technical assistance, warranty claims, or to order replacement parts, please contact ET2 customer support. Have your model number (E24506-91PC) and proof of purchase ready when contacting support.
You can find contact information for ET2 by visiting their official webWebsite oder den Händler, bei dem das Produkt gekauft wurde.