
1. Einleitung
The Mastech MS6612 is a digital luxmeter designed for measuring illuminance. It features a large LCD display with backlight and a bar graph for easy reading. This device offers automatic and manual range switching, data hold, peak value measurement, relative value measurement, and zero calibration functions. It is capable of measuring up to 200,000 Lux or 20,000 Foot-Candles (Fc).
2. Sicherheitshinweise
Please read and understand all safety instructions before operating the device. Failure to follow these instructions may result in injury or damage to the meter.
- Do not operate the meter in environments with explosive gas, vapor, or dust.
- Setzen Sie das Messgerät keinen extremen Temperaturen oder hoher Luftfeuchtigkeit aus.
- Um ein Auslaufen zu verhindern, entfernen Sie die Batterien, wenn das Messgerät längere Zeit nicht benutzt wird.
- Do not attempt to repair or modify the meter. Refer all servicing to qualified personnel.
- Halten Sie das Messgerät sauber und trocken.
3. Produktüberschreitungview
The Mastech MS6612 Digital Luxmeter consists of a main unit with an LCD display and control buttons, and a silicon photoelectric diode sensor for light detection.
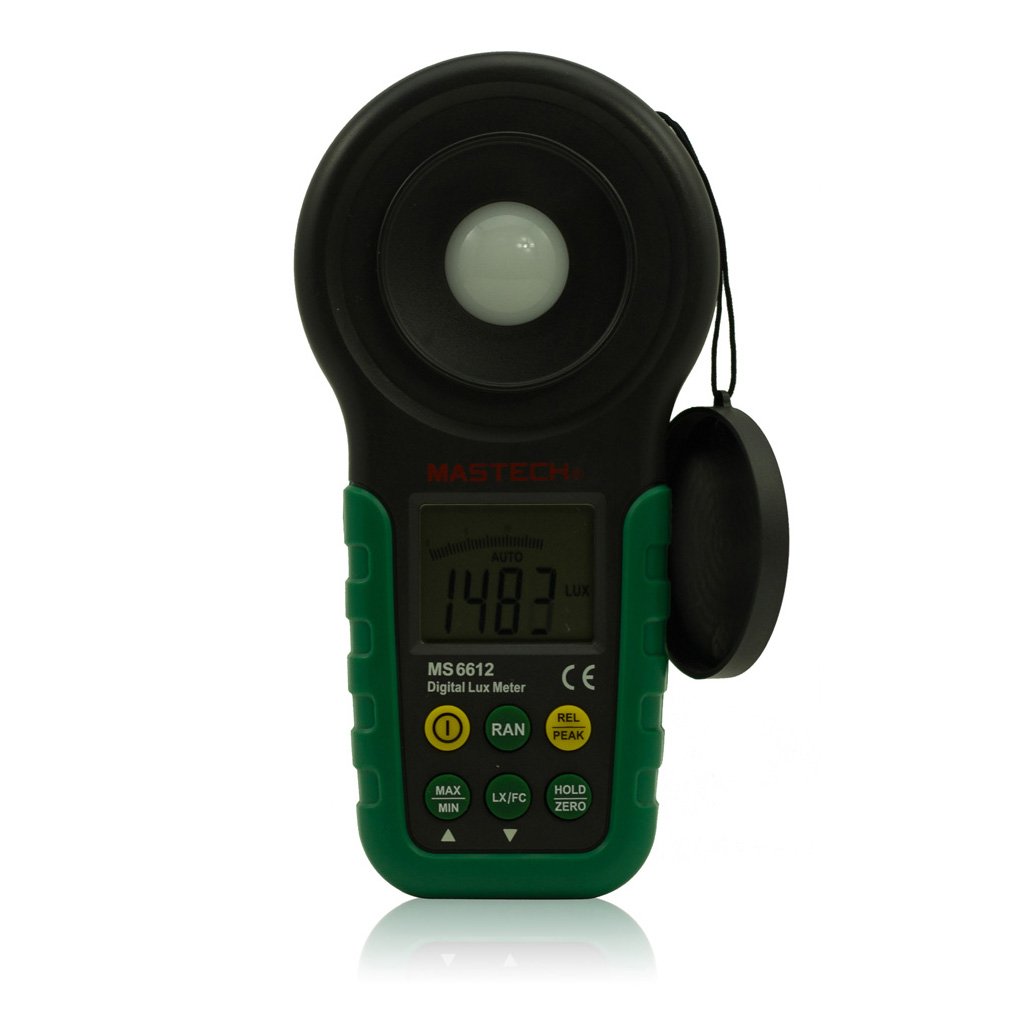
Abbildung 1: Front view of the Mastech MS6612 Digital Luxmeter. This image shows the main body of the device, including the large LCD screen, control buttons, and the light sensor located at the top.
Schlüsselkomponenten:
- LCD Anzeige: 3½ digits with analog bar display for clear readings.
- Bedientasten: For various functions such as power, range, hold, peak, relative, zero, unit conversion, and mute.
- Lichtsensor: Silicon photoelectric diode for accurate light measurement.
- Batteriefach: Located at the rear for a 9V battery.
4. Einrichtung
4.1 Einlegen der Batterie
- Suchen Sie den Batteriefachdeckel auf der Rückseite des Messgeräts.
- Verwenden Sie gegebenenfalls einen Schraubendreher, um das Batteriefach zu öffnen.
- Insert one 9V (IEC 6LR61) battery, observing the correct polarity (+/-).
- Setzen Sie den Batteriefachdeckel wieder auf und befestigen Sie ihn.
Note: A low battery indicator will appear on the display when the battery needs replacement.
5. Bedienungsanleitung
5.1 Ein-/Ausschalten
- Drücken Sie die LEISTUNG Taste, um das Messgerät einzuschalten.
- Drücken Sie die LEISTUNG button again to turn the meter off.
- The meter features an automatic power-off function, which will turn off the device if no keys are operated for more than 10 minutes.
5.2 Grundlegende Messung
- Schalten Sie das Messgerät ein.
- Point the light sensor towards the light source to be measured.
- The illuminance value will be displayed on the LCD. The meter automatically selects the appropriate range.
5.3 Range Switching (Auto/Manual)
The MS6612 supports both automatic and manual range switching.
- In auto-ranging mode, the meter automatically selects the best measurement range.
- Drücken Sie die REICHWEITE button to switch between auto and manual ranging modes. In manual mode, you can cycle through available ranges.
- If the measured value exceeds the current range in manual mode, the LCD will display "OL" (Overload).
5.4 Datenhaltefunktion
Um den aktuellen Messwert auf dem Display einzufrieren:
- Drücken Sie die HALTEN button. The "HOLD" indicator will appear on the display.
- Drücken Sie die HALTEN Drücken Sie erneut, um die Datenspeicherung aufzuheben und die Live-Messung fortzusetzen.
5.5 Maximum/Minimum Value Measurement
Zu view the maximum or minimum illuminance recorded during a measurement session:
- Drücken Sie die MAX/MIN button. The display will show the maximum recorded value.
- Drücken MAX/MIN again to cycle to the minimum recorded value.
- Drücken MAX/MIN a third time to exit this mode and return to live measurement.
5.6 Peak Value Measurement
This function captures the highest instantaneous illuminance value.
- Drücken Sie die GIPFEL button to activate peak measurement. The "PEAK" indicator will appear.
- The display will show the highest illuminance detected since activating the function.
- Drücken GIPFEL erneut, um diesen Modus zu verlassen.
5.7 Relative Wertmessung
This function allows you to set a reference point and measure the difference from that point.
- In a stable light environment, press the REL button. The current reading becomes the reference, and the display will show "0".
- Subsequent measurements will show the difference (positive or negative) from this reference value.
- Drücken REL again to exit relative measurement mode.
5.8 Zero Calibration Function
To ensure accuracy, especially in low light conditions, perform a zero calibration.
- Place the light sensor in a completely dark environment (e.g., cover it with an opaque cap).
- Drücken Sie die NULL button. The display should read "0.00".
- This calibrates the meter to account for any residual sensor output in darkness.
5.9 Unit Conversion (Fc/Lux)
The meter can display measurements in Lux or Foot-Candles (Fc).
- Drücken Sie die EINHEIT button to toggle between Lux and Fc units.
- The selected unit will be indicated on the LCD.
- Konvertierung: 1 Fc = 10.764 Lux; 1 Lux = 0.09290 Fc.
5.10 Touch Tone and Mute Function
The meter may emit a touch tone when buttons are pressed. This can be muted.
- Refer to the specific button on your device for muting the touch tone.
6. Wartung
6.1 Reinigung
- Wischen Sie die Oberfläche des Zählers ab.asing mit einem weichen, damp Tuch. Keine Scheuer- oder Lösungsmittel verwenden.
- Keep the light sensor clean and free from dust or smudges to ensure accurate readings. Use a soft, lint-free cloth.
6.2 Batteriewechsel
Replace the 9V battery when the low battery indicator appears on the display. Follow the steps in Section 4.1 for battery installation.
6.3 Speicherung
- If storing the meter for an extended period, remove the battery to prevent leakage and potential damage.
- Bewahren Sie das Messgerät an einem kühlen, trockenen Ort auf, geschützt vor direkter Sonneneinstrahlung und extremen Temperaturen.
7. Fehlerbehebung
| Problem | Mögliche Ursache | Lösung |
|---|---|---|
| Das Messgerät lässt sich nicht einschalten. | Batterie defekt oder falsch eingebaut. | Batteriepolarität prüfen, Batterie gegebenenfalls austauschen. |
| „OL“ wird auf dem Bildschirm angezeigt. | Measurement value exceeds current range (manual mode). | Switch to a higher range or enable auto-ranging. |
| Ungenaue Messwerte. | Dirty sensor, uncalibrated zero, or incorrect range. | Clean sensor, perform zero calibration, ensure correct range. |
| Anzeige für niedrigen Batteriestand. | Die Batterieladung ist niedrig. | Ersetzen Sie die 9-V-Batterie. |
8. Spezifikationen
| Parameter | Wert |
|---|---|
| Messbereiche | 20, 200, 2000, 20000, 200000 Lux 20, 200, 2000, 20000 Fc |
| Anzeige | 3½ digits, max reading of 1999, with analog bar display |
| Sensor | Silicon photoelectric diode |
| Measured Spectral Range | 320~730 nm |
| Sampling-Rate | ≥2 times/s |
| Betriebstemperatur | -10~50 °C, max 80% RH (Non-Condensed) |
| Lagertemperatur | -10~50 °C, max 80% RH (Non-Condensed, removing batteries) |
| Betriebsumgebung | Innenbereich |
| Höhe | 2000m highest |
| Stromversorgung | 1 x 9V, IEC 6LR61 battery |
| Akkulaufzeit | Ca. 200 Stunden |
| Abmessungen (HxBxT) | 190 mm x 89 mm x 42.5 mm (7.48 x 3.50 x 1.67 Zoll) |
| Gewicht (ohne Batterien) | Ca. 360 g (12.7 oz) |
| Gewicht (mit Batterien) | Ca. 420 g (14.8 oz) |
Illuminance Unit Conversion:
- 1 Foot-Candle (Fc) = 10.764 Lux
- 1 Lux = 0.09290 Foot-Candle (Fc)
9. Garantie und Support
Mastech products are designed for reliability and performance. For specific warranty information, please refer to the warranty card included with your purchase or visit the official Mastech website. For technical support or service inquiries, please contact Mastech customer service through their official channels.
Bitte bewahren Sie Ihren Kaufbeleg als Kaufnachweis für Garantieansprüche auf.