1. Einleitung
The Timex T231W2 is an AM/FM dual alarm clock radio designed for convenience and reliability. It features a large 1.2-inch green LED display for clear visibility, dual alarms that can be set independently, and a programmable sleep timer. An auxiliary input allows connection of external audio devices. A battery backup system maintains time and alarm settings during power interruptions.
2. Hauptmerkmale
- Wake to AM/FM radio or buzzer
- 20 Station preset memory (10 AM, 10 FM)
- Large, easy-to-read 1.2-inch green LED display
- Line-in jack to connect auxiliary audio sources
- 2-inch dynamic speaker for clear sound
- Programmable 90-minute Sleep Timer
- Battery backup for time and alarm settings
3. Packungsinhalt
- Timex T231W2 AM/FM Dual Alarm Clock Radio (White)
4. Bedienelemente und Anzeigen
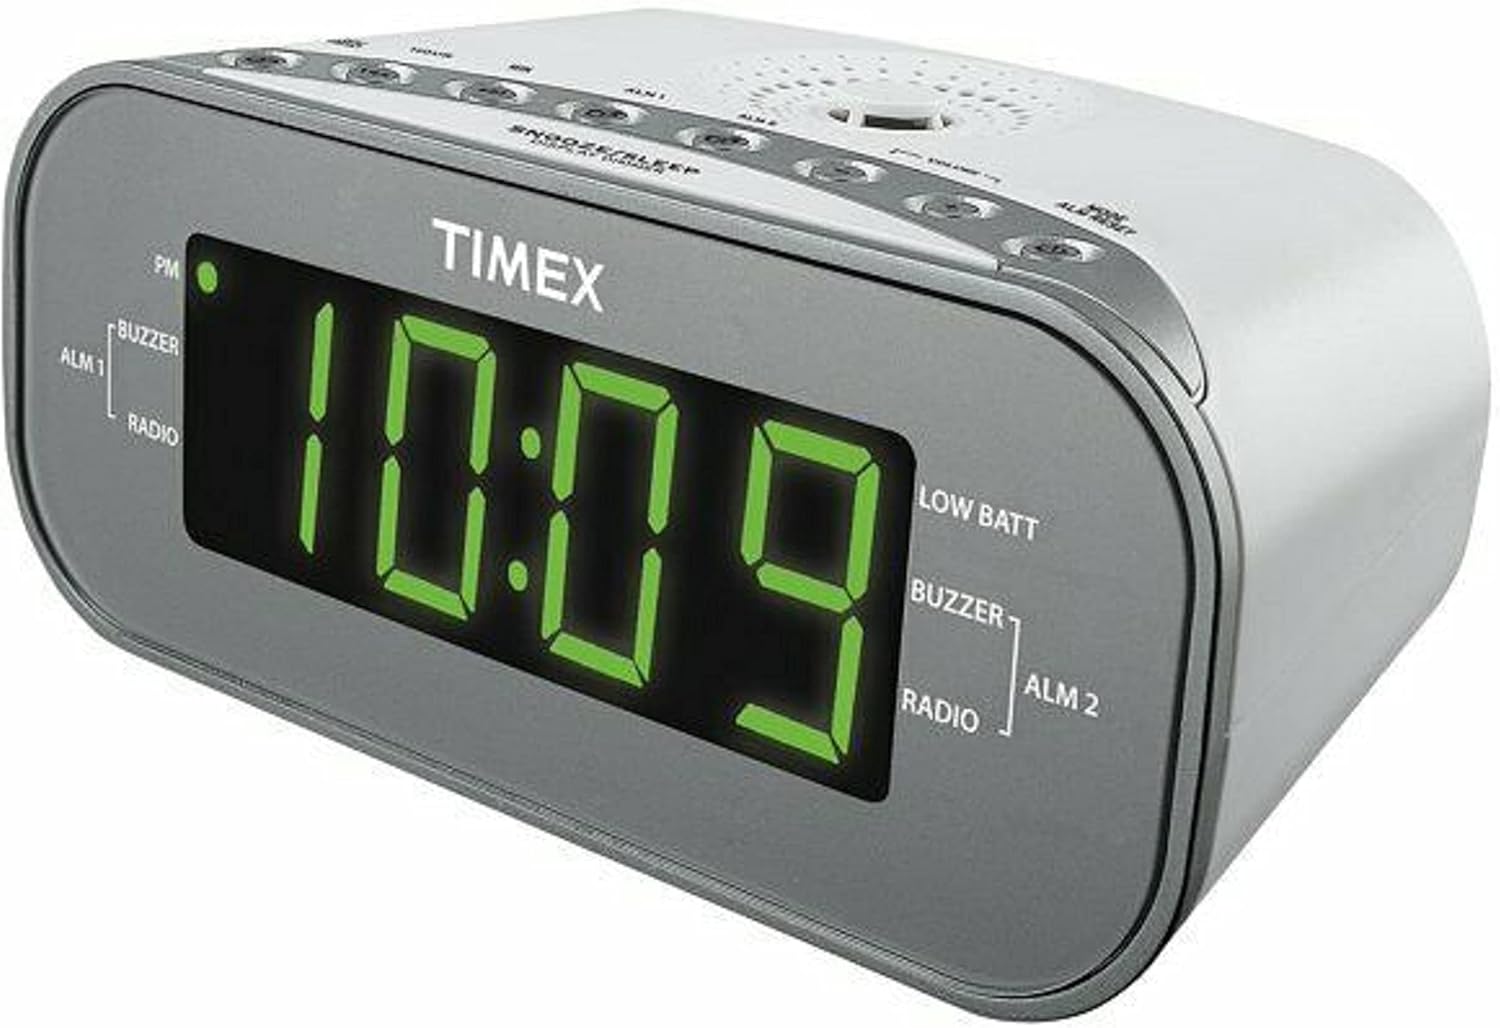
Abbildung 1: Vorderseite View of the Timex T231W2. This image displays the clock radio from a slight angle, highlighting the large green LED display showing the time '10:09'. Indicators for PM, ALM1 (Buzzer/Radio), ALM2 (Buzzer/Radio), and LOW BATT are visible on the display. The top panel shows several control buttons.

Abbildung 2: Oben View of the Timex T231W2 Controls. Dieses Bild vermittelt einen klaren Eindruck. view of the control buttons located on the top panel of the clock radio. Buttons include HOUR, MIN, ALM1, ALM2, VOLUME, MODE, ALM RESET, SNOOZE/SLEEP/DISPLAY DIMMER, PRESET, and TUNING controls.
4.1. Anzeigeanzeigen
- Zeitanzeige: Large green LED digits show current time.
- PM-Indikator: Lights up when the time is in the PM hours.
- ALM 1 / ALM 2: Indicates which alarm is active.
- BUZZER / RADIO: Indicates if the active alarm is set to buzzer or radio.
- NIEDRIGER SCHLACHT: Lights up when backup batteries are low and need replacement.
4.2. Control Buttons (Top Panel)
- HOUR / MIN: Used to set time and alarm hours/minutes.
- ALM 1 / ALM 2: Used to set and activate Alarm 1 and Alarm 2.
- LAUTSTÄRKE +/-: Adjusts the radio volume.
- MODE / ALM RESET: Switches between functions (e.g., radio, AUX) and resets active alarms.
- SNOOZE / SLEEP / DISPLAY DIMMER: Activates snooze, sets sleep timer, or adjusts display brightness.
- PRESET / TUNING: Used for saving and recalling radio presets, and manually tuning radio frequencies.
5. Einrichtung
5.1. Stromanschluss
- Stecken Sie das Netzkabel in eine Standardsteckdose.
- The display will flash, indicating the unit is powered on but the time is not yet set.
5.2. Batterie-Backup-Installation
The unit requires 2 AAA batteries (not included) for backup power. These batteries maintain time and alarm settings during a power outage.
- Öffnen Sie den Batteriefachdeckel an der Unterseite des Geräts.
- Insert 2 new AAA batteries, observing the correct polarity (+ and -) as indicated inside the compartment.
- Schließen Sie den Batteriefachdeckel fest.
- If the 'LOW BATT' indicator lights up, replace the batteries.
5.3. Einstellen der aktuellen Uhrzeit
- Halten Sie die MODUS Drücken Sie die Taste so lange, bis die Zeitanzeige zu blinken beginnt.
- Drücken Sie die STUNDE button repeatedly to set the hour. Observe the PM indicator for correct AM/PM setting.
- Drücken Sie die MIN button repeatedly to set the minutes.
- Drücken Sie die MODUS Zum Bestätigen und Verlassen des Zeiteinstellungsmodus erneut drücken.
6. Bedienungsanleitung
6.1. Radiobetrieb (AM/FM)
- Drücken Sie die MODUS button repeatedly until 'FM' or 'AM' appears on the display.
- Drücken Sie die TUNING buttons (up/down arrows) to manually tune to a desired station. Press and hold to auto-scan for the next available station.
- Stellen Sie die Lautstärke mit den BAND +/- Schaltflächen.
6.1.1. Setting and Recalling Radio Presets
The unit can store up to 20 radio stations (10 AM, 10 FM).
- Stellen Sie den gewünschten Radiosender ein.
- Halten Sie die VOREINSTELLUNG Drücken Sie die Taste so lange, bis die voreingestellte Zahl auf dem Display blinkt.
- Verwenden Sie die TUNING buttons to select the desired preset number (P01-P10 for AM/FM).
- Drücken Sie die VOREINSTELLUNG Drücken Sie erneut die Taste, um den Sender zu speichern.
- Um eine Voreinstellung aufzurufen, drücken Sie die Taste VOREINSTELLUNG Drücken Sie die Taste wiederholt, um durch die gespeicherten Sender zu blättern.
6.2. Setting and Using Alarms (Alarm 1 & Alarm 2)
Das Radiowecker verfügt über zwei unabhängige Weckfunktionen.
- Halten Sie die ALM 1 or ALM 2 Drücken Sie die Taste so lange, bis die Alarmzeit blinkt.
- Drücken Sie die STUNDE Und MIN Tasten zum Einstellen der gewünschten Weckzeit.
- Drücken Sie die ALM 1 or ALM 2 button again to select the wake source: SUMMER or RADIODie entsprechende Kontrollleuchte leuchtet auf.
- Drücken Sie die ALM 1 or ALM 2 button a third time to confirm and activate the alarm. The alarm indicator (ALM 1 or ALM 2) will remain lit.
- Um einen Alarm auszuschalten, drücken Sie die Taste ALM RESET Drücken Sie diese Taste. Der Alarm wird für den nächsten Tag zurückgesetzt.
- To deactivate an alarm completely, press the corresponding ALM 1 or ALM 2 button until its indicator light turns off.
6.3. Schlummerfunktion
Wenn ein Alarm ertönt, drücken Sie die Taste SNOOZE/SLEEP/DISPLAY DIMMER Mit dieser Taste kann der Alarm für etwa 9 Minuten stummgeschaltet werden. Nach Ablauf der Schlummerzeit ertönt der Alarm erneut.
6.4. Sleep-Timer
The sleep timer allows you to fall asleep to the radio, which will automatically turn off after a set period (up to 90 minutes).
- Während das Radio spielt, drücken Sie die Taste SNOOZE/SLEEP/DISPLAY DIMMER Durch wiederholtes Drücken der Taste können die verschiedenen Optionen des Sleep-Timers durchgeschaltet werden (z. B. 90, 60, 30, 15 Minuten, AUS).
- Das Radio spielt für die ausgewählte Dauer und schaltet sich dann automatisch aus.
6.5. Display-Dimmer
To adjust the brightness of the display, press and hold the SNOOZE/SLEEP/DISPLAY DIMMER button. The display brightness will cycle through different levels. Release the button when the desired brightness is reached.
6.6. Using the Line-in Jack (AUX)
Connect an external audio device (e.g., smartphone, MP3 player) to the unit using a 3.5mm audio cable (not included).
- Plug one end of the 3.5mm audio cable into the Line-in jack on the back of the clock radio.
- Plug the other end into the headphone jack or audio output of your external device.
- Drücken Sie die MODUS Drücken Sie die Taste wiederholt, bis „AUX“ im Display erscheint.
- Starten Sie die Wiedergabe auf Ihrem externen Gerät.
- Stellen Sie die Lautstärke mit den BAND +/- buttons on the clock radio and/or your external device.
7. Wartung
7.1. Reinigung
- Trennen Sie das Gerät vor der Reinigung vom Stromnetz.
- Verwenden Sie ein weiches, trockenes Tuch, um die Außenflächen abzuwischen.
- Do not use liquid cleaners, abrasive cleaners, or sprays, as these may damage the finish.
7.2. Allgemeine Pflege
- Vermeiden Sie es, das Gerät direkter Sonneneinstrahlung, der Nähe von Wärmequellen oder Bereichen mit hoher Luftfeuchtigkeit oder Staub auszusetzen.
- Belüftungsöffnungen nicht blockieren.
- Wenn das Gerät über einen längeren Zeitraum nicht benutzt wird, sollten die Backup-Batterien entfernt werden, um ein Auslaufen zu verhindern.
8. Fehlerbehebung
| Problem | Mögliche Ursache | Lösung |
|---|---|---|
| Gerät lässt sich nicht einschalten. | Das Netzkabel ist nicht richtig eingesteckt. | Ensure the AC power cord is firmly connected to both the unit and a working wall outlet. |
| Das Display ist dunkel oder ausgeschaltet. | Display dimmer setting is too low. | Halten Sie die SNOOZE/SLEEP/DISPLAY DIMMER Taste zum Anpassen der Helligkeit. |
| Der Alarm ertönt nicht. | Alarm nicht aktiviert oder falsch eingestellt. | Ensure the ALM 1/ALM 2 indicator is lit and the alarm time/source is correctly set. |
| Schlechter Radioempfang. | Antenna not extended or unit's position. | Extend the FM wire antenna fully. For AM, rotate the unit for best reception. Avoid placing near electronic devices that may cause interference. |
| Kein Ton vom AUX-Eingang. | Incorrect mode or volume settings. | Ensure the unit is in AUX mode. Check volume levels on both the clock radio and the external device. Verify cable connection. |
| 'LOW BATT' indicator is on. | Backup batteries are low. | Replace the 2 AAA backup batteries. |
9. Spezifikationen
| Besonderheit | Spezifikation |
|---|---|
| Marke | Timex |
| Modellnummer | T231WY2 |
| Farbe | Weiß |
| Anzeigetyp | LED (Grün) |
| Besondere Merkmale | Alarm, Auto Dimmable, Programmable Sleep Timer, Radio |
| Technische Daten | 6.9 Zoll B x 2.96 Zoll H |
| Stromquelle | AC Power, Battery Powered (Backup) |
| Pufferbatterien | 2 AAA-Batterien erforderlich (nicht im Lieferumfang enthalten) |
| Artikelgewicht | 1.4 Pfund |
| Konnektivität | Line-in Jack (AUX) |
| Radiobänder | AM/FM |
| Voreinstellungen | 20 (10 AM, 10 FM) |
10. Garantie und Support
Informationen zur Garantie und technische Unterstützung finden Sie in der Ihrer Bestellung beiliegenden Dokumentation oder wenden Sie sich direkt an den Hersteller. Bewahren Sie Ihren Kaufbeleg für Garantieansprüche auf.
11. Sicherheitshinweise
WARNUNG: Dieses Produkt kann Sie Chemikalien aussetzen, darunter Blei, das im US-Bundesstaat Kalifornien als krebserregend und als Ursache für Geburtsfehler oder andere Fortpflanzungsschäden gilt. Weitere Informationen finden Sie unter www.P65Warnings.ca.gov.
Beachten Sie beim Gebrauch elektrischer Geräte stets die grundlegenden Sicherheitsvorkehrungen, um das Risiko von Bränden, Stromschlägen und Verletzungen zu verringern.