1. Einleitung
This manual provides detailed instructions for the installation, operation, and maintenance of your ASUS X99-DELUXE motherboard. The ASUS X99-DELUXE is an ATX motherboard designed for high-performance computing, supporting Intel LGA 2011-3 processors and DDR4 memory.

Abbildung 1: Draufsicht view of the ASUS X99-DELUXE Motherboard, showing the CPU socket, RAM slots, and heatsinks.
2. Hauptmerkmale
- ASUS OC Socket: Designed to enhance 8-core CPU and DDR4 performance beyond standard X99 expectations.
- DDR4-Speicherunterstützung: Features a special memory overclocking design, supporting DDR4 memory speeds up to 3200MHz (O.C.).
- Dual M.2 X4 Support: Provides two M.2 slots with PCIe 3.0 x4 interface, enabling data transfer speeds up to 32Gb/s for compatible NVMe SSDs.
- Fan Extension Card: Includes an extension card for advanced PC cooling management.
- 5-Wege-Optimierung: Utilizes Dual Intelligent Processors 5 for system optimization, including performance tuning, power saving, digital power control, and fan control.
- UEFI-BIOS: Features a media-acclaimed Unified Extensible Firmware Interface (UEFI) BIOS for intuitive system configuration.
- SATA Express: Supports SATA Express for storage speeds up to 10Gb/s.
3. Einrichtung und Installation
Vor Beginn der Installation vergewissern Sie sich, dass Ihr System ausgeschaltet und vom Stromnetz getrennt ist. Fassen Sie das Motherboard an den Kanten an, um elektrostatische Entladungen zu vermeiden.
3.1. CPU Installation (LGA 2011-3 Socket)
- Carefully open the CPU socket retention mechanism.
- Richten Sie die dreieckige Markierung auf der CPU an der entsprechenden Markierung auf dem Sockel aus.
- Setzen Sie die CPU vorsichtig in den Sockel ein, ohne sie mit Gewalt einzusetzen.
- Close the retention mechanism to secure the CPU. Ensure no pins are bent during this process.

Abbildung 2: Schräg view of the ASUS X99-DELUXE Motherboard, highlighting the LGA 2011-3 CPU socket.
3.2. Installation des Arbeitsspeichers (DDR4)
The motherboard supports DDR4 memory modules. Refer to the motherboard manual for specific memory configurations and supported speeds.
- Öffnen Sie die Klemmen an beiden Enden des DIMM-Steckplatzes.
- Richten Sie die Kerbe am DDR4-Speichermodul an der entsprechenden Aussparung im DIMM-Steckplatz aus.
- Schieben Sie das Modul fest in den Schlitz, bis die Klammern einrasten.
3.3. Storage Device Installation (M.2, SATA)
Install M.2 SSDs into the dedicated M.2 slots and SATA drives to the SATA ports. The motherboard supports SATA 3 (6Gb/s) and SATA Express.
3.4. Peripheriegeräte anschließen
Connect your display, keyboard, mouse, and other peripherals to the rear I/O panel. The motherboard provides various USB ports, Ethernet ports, and audio jacks.
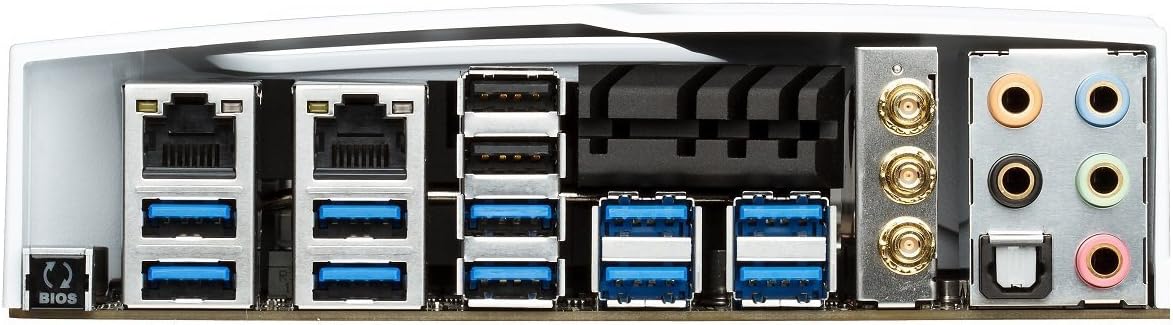
Figure 3: Rear I/O panel of the ASUS X99-DELUXE Motherboard, showing USB ports, Ethernet, and audio jacks.
4. Bedienungsanleitung
4.1. UEFI BIOS Configuration
The UEFI BIOS allows you to configure system settings, boot options, and hardware parameters. To enter the BIOS, press the DEL Taste beim Systemstart drücken.
- EZ-Modus: Provides a simplified interface for basic settings.
- Fortgeschrittener Modus: Offers comprehensive control over all motherboard features, including overclocking and fan control.
4.2. Treiberinstallation
After installing your operating system (e.g., Windows XP, as listed in specifications, and newer OS versions), install the necessary drivers for the motherboard chipset, audio, network, and other integrated components. These are typically provided on a support DVD or available for download from the ASUS webWebsite.
4.3. 5-Way Optimization
The 5-Way Optimization feature, accessible through ASUS software, automatically tunes your system for optimal performance, power efficiency, digital power delivery, and fan acoustics based on your usage. It is recommended to manage overclocking and fan settings directly within the BIOS for more precise control.
5. Wartung
Regelmäßige Wartung trägt zur Langlebigkeit und zum stabilen Betrieb Ihres Motherboards bei.
- Staubentfernung: Reinigen Sie das Motherboard und die Kühlkomponenten regelmäßig mit Druckluft von Staub. Stellen Sie sicher, dass das System vor der Reinigung ausgeschaltet und vom Stromnetz getrennt ist.
- Verbindungsprüfungen: Verify that all cables and components are securely seated.
- BIOS-Updates: Überprüfen Sie den ASUS-Support. website for the latest BIOS updates to improve compatibility and performance. Follow update instructions carefully.
6. Fehlerbehebung
If you encounter issues with your ASUS X99-DELUXE motherboard, consider the following troubleshooting steps:
- Kein Strom/Booten nicht möglich:
- Stellen Sie sicher, dass alle Stromkabel (24-Pin ATX, 8-Pin CPU) fest angeschlossen sind.
- Verify the power supply unit (PSU) is functioning correctly.
- Überprüfen Sie die Verbindung des Netzschalters an der Vorderseite mit dem Motherboard.
- Kein Bildschirm:
- Confirm the graphics card is properly seated in its PCIe slot and has adequate power.
- Stellen Sie sicher, dass das Monitorkabel fest mit der Grafikkarte verbunden ist.
- Testen Sie es nach Möglichkeit mit einem anderen Displaykabel oder Monitor.
- Systeminstabilität/Abstürze:
- Check RAM modules for proper seating; try reseating them or testing one module at a time.
- Ensure CPU cooler is correctly installed and making good contact with the CPU. Monitor CPU temperatures.
- BIOS-Einstellungen auf Standardwerte zurücksetzen.
- Bent CPU Socket Pins:
Bent pins in the CPU socket can cause severe system malfunctions or prevent booting. This type of damage is typically not covered under warranty. Exercise extreme caution during CPU installation to avoid bending pins.
7. Spezifikationen
| Kategorie | Spezifikation |
|---|---|
| Marke | ASUS |
| Modellname | X99-DELUXE |
| CPU-Sockel | LGA 2011-3 |
| Kompatible Prozessoren | Intel Core i7 (LGA 2011-3) |
| Chipsatztyp | Intel X99 |
| RAM-Speichertechnologie | DDR4 |
| Speichertaktfrequenz | Bis zu 3200 MHz (OC) |
| Verfügbare Speichersteckplätze | 8 |
| Maximale Größe des RAM-Speichers | 64 GB |
| Grafikkartenschnittstelle | PCI Express |
| Total PCIe Ports | 5 |
| Total SATA Ports | 8 |
| Unterstützter Systembusstandard | SATA 3 |
| USB 2.0-Anschlüsse | 2 (internal headers, total ports may vary) |
| Anzahl USB-Anschlüsse | Various (including USB 3.0 on rear I/O) |
| Anzahl der Ethernet-Ports | 1 (Dual Gigabit LAN) |
| Hauptstromanschlusstyp | 24-Pin ATX |
| Kompatible Geräte | Personalcomputer |
| Plattform | Windows XP (and newer OS versions) |
| Artikelgewicht | 4.44 Pfund (ca. 2.01 kg) |
8. Garantie und Support
Informationen zur Garantie und zum technischen Support finden Sie auf der offiziellen ASUS-Website. webBesuchen Sie die Website oder kontaktieren Sie den ASUS-Kundendienst. Bewahren Sie Ihren Kaufbeleg für Garantieansprüche auf.
ASUS-Kundendienst WebWebsite: https://www.asus.com/support/
Note: Damage resulting from improper installation, misuse, or unauthorized modifications may void your product warranty.