Einführung
Thank you for choosing the Magnasonic EAAC470 Alarm Clock Radio. This manual provides essential instructions for setting up, operating, and maintaining your device. Please read it thoroughly to ensure proper use and to maximize the features of your alarm clock radio.
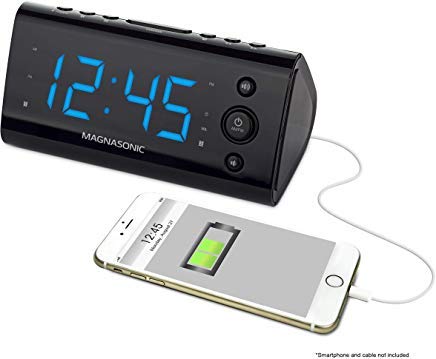
Abbildung 1: Vorderseite view of the Magnasonic EAAC470 Alarm Clock Radio.
Packungsinhalt
- Magnasonic EAAC470 Alarm Clock Radio
- Netzteil
- Benutzerhandbuch (dieses Dokument)
- CR2032 Lithium Battery (for backup)
Aufstellen
1. Stromanschluss
- Connect the power adapter to the DC input jack on the back of the alarm clock.
- Stecken Sie den Netzadapter in eine normale Steckdose. Das Display leuchtet auf.
2. Batterie-Backup-Installation
The EAAC470 includes a CR2032 lithium battery for backup power. This ensures that time and alarm settings are maintained during a power outage, und der Alarm ertönt trotzdem.
- Suchen Sie das Batteriefach an der Unterseite des Geräts.
- Öffnen Sie die Abdeckung des Batteriefachs.
- Insert one CR2032 lithium battery, observing the correct polarity (+/-).
- Schließen Sie den Batteriefachdeckel fest.
3. Automatic Time Setting (SelfSet Technology)
The alarm clock is equipped with SelfSet technology, which automatically displays the correct time upon initial power-up. You only need to set your time zone.
- Upon first power-up, the clock will display a default time.
- Drücken Sie die ZEITZONE button (location may vary, refer to device buttons).
- Verwenden Sie die STUNDE or MINUTE buttons to select your correct time zone.
- The clock will automatically adjust to the correct time for your selected zone.
- Notiz: If the time is incorrect after setting the time zone, manual adjustment may be required.
4. Manual Time and Date Adjustment
If the automatic time setting is inaccurate or if you need to adjust the time manually:
- Halten Sie die ZEITEINSTELLUNG Drücken Sie die Taste, bis das Display blinkt.
- Verwenden Sie die STUNDE Und MINUTE Tasten, um die aktuelle Uhrzeit einzustellen.
- Drücken ZEITEINSTELLUNG erneut, um die Uhrzeit zu bestätigen.
- Follow similar steps to adjust the year, month, and day if necessary, using the appropriate buttons.
5. FM Antenna Setup
For optimal FM radio reception, fully extend the wire antenna located on the back of the unit. Position it for the best signal.
Bedienungsanleitung
1. Einstellen von Alarmen (Alarm 1 & Alarm 2)
The EAAC470 features dual alarms that can be set independently.
- Drücken und halten Sie entweder ALARM 1 or ALARM 2 Drücken Sie die Taste so lange, bis die Alarmzeit blinkt.
- Verwenden Sie die STUNDE Und MINUTE Tasten zum Einstellen der gewünschten Weckzeit.
- Drücken Sie die jeweilige Taste ALARM button again to select the alarm source (Buzzer or Radio).
- Drücken Sie die ALARM button a third time to select the alarm schedule (Every Day, Weekdays, Weekends).
- Drücken Sie die ALARM button a fourth time to confirm and activate the alarm. An alarm indicator will appear on the display.
- To disable an alarm, repeatedly press its ALARM button until the alarm indicator disappears.
2. Radiobetrieb (AM/FM)
The clock radio includes a digital AM/FM tuner with station presets.
- Drücken Sie die RADIO EIN/AUS Taste, um das Radio einzuschalten.
- Drücken Sie die AM/FM Taste zum Umschalten zwischen den Bändern.
- Verwenden Sie die TUNE +/- Tasten zum manuellen Einstellen eines Senders oder zum automatischen Suchen nach dem nächsten verfügbaren Sender durch Gedrückthalten der Tasten.
- So speichern Sie eine Vorgabe:
- Stellen Sie den gewünschten Sender ein.
- Halten Sie die VOREINSTELLUNG Drücken Sie die Taste so lange, bis die voreingestellte Zahl blinkt.
- Verwenden Sie die VOREINSTELLUNG +/- Tasten zur Auswahl einer voreingestellten Zahl (1-20).
- Drücken VOREINSTELLUNG erneut, um den Bahnhof zu retten.
- Um eine Voreinstellung aufzurufen: Drücken Sie kurz die Taste VOREINSTELLUNG drücken und verwenden VOREINSTELLUNG +/- durch die gespeicherten Stationen blättern.
- Stellen Sie die Lautstärke mit ein BAND +/- Schaltflächen.
Note on Radio Quality: The built-in speaker is designed for alarm clock functionality. Sound quality may not match dedicated audio systems. AM reception can be directional; adjust the unit's position for better clarity.
3. USB-Ladeanschluss
A convenient USB charging port is located on the front of the unit.

Abbildung 2: Vorderseite view highlighting the USB charging port.
Plug your smartphone, tablet, or other USB-powered device into this port to charge. This port provides power for charging and does not transfer data.
4. Display Dimming Options
The 1.2" LED display offers four brightness settings (High, Medium, Low, Off).

Figure 3: Close-up of the LED display.
Drücken Sie die DIMMER button (often integrated with the SNOOZE button) repeatedly to cycle through the brightness levels: High → Medium → Low → Off.
Note on Brightness: Even the lowest setting may appear bright in a completely dark room. The "Off" setting allows for a completely dark display if preferred.
5. Snooze and Sleep Functions
- Schlummern: Wenn ein Alarm ertönt, drücken Sie die Taste SCHLAFEN button to temporarily silence the alarm for a set period (e.g., 9 minutes). The alarm will sound again after the snooze period.
- Schlaf-Timer: Während das Radio spielt, drücken Sie die Taste SCHLAFEN button repeatedly to set a sleep timer (e.g., 90, 60, 30, 15 minutes). The radio will play for the selected duration and then automatically turn off.
6. Temperaturanzeige
The unit can display the indoor temperature. Press the TEMP button (or a multi-function button) to cycle between time and temperature display.
Wartung
Reinigung
- Vor der Reinigung den Netzadapter abziehen.
- Wischen Sie die Außenseite des Geräts mit einem weichen, trockenen Tuch ab.
- Verwenden Sie keine Scheuermittel, Wachse oder Lösungsmittel, da diese die Oberfläche beschädigen können.
- Vermeiden Sie, dass Feuchtigkeit in die Öffnungen eindringt.
Batteriewechsel
The CR2032 backup battery typically lasts for several years. If the time or settings are lost during a power outage, it may be time to replace the battery.
- Trennen Sie das Netzteil.
- Öffnen Sie das Batteriefach an der Unterseite des Geräts.
- Entfernen Sie die alte CR2032-Batterie.
- Setzen Sie eine neue CR2032-Lithiumbatterie ein und achten Sie dabei auf die richtige Polarität.
- Schließen Sie das Batteriefach.
- Reconnect power. You may need to reset the time zone and any manual time adjustments.
Fehlerbehebung
| Problem | Mögliche Ursache/Lösung |
|---|---|
| Clock display is blank or not working. |
|
| Der Alarm ertönt nicht. |
|
| Radio reception is poor or static. |
|
| Das Laden über USB funktioniert nicht. |
|
| Time is incorrect after power-up. |
|
| Display is too bright even on the lowest setting. |
|
Technische Daten
| Besonderheit | Detail |
|---|---|
| Marke | Magnasonic |
| Modellnummer | EAAC470 |
| Anzeigetyp | Digital LED (1.2") |
| Display-Dimmung | 4 Options (High, Medium, Low, Off) |
| Stromquelle | Netzteil |
| Batterie-Backup | 1 x CR2032 Lithiumbatterie (im Lieferumfang enthalten) |
| Konnektivität | USB (nur zum Laden) |
| Radio-Tuner | Digital AM/FM (20 programmable stations) |
| Alarm | Dual Alarm with selectable source (Buzzer/Radio) and schedule |
| Besondere Merkmale | Auto Time Set (SelfSet), Indoor Temperature Display |
| Technische Daten | 6 x 3.1 x 3 Zoll |
| Artikelgewicht | 12 Unzen (0.75 Pfund) |
| Material | Acrylnitril-Butadien-Styrol |
Garantieinformationen
The Magnasonic EAAC470 Alarm Clock Radio is covered by a 1 Year Manufacturer's Direct Warranty. This warranty covers defects in materials and workmanship under normal use. Please retain your proof of purchase for warranty claims. For specific terms and conditions, refer to the warranty card included with your product or visit the Magnasonic official webWebsite.
Unterstützung
For further assistance, technical support, or warranty inquiries, please contact Magnasonic customer service. Contact information can typically be found on the manufacturer's webauf der Website oder auf der Produktverpackung.
WebWebsite: www.magnasonic.com (Hinweis: Dies ist ein Platzhalter. URL, please refer to official product documentation for the correct support webWebsite.)