
1. Einleitung
Vielen Dank für Ihren Einkauf.asing the Mastech MS8230B Digital Multimeter. This device is a compact, battery-operated, handheld digital multimeter designed for measuring DC and AC voltage, DC current, resistance, diode, and transistor (hFE) tests. It features a large LCD display for easy reading and is built to international safety standards.
Please read this instruction manual thoroughly before using the multimeter to ensure safe and proper operation. Keep this manual for future reference.
2. Sicherheitshinweise
This multimeter is designed according to IEC 1010-1 international safety standards for electronic measuring instruments. It complies with CAT III 600V and CAT II 1000V overvoltage categories. Always adhere to the following safety precautions:
- Never exceed the maximum input limits for any function.
- Do not use the meter if the case is damaged or open.
- Vergewissern Sie sich, dass die Messleitungen in gutem Zustand sind und keine beschädigte Isolierung aufweisen.
- Schalten Sie die Stromzufuhr zum Stromkreis immer ab und entladen Sie alle Hochspannungsgeräte.tage capacitors before measuring resistance, diodes, or hFE.
- Seien Sie äußerst vorsichtig, wenn Sie mit vol arbeitentagEs darf nicht über 60 V DC oder 30 V AC RMS betrieben werden, da hiervon Stromschlaggefahr ausgeht.
- Vor dem Ändern von Funktionen oder Messbereichen müssen die Messleitungen aus dem Stromkreis entfernt werden.
- Tauschen Sie die Batterie sofort aus, sobald die Anzeige für niedrigen Batteriestand erscheint, um genaue Messwerte zu gewährleisten.
- Das Messgerät darf nicht in explosionsgefährdeten Bereichen mit Gasen, Dämpfen oder Stäuben betrieben werden.
3. Packungsinhalt
Prüfen Sie, ob alle unten aufgeführten Teile vorhanden und unbeschädigt sind:
- Mastech MS8230B Digital Multimeter
- Testleitungen (ein Paar)
- 9V-Batterie (vorinstalliert oder separat enthalten)
- Bedienungsanleitung
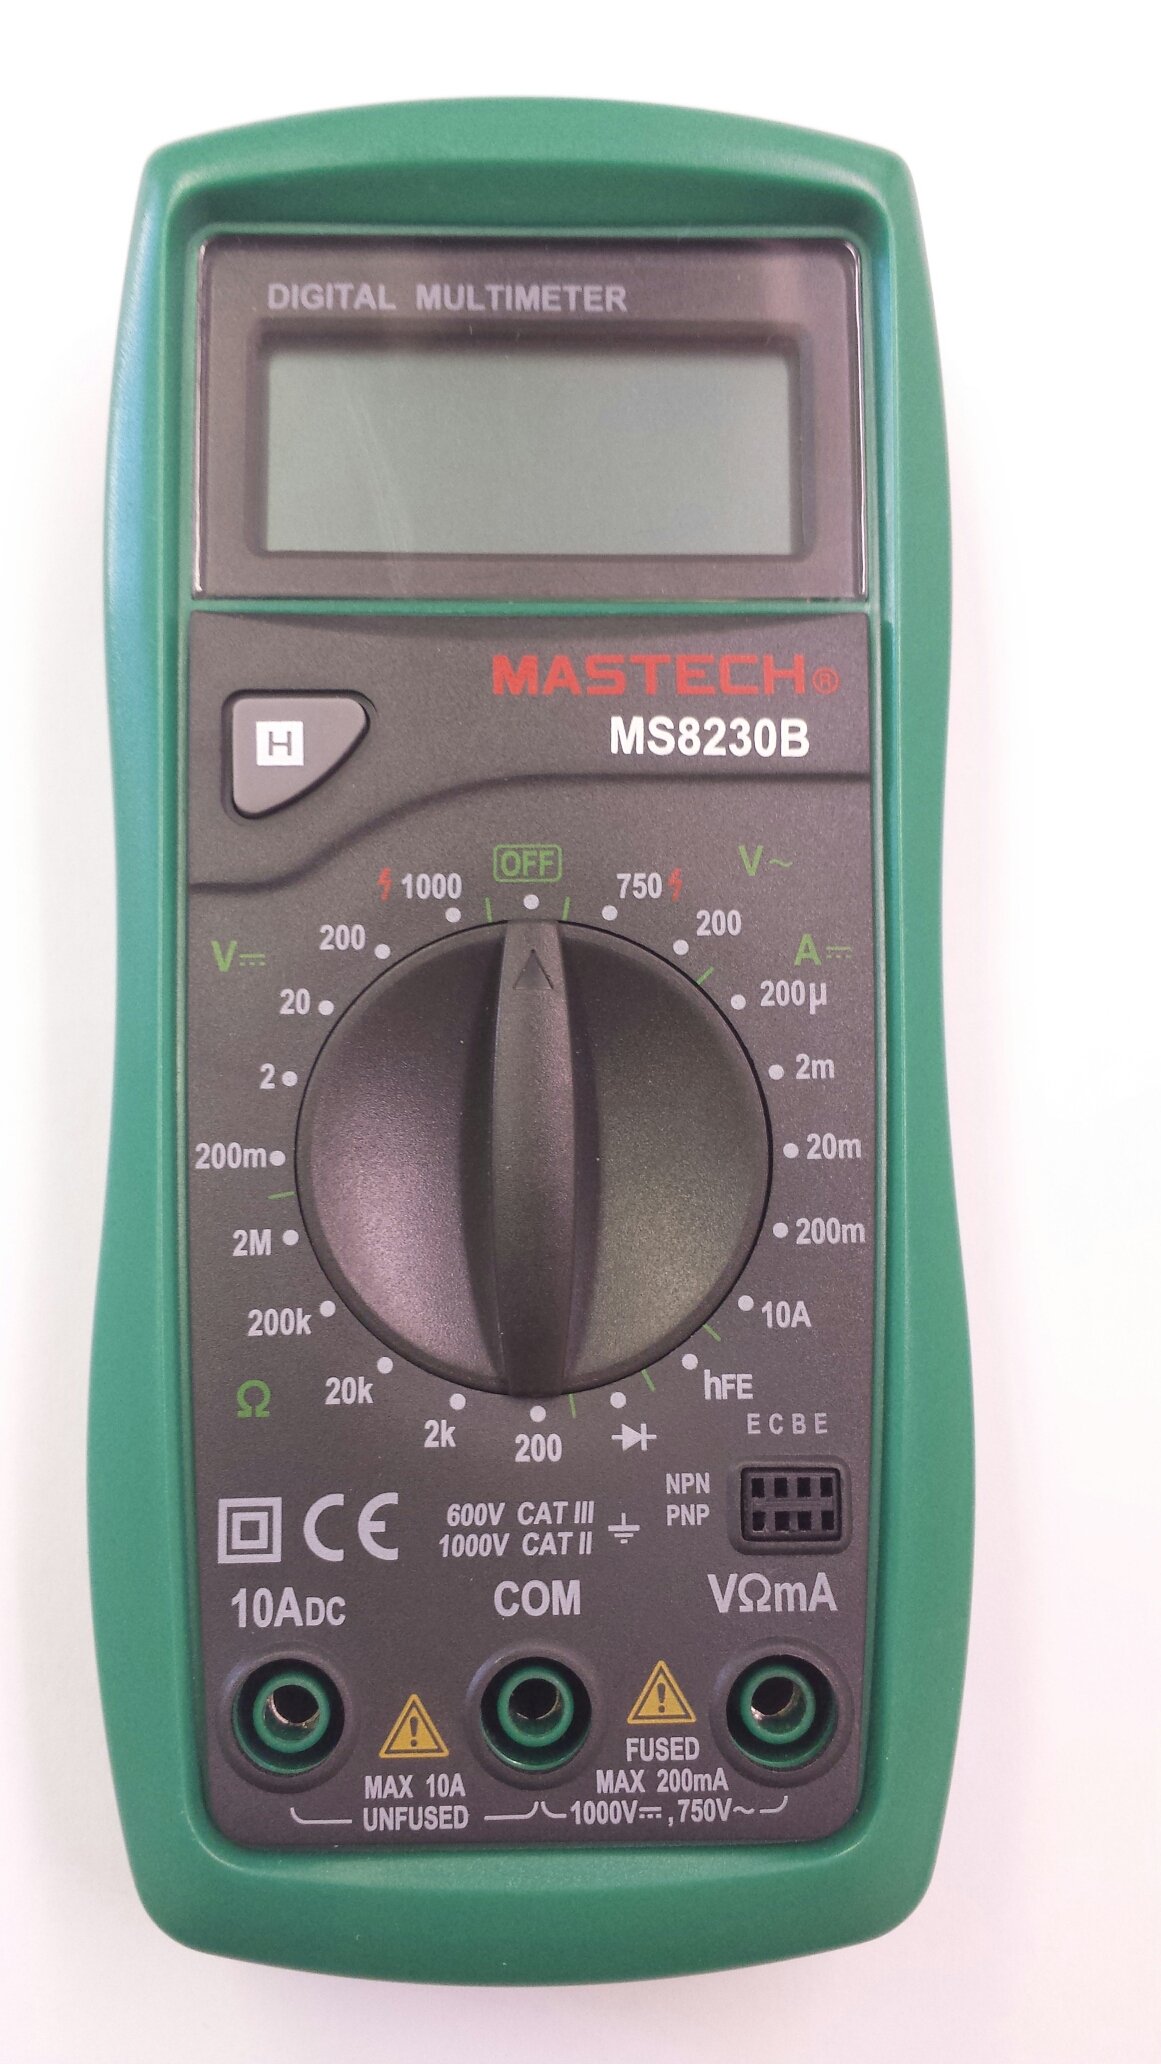
Image 1: Contents of the Mastech MS8230B package, including the multimeter, test leads, batteries, and user manual.
4. Einrichtung
4.1 Einlegen der Batterie
The MS8230B multimeter requires one 9V battery for operation. If the battery is not pre-installed or needs replacement:
- Stellen Sie sicher, dass das Multimeter ausgeschaltet ist und trennen Sie alle Messleitungen.
- Suchen Sie die Abdeckung des Batteriefachs auf der Rückseite des Geräts.
- Loosen the screw(s) on the battery cover and remove the cover.
- Schließen Sie die 9V-Batterie unter Beachtung der richtigen Polarität an den Batterieanschluss an.
- Setzen Sie die Batterie in das Batteriefach ein und bringen Sie den Deckel wieder an. Befestigen Sie ihn anschließend mit der/den Schraube(n).
4.2 Anschließen der Testleitungen
Always connect the test leads correctly for the desired measurement:
- Stecken Sie die rote Messleitung in die „VΩmA“-Buchse für die Lautstärke.tage, Widerstand und Messungen bei niedrigen Strömen.
- Insert the red test lead into the "10ADC" jack for high DC current measurements (up to 10A).
- Always insert the black test lead into the "COM" (common) jack.
5. Bedienungsanleitung
Before taking any measurement, ensure the test leads are correctly connected and the function switch is set to the appropriate range.
5.1 DC-Voltage-Messung (DCV)
- Verbinden Sie die rote Messleitung mit der Buchse „VΩmA“ und die schwarze Messleitung mit der Buchse „COM“.
- Set the rotary switch to the desired DCV range (e.g., 200mV, 2V, 20V, 200V, 1000V). If the voltagDa e unbekannt ist, beginnen Sie mit dem höchsten Bereich und verringern Sie ihn nach Bedarf.
- Schließen Sie die Messleitungen an das zu messende Bauteil oder den zu messenden Stromkreis an.
- Lesen Sie den Bandtage value on the LCD display. Observe the polarity indication.
5.2 AC-Voltage-Messung (ACV)
- Verbinden Sie die rote Messleitung mit der Buchse „VΩmA“ und die schwarze Messleitung mit der Buchse „COM“.
- Set the rotary switch to the desired ACV range (e.g., 200V, 750V). Start with the highest range if the voltage ist unbekannt.
- Schließen Sie die Messleitungen an das zu messende Bauteil oder den zu messenden Stromkreis an.
- Lesen Sie den Bandtage-Wert auf dem LCD-Display.
5.3 Gleichstrommessung (DCA)
Vorsicht: Never attempt to measure current on a circuit with voltage present by connecting the meter in parallel. Always connect the meter in series with the load.
- Determine the expected current. For currents up to 200mA, connect the red lead to "VΩmA". For currents up to 10A, connect the red lead to "10ADC". The black lead always goes to "COM".
- Set the rotary switch to the appropriate DCA range (e.g., 200µA, 2mA, 20mA, 200mA, 10A).
- Turn off the power to the circuit. Open the circuit where the current is to be measured.
- Schließen Sie das Multimeter in Reihe mit dem Stromkreis an.
- Schalten Sie die Stromversorgung ein und lesen Sie den Stromwert auf dem LCD-Display ab.
5.4 Widerstandsmessung
Vorsicht: Ensure the circuit under test is completely de-energized and all capacitors are discharged before measuring resistance.
- Verbinden Sie die rote Messleitung mit der Buchse „VΩmA“ und die schwarze Messleitung mit der Buchse „COM“.
- Set the rotary switch to the desired Resistance (Ω) range (e.g., 200Ω, 2kΩ, 20kΩ, 200kΩ, 2MΩ).
- Schließen Sie die Messleitungen an das zu messende Bauteil an.
- Lesen Sie den Widerstandswert auf dem LCD-Display ab.
5.5 Diodentest
Vorsicht: Ensure the circuit under test is completely de-energized and all capacitors are discharged before performing a diode test.
- Verbinden Sie die rote Messleitung mit der Buchse „VΩmA“ und die schwarze Messleitung mit der Buchse „COM“.
- Set the rotary switch to the Diode symbol (→|).
- Schließen Sie die rote Messleitung an die Anode und die schwarze Messleitung an die Kathode der Diode an. Das Display zeigt die Durchlassspannung an.tage-Spannungsabfall (typischerweise 0.5 V bis 0.8 V für Siliziumdioden).
- Reverse the test leads. The display should show "OL" (Open Loop) for a good diode. A reading in both directions or "0" indicates a shorted diode.
5.6 Transistor-hFE-Test
Vorsicht: Ensure the transistor is not connected to a live circuit.
- Stellen Sie den Drehschalter auf die Position "hFE".
- Ermitteln Sie, ob es sich um einen NPN- oder einen PNP-Transistor handelt.
- Insert the transistor's emitter, base, and collector leads into the corresponding holes in the hFE socket on the multimeter.
- Read the hFE (DC current gain) value on the LCD display.
5.7 Datenhaltefunktion
Press the "H" button to hold the current reading on the display. Press it again to release the hold function and resume live readings.
6. Wartung
6.1 Reinigung
Löschen Sie den Fall mit Anzeigeamp Mit einem Tuch und mildem Reinigungsmittel reinigen. Keine Scheuermittel oder Lösungsmittel verwenden. Wagenheber staub- und schmutzfrei halten.
6.2 Batteriewechsel
When the battery symbol appears on the LCD, the 9V battery needs to be replaced. Refer to section 4.1 for battery installation instructions.
6.3 Sicherungswechsel
The multimeter is protected by a fuse. If the current measurement function stops working, the fuse may need replacement. This should only be performed by qualified personnel. The fuse specifications are typically printed near the fuse holder or in the specifications section.
7. Fehlerbehebung
Falls das Multimeter nicht ordnungsgemäß funktioniert, überprüfen Sie Folgendes:
- Keine oder nur schwache Anzeige: Überprüfen Sie die Batterie. Tauschen Sie sie gegebenenfalls aus.
- Falsche Messwerte: Ensure the test leads are properly connected, the function switch is on the correct range, and the battery is not low.
- Anzeige: „OL“ (Überlastung): Der Messwert überschreitet den gewählten Messbereich. Wählen Sie einen höheren Messbereich.
- Strommessung funktioniert nicht: Überprüfen Sie die Sicherung.
Wenn die Probleme weiterhin bestehen, wenden Sie sich an den Kundendienst.
8. Spezifikationen
The Mastech MS8230B Digital Multimeter offers the following technical specifications:

Image 2: Detailed specifications for the Mastech MS8230B Multimeter, including display, range, and accuracy.
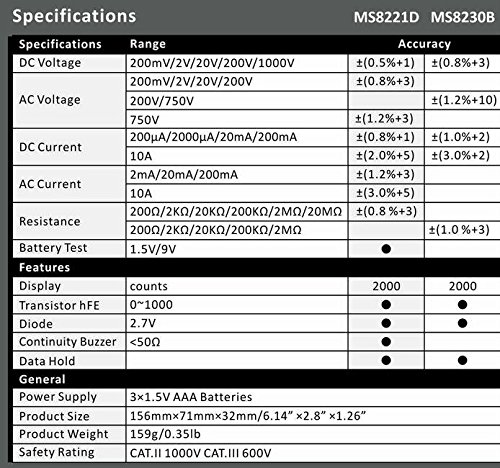
Image 3: Comparison table of specifications for Mastech MS8230B and MS8221D multimeters.
| Spezifikation | Wert |
|---|---|
| Anzeige | 1999 counts, 15mm digit height |
| DC-Voltage (DCV) | 200mV, 2V, 20V, 200V, 1000V (Accuracy: 0.5% to 0.8%) |
| AC-Lautstärketage (ACV) | 200V, 750V (Accuracy: 1.2%) |
| Gleichstrom (DCA) | 200µA, 2mA, 20mA, 200mA, 10A (Accuracy: 1.0% to 2.0%) |
| Widerstand (Ω) | 200Ω, 2kΩ, 20kΩ, 200kΩ, 2MΩ (Accuracy: 0.8% to 1.0%) |
| Diodentest | Vorwärts-Voltagich lasse fallen |
| Transistor-hFE-Test | 1 bis 1000 |
| Daten halten | Ja |
| Anzeige für niedrigen Batteriestand | Ja |
| Überlastschutz | Ja |
| Stromquelle | 1 x 9 V Batterie |
| Abmessungen (L x B x H) | 15.2 x 7.6 x 2.5 cm (ca. 6 x 3 x 1 Zoll) |
| Gewicht | Ca. 158.76 g (5.6 Unzen) |
| Sicherheitsbewertung | IEC 1010-1 CAT III 600V, CAT II 1000V |
| Betriebstemperatur | 0 °C bis 40 °C (32 °F bis 104 °F) |
| Lagertemperatur | -10 °C bis 50 °C (14 °F bis 122 °F) |
9. Garantie und Support
Mastech products are designed for reliability and performance. For specific warranty details, please refer to the warranty card included with your product or contact your local Mastech distributor.
For technical support or service inquiries, please contact Mastech customer service through their official webWebsite oder die Kontaktinformationen, die Sie mit Ihren Kaufunterlagen erhalten haben.