
1. Einleitung
This manual provides essential information for the safe and efficient operation of your COTEK SP-1000-112 Pure Sine Wave Inverter. Please read all instructions carefully before installation and use. The SP-1000-112 is designed to convert 12VDC battery power into 120VAC pure sine wave electricity, suitable for sensitive electronics and various AC appliances.
Hauptmerkmale:
- Pure sine wave output for clean, stable power.
- Ein-/Ausschaltfunktion per Fernbedienung (grüner Anschluss).
- Input & output are fully isolated for enhanced safety.
- Temperatur- und lastgesteuerter Lüfter für optimale Leistung.
- Benutzerfreundliche Schnittstelle.
- Typ 1 Aluminium-Innengehäuse.

Abbildung 1: COTEK SP-1000-112 Pure Sine Wave Inverter, front-side view. This image shows the overall design of the COTEK SP-1000-112 Pure Sine Wave Inverter, highlighting its compact form factor and blue casing.
2. Sicherheitshinweise
Always observe the following safety precautions to prevent injury and damage to the inverter or connected equipment.
- Elektrische Gefahr: Hohe Lautstärketage is present inside the inverter when connected to a battery. Do not open the inverter casing.
- Richtige Belüftung: Sorgen Sie für ausreichende Belüftung um den Wechselrichter herum, um eine Überhitzung zu vermeiden. Blockieren Sie die Belüftungsöffnungen nicht.
- Trockener Standort: Install the inverter in a dry environment, away from water, moisture, and corrosive substances.
- Batteriesicherheit: Work in a well-ventilated area when connecting batteries. Batteries can produce explosive gases. Wear appropriate personal protective equipment.
- Erdung: Der Wechselrichter muss ordnungsgemäß geerdet sein. Beachten Sie alle lokalen und nationalen Elektrovorschriften.
- Tragfähigkeit: Do not exceed the inverter's rated output power. Overloading can cause damage and fire hazards.
- Warnung gemäß California Proposition 65: Dieses Produkt kann Stoffe enthalten, die gemäß der kalifornischen Proposition 65 als bedenklich gelten.

Abbildung 2: Safety equipment for electrical work. Image depicting essential safety gear such as a hard hat, safety glasses, and work gloves, emphasizing the importance of personal protective equipment during installation and maintenance.
3. Einrichtung und Installation
Follow these steps for proper installation of your SP-1000-112 inverter.
3.1 Wechselrichter montieren
- Choose a secure, dry, and well-ventilated location.
- Ensure sufficient clearance around the inverter for airflow, especially around the cooling fan vents.
- Mount the inverter horizontally on a stable surface using appropriate fasteners.
3.2 DC-Eingangsanschluss
Schließen Sie den Wechselrichter direkt an eine 12-V-Gleichstrom-Batteriebank an. Verwenden Sie Kabel mit ausreichendem Querschnitt, um Spannungsspitzen zu minimieren.tage drop und einen sicheren Betrieb gewährleisten.
- Stellen Sie sicher, dass sich der Netzschalter des Wechselrichters in der Position AUS befindet.
- Verbinden Sie das positive (+) Gleichstromkabel von der Batterie mit dem positiven (+) Anschluss des Wechselrichters.
- Verbinden Sie das negative (-) Gleichstromkabel der Batterie mit dem negativen (-) Anschluss des Wechselrichters.
- Sichern Sie alle Verbindungen fest.

Abbildung 3: Rear panel of COTEK SP-1000-112 Inverter. The rear panel includes the DC input terminals for battery connection, a ground lug, and a green terminal block for remote control and monitoring connections.
3.3 AC-Ausgangsanschluss
The inverter features two GFCI 120VAC outlets for connecting your AC appliances.
- Ensure the inverter is powered off before connecting any AC loads.
- Plug your AC appliances directly into the GFCI outlets on the front panel.
- Die Dauerleistungsaufnahme des Wechselrichters von 1000 W darf nicht überschritten werden.

Abbildung 4: Front panel of COTEK SP-1000-112 Inverter. The front panel features two GFCI 120VAC outlets, a power ON/OFF switch, and LED indicators for operational status and fault conditions. DIP switches for configuration are also visible.
3.4 Anschluss einer Fernbedienung (optional)
The inverter supports an optional remote control via the green terminal block on the rear panel. Refer to the remote control's specific instructions for wiring details.
4. Bedienungsanleitung
4.1 Ein-/Ausschalten
- After all connections are secure, switch the inverter's power switch to the ON position.
- The LED indicators will illuminate to show operational status.
- To power off, switch the power switch to the OFF position.
4.2 Energiesparmodus
The SP-1000-112 features an adjustable power saving mode, which can be configured via DIP switches. This mode reduces power consumption when no load or a very light load is detected, helping to conserve battery energy.

Abbildung 5: Light bulb illustrating power saving mode. A light bulb glowing, symbolizing the inverter's power saving mode feature which optimizes energy consumption for lighter loads.
4.3 GFCI-Steckdosen
The integrated Ground Fault Circuit Interrupter (GFCI) outlets provide protection against electrical shock. If a ground fault is detected, the GFCI will trip, cutting power to the outlets. To reset, press the 'RESET' button on the outlet.

Abbildung 6: RV park at night, powered by inverter. An image of an RV park illuminated at night, demonstrating a typical application where the inverter provides reliable power for various appliances.
5. Wartung
Regelmäßige Wartung gewährleistet die Langlebigkeit und den zuverlässigen Betrieb Ihres Wechselrichters.
- Reinigung: Reinigen Sie die Außenseite des Wechselrichters regelmäßig mit einem trockenen Tuch. Achten Sie darauf, dass die Lüftungsöffnungen frei von Staub und Schmutz sind. Verwenden Sie keine flüssigen Reinigungsmittel.
- Verbindungen: Annually inspect all DC and AC connections for tightness and corrosion. Loose connections can cause overheating and poor performance.
- Lüfterbetrieb: The cooling fan is temperature and load controlled. Ensure it operates freely when needed. If the fan becomes excessively noisy or stops working, contact support.
6. Fehlerbehebung
In diesem Abschnitt werden häufig auftretende Probleme behandelt, die bei Ihrem Wechselrichter auftreten können.
6.1 LED-Anzeigen
The inverter features LED indicators to communicate its status:
- Grüne LED: Normalbetrieb.
- Gelbe/orange LED: Warnzustand (z. B. niedriger Batteriestand)tage, hohe Temperatur).
- Rote LED: Fault condition (e.g., overload, short circuit, over temperature, input over/under voltage). The inverter will typically shut down in this state.
6.2 Häufige Probleme und Lösungen
- Kein Wechselstromausgang:
- Prüfen Sie, ob der Wechselrichter eingeschaltet ist.
- Verify DC input connections are secure and battery voltage liegt innerhalb des Betriebsbereichs.
- Check if the GFCI outlets have tripped. Press the 'RESET' button.
- Look for fault indicators (Red LED).
- Wechselrichter schaltet sich ab:
- Überlast: Reduce the connected AC load. The inverter has overload protection.
- Niedrige Batterielautstärketage: Recharge or replace the battery. The inverter will shut down to protect the battery from deep discharge.
- Übertemperatur: Ensure adequate ventilation. Allow the inverter to cool down. The fan should be operating.
- Input Over/Under Voltage: Überprüfen Sie das Batterievolumentage is stable and within the specified input range (10.5-16.5VDC for 12V models).
- GFCI Trips Frequently:
- This can indicate a ground fault in the connected appliance or wiring. Disconnect appliances one by one to identify the faulty device.
- Stellen Sie sicher, dass der Wechselrichter ordnungsgemäß geerdet ist.
- A faulty appliance drawing excessive current can also trip the GFCI.
7. Spezifikationen
Detailed technical specifications for the COTEK SP-1000-112 Pure Sine Wave Inverter.
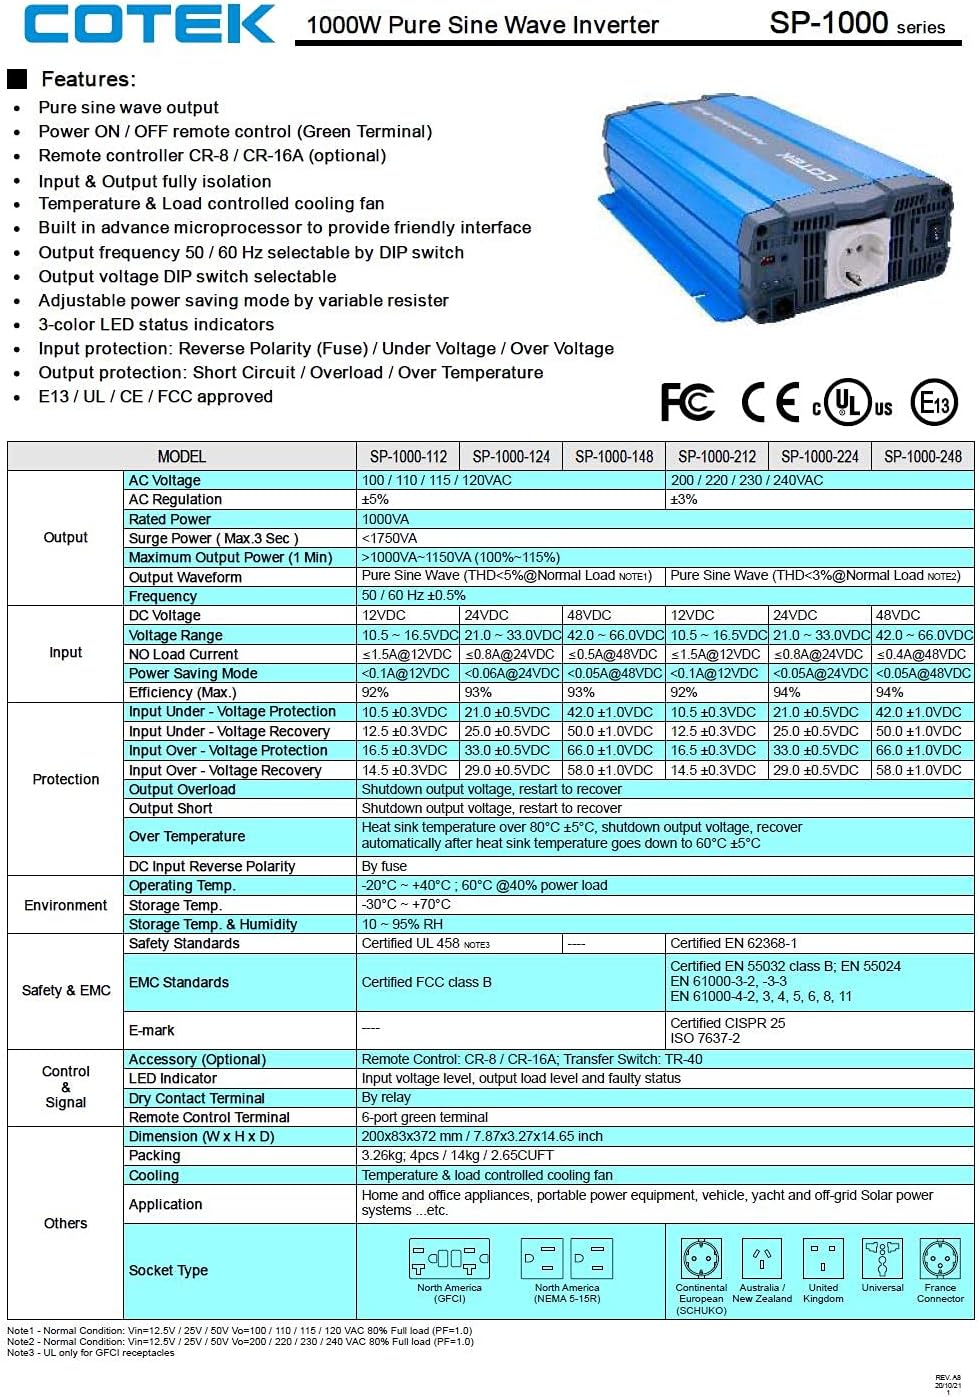
Abbildung 7: Technical specifications table for COTEK SP-1000 series inverters. This table provides comprehensive technical specifications for the SP-1000 series, including AC voltage, wattage, surge power, frequency, input voltage range, efficiency, and protection features.

Abbildung 8: Mechanical drawings and performance curves for COTEK SP-1000 series inverters. This image displays detailed mechanical dimensions of the inverter, along with power voltage and power temperature curves illustrating performance characteristics under various conditions.
| Besonderheit | Spezifikation |
|---|---|
| Marke | COTEK |
| Modellname | Cotek SP-1000-112 1000 Watt 110 Volt AC 12 Volt DC Pure Sine Inverter |
| Empfohlene Verwendung | Fahrzeug |
| Stromquelle | Batteriebetrieben |
| Wastage (kontinuierlich) | 1000 Watt |
| Eingangslautstärketage | 12 Volt Gleichstrom |
| Ausgangsleistung | 1000 Watt Wechselstrom |
| Anzahl der Verkaufsstellen | 2 (GFCI) |
| Frequenz | 60 Hz |
| Standby Power Shutoff | Hohe Effizienz |
| Artikelgewicht | 9 Pfund |
| Farbe | Blau |
| UPC | 810308000592 |
| Hersteller-Teilenummer | SP-1000-112 |
8. Garantieinformationen
Der COTEK SP-1000-112 Sinus-Wechselrichter wird mit folgendem Lieferumfang geliefert: 2 Jahre Herstellergarantie. Please retain your proof of purchase for warranty claims. For specific terms and conditions, refer to the warranty documentation provided with your product or contact COTEK customer support.
9. Kundendienst
For technical assistance, troubleshooting beyond this manual, or warranty inquiries, please contact COTEK customer support. Refer to the manufacturer's official webDie aktuellsten Kontaktinformationen finden Sie auf der Website oder der Produktverpackung.
Hersteller: Cotek