
Einführung
Vielen Dank für Ihren Einkauf.asing the STOGA Ubox STV040 Dual Lens Car DVR Camera. This manual provides detailed instructions for the proper installation, operation, and maintenance of your device. Please read this manual thoroughly before using the product to ensure optimal performance and safety.
Packungsinhalt
Bitte überprüfen Sie den Packungsinhalt nach dem Öffnen. Sollten Artikel fehlen oder beschädigt sein, wenden Sie sich bitte an Ihren Händler.
- 1 x STOGA Ubox STV040 Car DVR Camera
- 1 x Autoladegerät
- 1 x Autohalterung
- 1 x External GPS Module
- 1 x Benutzerhandbuch
Produkt überview
Familiarize yourself with the components and features of your STOGA Ubox STV040 Car DVR Camera.

Abbildung 1: Front view of the DVR camera with the display screen active.

Abbildung 2: Front view detailing the dual wide-angle lenses and surrounding controls.
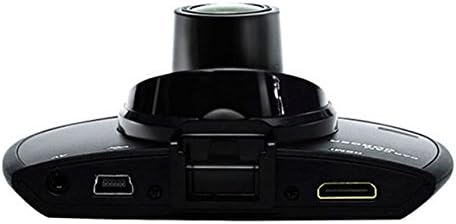
Abbildung 3: Spitze view illustrating the connectivity ports (HDMI, USB, AV).
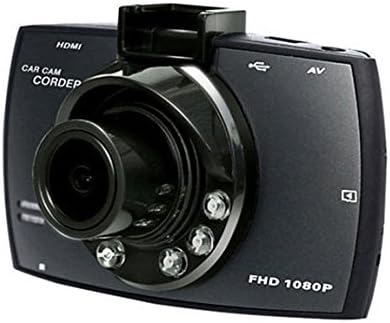
Abbildung 4: Angled perspective of the DVR camera, showing its compact design.
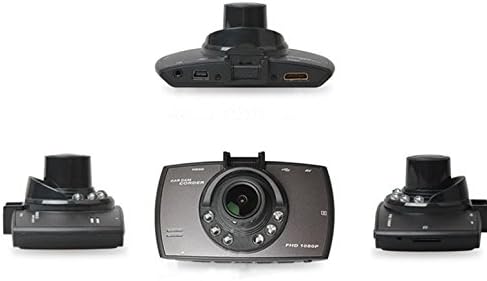
Abbildung 5: Umfassend view of the DVR camera from various angles.
Aufstellen
1. Installing the Micro SD Card
Insert a Micro SD card (Class 6 or higher, 4GB-32GB) into the designated slot on the DVR camera. Ensure the card is inserted correctly until it clicks into place. The device supports continuous loop recording and emergency event recording.
2. Montage der Kamera
- Attach the car mount to the windshield in a position that does not obstruct your view.
- Securely attach the DVR camera to the car mount.
- Adjust the camera angle to ensure both lenses capture the desired view (front and interior/side). The dual lenses are 180-degree rotatable.
3. Stromanschluss
Connect the car charger to the DVR camera's power input and plug the other end into your vehicle's 12V power outlet (cigarette lighter socket). The camera will typically power on automatically when the vehicle starts and power off when the vehicle is turned off.
4. GPS Module Connection (Optional)
Connect the external GPS module to the designated GPS port on the DVR camera. This enables GPS logging, recording location data along with video footage.
Bedienungsanleitung
Ein-/Ausschalten
- Automatisch: The camera powers on and starts recording automatically when the car engine starts. It powers off automatically when the engine is turned off.
- Manual: Durch Drücken und Halten des Netzschalters kann das Gerät manuell ein- oder ausgeschaltet werden.
Aufnahmemodi
- Loop-Aufnahme: The camera continuously records video in segments. When the memory card is full, it automatically overwrites the oldest unlocked footage.
- Notfallaufzeichnung (G-Sensor): The built-in G-Sensor detects sudden impacts or collisions. In such an event, the current video segment is automatically locked and protected from being overwritten.
Menünavigation
Use the control buttons located on the device to navigate through the menu options on the 2.0" TFT LCD screen. Adjust settings such as video resolution, date/time stamp, language (English, Chinese, Japanese, Russian), and G-Sensor sensitivity.
Wiedergabe
- Stop recording if currently active.
- Enter playback mode via the menu.
- Wählen Sie das gewünschte Video aus file for playback on the device screen.
- Alternatively, remove the Micro SD card and insert it into a computer to view files.
Passwortschutz
The device supports password protection to prevent unauthorized access to recordings. Refer to the on-screen menu for setting up and managing this feature.
Wartung
- Reinigung: Use a soft, dry cloth to clean the camera lenses and screen. Avoid abrasive cleaners or solvents.
- Micro SD Karte: Format the Micro SD card regularly (e.g., once a month) to ensure optimal performance and prevent data corruption. Back up important files vor der Formatierung.
- Temperatur: Vermeiden Sie es, das Gerät extremen Temperaturen, direkter Sonneneinstrahlung über längere Zeiträume oder hoher Luftfeuchtigkeit auszusetzen.
- Firmware-Updates: Überprüfen Sie die Angaben des Herstellers webBesuchen Sie die Website regelmäßig, um zu prüfen, ob Firmware-Updates verfügbar sind, um die Leistung zu verbessern und neue Funktionen hinzuzufügen.
Fehlerbehebung
| Problem | Mögliche Ursache/Lösung |
|---|---|
| Die Kamera lässt sich nicht einschalten. |
|
| Die Aufnahme wird unerwartet abgebrochen. |
|
| Schlechte Videoqualität. |
|
| GPS funktioniert nicht. |
|
| Der Akku hält keine Ladung. |
|
Technische Daten
| Besonderheit | Detail |
|---|---|
| Modellnummer | Ubox STV040 |
| Anzeige | 2.0" TFT LCD (960 x 240 pixels) |
| Objektive | Dual 140-degree A+ wide-angle, 180-degree rotatable |
| Sensor | CMOS |
| Videoauflösung | 1280 x 480 @ 30 fps, 640 x 480 @ 30 fps |
| Videoformat | AVI |
| Bildformat | M-JPG |
| Nachtsicht | Infrarot-Nachtsichtfunktion |
| Lagerung | Micro TF (SD HC) card, 4GB-32GB, Class 6 and above |
| GPS | Supports external GPS module |
| G-Sensor | Integrated, supports emergency event recording lock |
| Mikrofon/Lautsprecher | Integriert |
| Ausgabe | CVBS (Video Output) |
| Batterie | 3.7V 700mA Lithium-Polymer battery |
| Betriebssystemkompatibilität | Windows 2000/XP/Vista/Windows 7 |
| Unterstützte Sprachen | English, Chinese, Japanese, Russian |
Garantie und Support
For warranty information and technical support, please refer to the documentation provided with your purchase or contact your retailer. Keep your purchase receipt as proof of purchase for warranty claims.
For further assistance, you may also visit the official STOGA webBesuchen Sie die Website (falls verfügbar) oder kontaktieren Sie deren Kundendienstabteilung.