Einführung
This manual provides essential instructions for the setup, operation, and maintenance of your Gigaset Handset and Charging Station. This product is compatible with various Gigaset phone systems, including models S2, S44, S200, S440, S445, S645, SX440, and SX445. Please read this manual carefully to ensure proper use and to maximize the lifespan of your device.
1. Einrichtung
1.1 Auspacken und erste Inspektion
Carefully unpack all components. Ensure that the handset, charging station, and power adapter are present and undamaged. If any items are missing or damaged, contact your retailer.
1.2 Ladestation anschließen
- Connect the power adapter cable to the charging station.
- Stecken Sie das Netzteil in eine normale Steckdose.
- Place the charging station on a flat, stable surface, away from heat sources and direct sunlight.

Abbildung 1.1: Oben view of the Gigaset charging station. This image shows the compact design of the charging station, ready to receive the handset.
1.3 Inserting the Battery and Charging the Handset
- Öffnen Sie die Abdeckung des Batteriefachs auf der Rückseite des Mobilteils.
- Legen Sie den Akku ein und achten Sie dabei auf die richtige Polarität.
- Schließen Sie den Batteriefachdeckel.
- Place the handset into the charging station. Ensure it is seated correctly and the charging indicator (if present) illuminates.
- Allow the handset to charge for at least 6-8 hours before initial use to ensure full battery capacity.
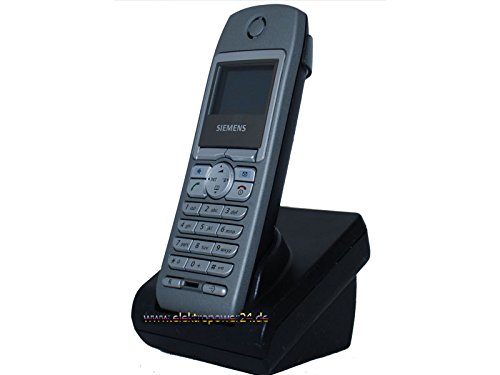
Bild 1.2: Vorderseite view of the Gigaset handset securely placed in its charging station. The display shows "Wahlvorbereitung" (dialing preparation) and a phone number, indicating it's powered on and ready.
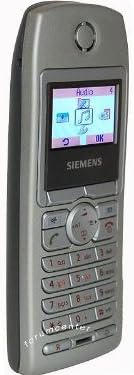
Abbildung 1.3: Seite view of the Gigaset handset, highlighting its ergonomic design and button layout. The display shows menu options like "Audio" and "OK".

Abbildung 1.4: Rückseite view of the Gigaset handset, showing the smooth casing and the location of the battery compartment cover.
1.4 Anmelden des Mobilteils an einer Basisstation
This handset is designed to be compatible with various Gigaset base stations. The registration process may vary slightly depending on your specific base station model. Refer to your base station's manual for detailed instructions. Generally, the steps involve:
- Activate registration mode on your Gigaset base station (usually by pressing and holding a registration button).
- On the handset, navigate to the "Settings" or "Registration" menu.
- Select "Register Handset" and follow the on-screen prompts. You may need to enter a PIN (default is usually 0000).
- Once registered, the handset display will confirm successful connection to the base station.
2. Bedienungsanleitung
2.1 Grundfunktionen
- Einen Anruf tätigen: Geben Sie die Telefonnummer ein und drücken Sie die grüne Anruftaste.
- Anruf annehmen: Drücken Sie die grüne Anruftaste, wenn das Telefon klingelt.
- Anruf beenden: Drücken Sie die rote Auflegen-Taste.
- Freisprechen: During a call, press the dedicated hands-free key (often backlit) to activate the speakerphone.
2.2 Telefonbuch (Verzeichnis)
The handset features a directory capable of storing up to 200 phone numbers and names.
- Hinzufügen eines Eintrags: Navigate to the "Directory" or "Phonebook" menu, select "New Entry," and enter the name and number.
- Anruf aus dem Verzeichnis: Open the directory, scroll to the desired entry, and press the green call key.
2.3 Anzeige und Indikatoren
The handset features a 5-line illuminated graphic display. Key indicators include:
- Datums-/Zeitanzeige: Always visible on the idle screen.
- CLIP Function (Call Display): Shows the caller's number or name (if stored in the directory) for incoming calls.
- Batterieanzeige: Zeigt den aktuellen Ladezustand des Akkus an.
- Signalstärkeanzeige: Displays the connection quality to the base station.
3. Wartung
3.1 Reinigung
- Wipe the handset and charging station with a soft, damp Tuch.
- Keine Scheuer- oder Lösungsmittel verwenden.
- Achten Sie darauf, dass keine Flüssigkeit in die Öffnungen des Geräts eindringt.
3.2 Batteriepflege
- Always use the original or approved replacement rechargeable batteries.
- Setzen Sie den Akku keinen extremen Temperaturen aus.
- Wenn das Mobiltelefon längere Zeit nicht benutzt wird, sollte der Akku entfernt werden.
4. Fehlerbehebung
| Problem | Mögliche Ursache | Lösung |
|---|---|---|
| Das Mobiltelefon lässt sich nicht einschalten. | Batterie nicht richtig eingesetzt oder entladen. | Check battery insertion. Place handset in charging station for several hours. |
| Kein Freizeichen. | Mobilteil nicht an der Basisstation angemeldet oder außerhalb der Reichweite. | Ensure handset is registered. Move closer to the base station. Check base station power. |
| Schlechte Gesprächsqualität. | Interference or handset too far from base station. | Entfernen Sie sich von anderen elektronischen Geräten. Gehen Sie näher an die Basisstation heran. |
| Ich kann keine Anrufe tätigen oder empfangen. | Line issue or base station problem. | Check your telephone line connection. Restart the base station by unplugging and replugging its power. |
5. Spezifikationen
- Marke: Gigaset
- Kompatible Modelle: Gigaset S2, S44, S200, S440, S445, S645, SX440, SX445
- Telefonbuchkapazität: Up to 200 entries (names and numbers)
- Anzeige: 5-line illuminated graphic display
- Merkmale: Backlit hands-free key, Date/Time display, CLIP function (Call Display)
- Hersteller: Gigaset
- ASIN: B0102FULTW
Note: Information regarding spare parts availability and guaranteed software updates is not provided. This product is currently not listed as discontinued by the manufacturer.
6. Garantie und Support
Specific warranty details for this Gigaset Handset and Charging Station are not provided within the available product information. For warranty claims, technical support, or service inquiries, please refer to the documentation included with your original purchase or visit the official Gigaset webWebsite für Ihre Region.
Sie können sich auch an Ihren Händler wenden, um Unterstützung zu erhalten.