
Einführung
This manual provides detailed instructions for the setup, operation, and maintenance of your Homtime C12PRO Docking Station Speaker. The C12PRO integrates a Bluetooth speaker, FM radio, alarm clock, and dual USB charging capabilities, designed for convenient everyday use.
Packungsinhalt
Bitte überprüfen Sie, ob alle unten aufgeführten Artikel in Ihrem Paket enthalten sind:
- 1 x Homtime C12PRO Speaker Unit
- 1 x Netzteil
- 1 x Benutzerhandbuch
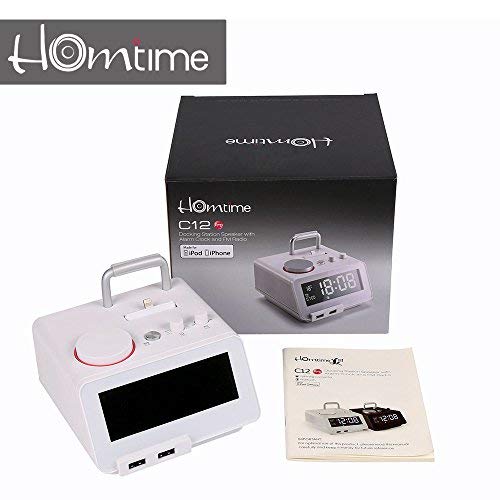
Bild: Contents of the Homtime C12PRO package, showing the main speaker unit, power adapter, and the user manual.
Produkt überview
Familiarize yourself with the various components and controls of your C12PRO unit.

Bild: Front view of the Homtime C12PRO with an iPhone docked. The large digital display shows time and temperature, and the front features dual USB charging ports.

Bild: Front view of the Homtime C12PRO without a phone docked. This image clearly shows the digital display, the docking connector, and the control buttons on the top surface.
Frontplatte und Display
- Großes 4.2-Zoll-LCD-Display: Shows time, alarm status, and room temperature (Celsius or Fahrenheit). Brightness is adjustable.
- Zwei USB-Ladeanschlüsse: Located at the front base for convenient charging of external devices.
Bedienelemente auf der Oberseite
- Docking Connector: Apple Certified Lightning connector for iPod/iPhone.
- Bedienknöpfe/Regler: For setting time, alarm, volume, mode selection, and FM radio tuning.
Anschlüsse auf der Rückseite
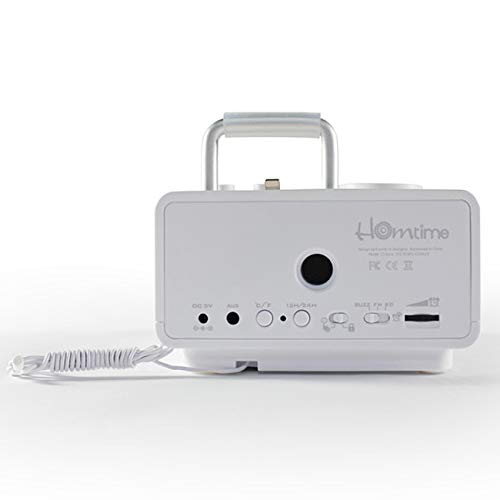
Bild: Hinteren view of the Homtime C12PRO. This image displays the DC 9V power input, AUX-in port, 12H/24H time format button, and other rear controls.
- DC 9V Stromeingang: Schließen Sie hier das mitgelieferte Netzteil an.
- AUX-Eingangsanschluss: 3.5-mm-Klinkenbuchse zum Anschluss externer Audioquellen.
- 12H/24H-Taste: Toggles between 12-hour and 24-hour time display formats.
- Andere Steuerelemente: May include snooze/dimmer, alarm on/off, and FM antenna connection.
Aufstellen
- Auspacken des Geräts: Carefully remove the C12PRO speaker and all accessories from the packaging.
- Strom anschließen: Insert the DC plug of the power adapter into the DC 9V input port on the rear of the unit. Plug the power adapter into a standard wall outlet. The display will illuminate.
- Erste Zeiteinstellung:
- Halten Sie die ZEITEINSTELLUNG button (location may vary, typically on top or rear).
- Verwenden Sie die +/- buttons or rotary knob to adjust the hour. Press ZEITEINSTELLUNG zur Bestätigung erneut.
- Stellen Sie die Minute mithilfe der +/- buttons or rotary knob. Press ZEITEINSTELLUNG Zeiteinstellungsmodus bestätigen und verlassen.
- Um zwischen 12-Stunden- und 24-Stunden-Format umzuschalten, drücken Sie die Taste 12 Std./24 Std. Taste auf der Rückseite.
- Displayhelligkeit anpassen: Drücken Sie die SCHLUMMER/DIMMER button (often combined) repeatedly to cycle through brightness levels.
- Temperatureinheit einstellen: Drücken Sie ggf ° C / ° F button to switch between Celsius and Fahrenheit display for room temperature.
Bedienungsanleitung
Ein-/Ausschalten
Drücken Sie die LEISTUNG button to turn the unit on or off. When off, the clock display remains active.
Einstellen des Alarms
- Halten Sie die WECKER GESTELLT Drücken Sie den Knopf. Die Alarmstunde blinkt.
- Verwenden Sie die +/- buttons or rotary knob to adjust the alarm hour. Press WECKER GESTELLT zur Bestätigung.
- Adjust the alarm minute. Press WECKER GESTELLT zur Bestätigung.
- Select the alarm source (Buzzer, FM Radio, or Docked Device). Use +/- or rotary knob and press WECKER GESTELLT zur Bestätigung.
- Zum Aktivieren/Deaktivieren des Alarms drücken Sie die Taste ALARM EIN / AUS button. An alarm icon will appear on the display when active.
- Wenn der Alarm ertönt, drücken Sie die SCHLAFEN button to temporarily silence it for a few minutes. Press LEISTUNG , um den Alarm für den Tag auszuschalten.
FM-Radiobetrieb
- Drücken Sie die MODUS Drücken Sie die Taste so lange, bis „FM“ im Display erscheint.
- For automatic station scanning, press and hold the WIEDERGABE/PAUSE button (or a dedicated SCAN button). The radio will scan and save available stations.
- Verwenden Sie zur manuellen Abstimmung die ZURÜCK/WEITER buttons or rotary knob to adjust the frequency.
- To select a saved station, press the VOREINSTELLUNG drücken und dann verwenden ZURÜCK/WEITER , um zu navigieren.
- Stellen Sie die Lautstärke mit ein VOLUMEN Drehknopf oder Tasten.
Bluetooth-Kopplung
- Drücken Sie die MODUS button until "BT" or "Bluetooth" appears on the display. The Bluetooth indicator will flash, indicating pairing mode.
- Aktivieren Sie auf Ihrem Mobilgerät Bluetooth und suchen Sie nach neuen Geräten.
- Select "Homtime C12PRO" from the list of available devices.
- Once paired, the Bluetooth indicator on the C12PRO will stop flashing and remain solid. You can now play audio wirelessly from your device.
- Adjust volume on both the C12PRO and your connected device.
Verwenden der Dockingstation
The C12PRO features an Apple Certified Lightning connector for compatible iPod/iPhone devices.
- Carefully align your iPhone/iPod with the Lightning connector on the top of the unit.
- Gently push down until the device is securely seated.
- The C12PRO will automatically charge your device and can play audio from it.
- Drücken Sie die MODUS button to select the docking station as the audio source.
Aufladen über USB
The unit includes dual USB ports for charging other devices.
- Connect your USB charging cable to one of the USB ports on the front of the C12PRO.
- Connect the other end of the cable to your device (e.g., Android phone, tablet).
- The C12PRO will provide power to charge your device.
AUX-in Connection
Connect external audio players via the 3.5mm AUX-in port.
- Connect a 3.5mm audio cable (not included) from your external audio device's headphone jack to the AUX-in port on the rear of the C12PRO.
- Drücken Sie die MODUS Drücken Sie die Taste so lange, bis „AUX“ im Display erscheint.
- Play audio from your external device. Adjust volume on both the C12PRO and the external device.
Wartung
- Reinigung: Disconnect the power adapter before cleaning. Use a soft, dry cloth to wipe the exterior surfaces. Do not use abrasive cleaners, waxes, or solvents.
- Lagerung: Wenn Sie das Gerät über einen längeren Zeitraum lagern, trennen Sie es vom Stromnetz und lagern Sie es an einem kühlen, trockenen Ort, geschützt vor direkter Sonneneinstrahlung und extremen Temperaturen.
- Batterie: The unit contains a CR2 battery (included) for clock memory backup. This battery is not user-replaceable for general operation and should only be replaced by qualified service personnel if necessary.
Fehlerbehebung
| Problem | Mögliche Ursache | Lösung |
|---|---|---|
| Kein Strom/Display aus | Netzteil nicht angeschlossen oder Steckdose defekt. | Stellen Sie sicher, dass der Netzadapter fest mit dem Gerät und einer funktionierenden Steckdose verbunden ist. |
| Kein Ton vom Lautsprecher | Volume too low; incorrect source selected; device not connected properly. | Lautstärke erhöhen. Drücken MODUS to select the correct audio source (BT, FM, Dock, AUX). Reconnect Bluetooth device or docked phone. |
| Die Bluetooth-Kopplung schlägt fehl | C12PRO not in pairing mode; device too far; interference. | Ensure C12PRO is in BT mode and flashing. Move device closer. Turn off other Bluetooth devices. |
| FM-Radio: Rauschen/schlechter Empfang | Schwaches Signal; Antenne nicht ausgefahren. | Extend the FM antenna fully. Reposition the unit for better reception. Perform auto-scan again. |
| Alarm ertönt nicht | Alarm nicht aktiviert; Alarmlautstärke zu niedrig. | Ensure the alarm icon is visible on the display. Check alarm volume settings. |
| Device not charging via USB/Dock | Cable issue; device not compatible; unit not powered. | Try a different USB cable. Ensure the C12PRO is powered on. Verify device compatibility with the Lightning dock. |
Technische Daten

Bild: A table detailing the specifications of the Homtime C12PRO, including driver units, S/N ratio, Bluetooth version, range, radio frequency, power, and dimensions.
| Modell | C12 Pro |
| Treibereinheiten | 2 x 40 mm |
| Signal-Rausch-Verhältnis | >70 dB |
| Bluetooth-Version | 2.1 + EDR |
| Bluetooth-Reichweite | 10 Mio. |
| Radiofrequenzbereich | 87.5 MHz – 108 MHz |
| Kompatible Geräte | iPad, iPhone, Android, Windows Phone, Computer |
| Netzteil | AC100-240V, 50/60Hz, DC 5V 3A |
| Ausgangsleistung | 3W + 3W (6 Watts total) |
| Abmessungen (LxBxH) | 12.8 x 12.9 x 10.7 cm |
| Artikelgewicht | 800 g |
| Audioquellen | Apple Lightning, USB, Bluetooth, Aux-in |
| Anzeigetyp | Digital LCD (4.2 inches) |
| Batterien | 1 CR2 battery required (included for clock memory) |
Garantie und Support
Garantieinformationen
The Homtime C12PRO comes with a 1 Jahr eingeschränkte Garantie from the date of purchase. This warranty covers manufacturing defects in materials and workmanship under normal use. It does not cover damage caused by misuse, accidents, unauthorized modifications, or external causes.
Bitte bewahren Sie Ihren Kaufbeleg für Garantieansprüche auf.
Kundenservice
For technical assistance, troubleshooting not covered in this manual, or warranty inquiries, please contact Homtime customer support. Refer to the contact information provided with your product packaging or visit the official Homtime webBesuchen Sie die Website für die aktuellsten Supportinformationen.