1. Einleitung
This manual provides detailed instructions for the installation, operation, maintenance, and troubleshooting of your Gateway SX2865 SFF Desktop Motherboard H61 (Model DB.U7411.001). This motherboard is designed for Small Form Factor (SFF) desktop systems, featuring the Intel H61 Express chipset and supporting LGA 1155/1156 CPUs and DDR3 RAM. Please read this manual thoroughly before proceeding with any installation or configuration to ensure proper functionality and safety.
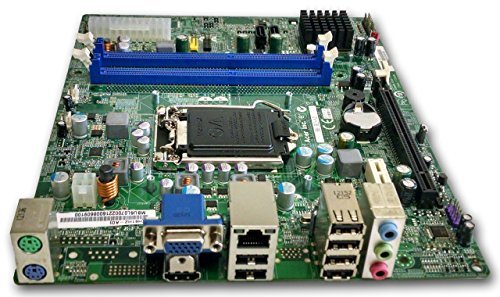
Abbildung 1: Überview of the Gateway SX2865 SFF Desktop Motherboard H61. This image displays the main components and layout of the motherboard, including the CPU socket, RAM slots, and various connectors.
2. Sicherheitshinweise
Always observe the following safety precautions when handling and installing computer components:
- Vor dem Einbau oder Ausbau von Komponenten muss der Netzstecker aus der Steckdose gezogen werden.
- Tragen Sie ein antistatisches Armband, um Schäden an empfindlichen Bauteilen durch elektrostatische Entladung (ESD) zu verhindern.
- Fassen Sie das Motherboard an den Kanten an, um eine Berührung empfindlicher Bauteile oder Schaltkreise zu vermeiden.
- Sorgen Sie für ausreichende Belüftung im Computergehäuse, um eine Überhitzung zu vermeiden.
- Das Motherboard darf weder Feuchtigkeit noch extremen Temperaturen ausgesetzt werden.
- Wenn Sie sich bei einem Installationsschritt unsicher sind, wenden Sie sich an einen qualifizierten Techniker.
3. Einrichtung und Installation
Follow these steps to properly install the Gateway SX2865 SFF Desktop Motherboard into your system:
3.1. Vorbereitung des Chassis
- Open your computer chassis and ensure it is clean and free of dust.
- Installieren Sie die mit Ihrem Gehäuse oder Motherboard gelieferte I/O-Blende in die Öffnung an der Rückseite.
- Verify that the standoffs in the chassis align with the mounting holes on the motherboard. Adjust if necessary.
3.2. CPU-Installation
- Locate the CPU socket (LGA 1155/1156) on the motherboard.
- Den Ladehebel vorsichtig anheben und die CPU-Sockelabdeckung öffnen.
- Carefully align the CPU with the socket, matching the golden triangle on the CPU with the triangle mark on the socket. Do not force the CPU into the socket.
- Schließen Sie die Steckdosenabdeckung und drücken Sie den Lasthebel nach unten, bis er einrastet.
- Apply a thin layer of thermal paste to the CPU surface (if not pre-applied on the cooler).
- Install the CPU cooler according to its manufacturer's instructions, ensuring it is securely fastened.
3.3. RAM-Installation
- Suchen Sie die DDR3-DIMM-Steckplätze auf dem Motherboard.
- Öffnen Sie die Klemmen an beiden Enden des DIMM-Steckplatzes.
- Richten Sie die Kerbe am RAM-Modul an der Nut im DIMM-Steckplatz aus.
- Drücken Sie beide Enden des RAM-Moduls fest nach unten, bis die Klammern einrasten.
3.4. Montage des Motherboards
- Carefully place the motherboard into the chassis, aligning the mounting holes with the standoffs.
- Befestigen Sie das Motherboard mit Schrauben, achten Sie dabei aber darauf, diese nicht zu fest anzuziehen.
3.5. Anschluss von Peripheriegeräten und Stromversorgung
- Verbinden Sie den 24-poligen ATX-Stromanschluss und den 4-poligen CPU-Stromanschluss Ihres Netzteils mit dem Motherboard.
- Verbinden Sie SATA-Datenkabel von Ihren Speichergeräten (HDD/SSD) mit den SATA-Anschlüssen auf dem Motherboard.
- Connect front panel connectors (power button, reset button, USB, audio) to their respective headers on the motherboard. Refer to the motherboard's silkscreen labels for correct orientation.
- Install any expansion cards (e.g., graphics card) into the appropriate PCIe slots and secure them.
- Connect all necessary cables to your power supply.
4. Betrieb und Konfiguration
4.1. Erster Startvorgang
- After all components are installed and connected, close the chassis.
- Schließen Sie Monitor, Tastatur und Maus an.
- Schließen Sie das Netzkabel an das Netzteil und eine Wandsteckdose an.
- Drücken Sie den Netzschalter an Ihrem Computer.
4.2. BIOS/UEFI-Einrichtung
The BIOS (Basic Input/Output System) or UEFI (Unified Extensible Firmware Interface) is firmware that initializes hardware during the booting process. To enter the BIOS/UEFI setup utility:
- During the initial boot-up sequence, repeatedly press the designated key (commonly Del, F2, oder F10). The exact key may vary; check the on-screen prompts.
- Within the BIOS/UEFI, you can configure settings such as:
- Systemdatum und -zeit
- Boot Order (to install an operating system from a USB drive or DVD)
- SATA Mode (AHCI, IDE)
- CPU and Memory settings (advanced users)
- Änderungen speichern und BIOS/UEFI verlassen, um den Bootvorgang fortzusetzen.
4.3. Installation des Betriebssystems und der Treiber
After configuring the BIOS/UEFI, proceed with installing your preferred operating system (e.g., Windows, Linux). Once the OS is installed, install the necessary drivers for the motherboard's components (chipset, audio, LAN, etc.). These drivers are typically available on the manufacturer's website (Acer/Gateway) or can be found through the operating system's update features.
5. Wartung
Regular maintenance helps ensure the longevity and stable performance of your motherboard:
- Staubentfernung: Periodically clean the inside of your computer case, including the motherboard, CPU cooler, and fan vents, using compressed air. Ensure the system is powered off and unplugged before cleaning.
- BIOS-Updates: Überprüfen Sie die Angaben des Herstellers website (Acer/Gateway) for BIOS/UEFI updates. Updates can improve stability, add support for new hardware, or fix bugs. Follow the update instructions carefully to avoid damaging the motherboard.
- Treiber-Updates: Keep your system drivers updated to ensure optimal performance and compatibility.
- Physische Inspektion: Überprüfen Sie gelegentlich das Motherboard auf Anzeichen von Beschädigungen, lose Verbindungen oder aufgeblähte Kondensatoren.
6. Fehlerbehebung
Sollten Sie Probleme mit Ihrem Motherboard haben, beachten Sie bitte die folgenden gängigen Schritte zur Fehlerbehebung:
- Kein Strom:
- Ensure the power supply is connected correctly to the motherboard (24-pin ATX and 4-pin CPU).
- Check that the power supply switch is in the 'ON' position.
- Verify the power cord is securely plugged into both the power supply and the wall outlet.
- Confirm the front panel power button connector is correctly attached to the motherboard.
- Kein Bildschirm:
- Ensure the monitor is powered on and connected to the correct video output (either integrated graphics or a dedicated graphics card).
- Setzen Sie die RAM-Module neu ein. Versuchen Sie, den Computer mit nur einem installierten RAM-Modul zu starten.
- Setzen Sie die Grafikkarte gegebenenfalls neu ein.
- Check if the CPU cooler is properly installed and the CPU power connector is secure.
- System Fails to Boot / POST Errors:
- Listen for beep codes from the motherboard's speaker (if installed). Consult the motherboard's documentation for beep code meanings.
- Clear the CMOS (Complementary Metal-Oxide-Semiconductor) by removing the CMOS battery for a few minutes or using the clear CMOS jumper (refer to motherboard layout).
- Ensure all essential components (CPU, RAM, GPU) are correctly installed.
- Betriebssystemprobleme:
- Verify that all necessary drivers are installed and up to date.
- Check SATA cable connections for storage devices.
- Run diagnostic tools for hard drives/SSDs and RAM.
7. Spezifikationen
Key technical specifications for the Gateway SX2865 SFF Desktop Motherboard H61 (Model DB.U7411.001):
| Besonderheit | Detail |
|---|---|
| Marke | Tor |
| Modellname | SX2865 |
| Artikelmodellnummer | DB.U7411.001 |
| Hersteller | Acer |
| Chipsatztyp | Intel H61 Express |
| CPU-Sockel | LGA 1155 or LGA 1156 |
| Kompatible Prozessoren | Intel Xeon (and other compatible LGA 1155/1156 CPUs) |
| RAM-Speichertechnologie | DDR3 |
| Speichertaktfrequenz | 2133 MHz (Max supported, actual speed depends on CPU and RAM) |
| Speicherkapazität | 16 GB (Maximum supported) |
| Kompatible Geräte | Personalcomputer |
| Plattform | Linux (and other compatible operating systems) |
| Formfaktor | uATX (Micro-ATX) |
8. Garantie und Support
For warranty information and technical support regarding your Gateway SX2865 SFF Desktop Motherboard H61 (Model DB.U7411.001), please refer to the documentation provided with your original system or contact the manufacturer directly.
- Hersteller: Acer (as per product specifications)
- Marke: Tor
- Besuchen Sie die offizielle Gateway-Unterstützung webWebsite or Acer-Support webWebsite Für Fahrer, FAQs und Kontaktinformationen.
- Bewahren Sie Ihren Kaufbeleg für Garantieansprüche auf.