Einführung
Welcome to the Necchi N82 Automatic Sewing Machine instruction manual. This guide provides essential information for the safe and efficient operation of your new sewing machine. Please read this manual thoroughly before using the machine to ensure proper setup, operation, and maintenance.
The Necchi N82 is a robust and versatile sewing machine, ideal for both beginners and experienced users. It features 8 stitch points, 14 programs, and a 4-step automatic buttonhole function, designed to handle various sewing projects with ease.
Wichtige Sicherheitshinweise
Beim Gebrauch eines Elektrogeräts sollten immer grundlegende Sicherheitsvorkehrungen getroffen werden, darunter die folgenden:
- Lesen Sie alle Anweisungen, bevor Sie diese Nähmaschine verwenden.
- Keep these instructions in a convenient place near the machine.
- Always unplug the sewing machine from the electrical outlet immediately after using and before cleaning, removing covers, lubricating, or making any other user servicing adjustments mentioned in the instruction manual.
- Do not allow children to play with the machine. Close supervision is necessary when the sewing machine is used by or near children.
- Use this product only for its intended use as described in this manual. Use only accessories recommended by the manufacturer.
- Betreiben Sie diese Nähmaschine niemals, wenn sie ein beschädigtes Kabel oder einen beschädigten Stecker hat, wenn sie nicht richtig funktioniert, wenn sie heruntergefallen oder beschädigt oder ins Wasser gefallen ist.
- Lassen Sie niemals Gegenstände in Öffnungen fallen oder stecken Sie sie hinein.
- Nicht im Freien verwenden.
- Nicht in Bereichen betreiben, in denen Aerosolprodukte (Sprays) verwendet werden oder Sauerstoff verabreicht wird.
- Zum Trennen der Verbindung drehen Sie alle Bedienelemente in die Position „Aus“ und ziehen dann den Stecker aus der Steckdose.
- Halten Sie die Finger von allen beweglichen Teilen fern. Besondere Sorgfalt ist um die Nähmaschinennadel erforderlich.
- Verwenden Sie immer die richtige Stichplatte. Bei Verwendung einer falschen Platte kann die Nadel abbrechen.
- Verwenden Sie keine gebogenen Nadeln.
- Ziehen oder schieben Sie den Stoff während des Nähens nicht. Dadurch kann die Nadel abgelenkt werden und brechen.
- Tragen Sie eine Schutzbrille.
Packungsinhalt
Upon unpacking your Necchi N82 sewing machine, please ensure all the following items are present:
- Necchi N82 Sewing Machine
- Standard-Zickzackfuß
- Reißverschlussfuß
- Knopflochfuß
- Schraubendreher
- Öler
- Needles (assorted)
- Quilt-Guide
- 3 Spulen
- Darning Plate (for feed dog cover)
- 2 Spool Holders (large and small)
- Filzunterlage
- Electric Foot Pedal
- Bedienungsanleitung (dieses Dokument)
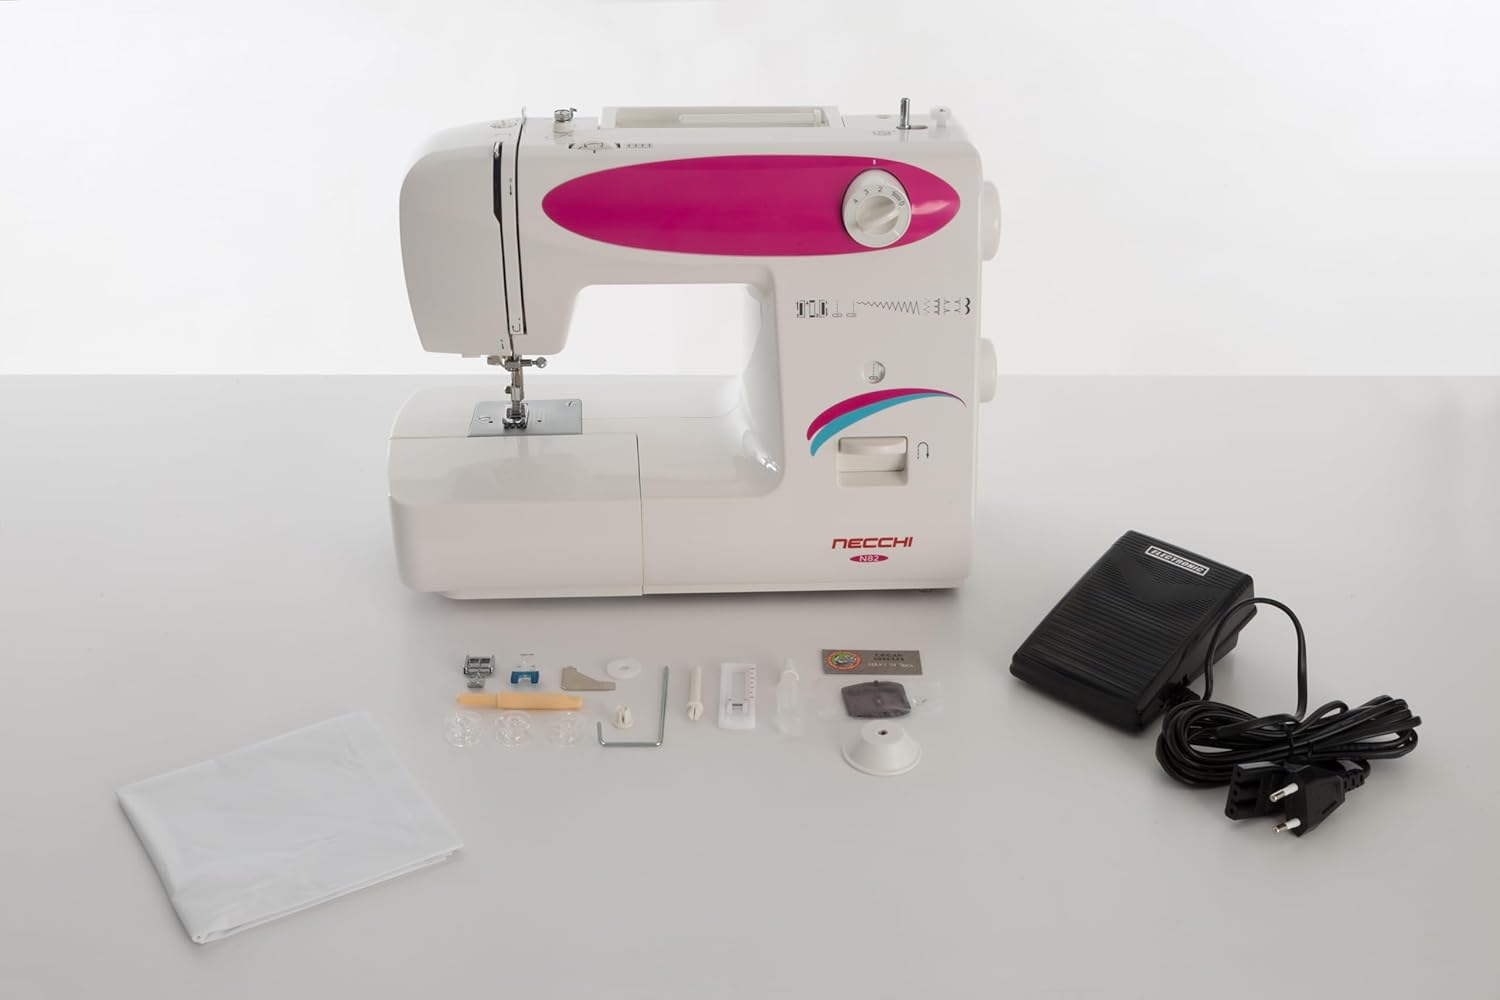
Image: The Necchi N82 sewing machine displayed with its complete set of accessories, including various presser feet, bobbins, needles, and the foot pedal.
Maschine überview
Familiarize yourself with the main components of your Necchi N82 sewing machine.

Bild: Eine klare Front view of the Necchi N82 sewing machine, highlighting its general design and controls.

Abbildung: Eine detaillierte Frontansicht view der Necchi N82 Nähmaschine, mit Darstellung des Nadelbereichs, des Nähfußes und des Stichwahlrades.

Abbildung: Seite A view of the Necchi N82 sewing machine, illustrating its profile and power input area.
Schlüsselkomponenten:
- Stichwahlrad: Dient zur Auswahl der gewünschten Stichmuster.
- Stitch Length/Width Dial: Adjusts the length and width of stitches.
- Spannungswählrad: Controls the tension of the upper thread.
- Rückwärtsstichhebel: Zur Verstärkung von Nähten.
- Nähfußheber: Hebt und senkt den Nähfuß.
- Nadel Clamp: Hält die Nadel an ihrem Platz.
- Spulenwickler: Zum Aufspulen von Garn auf Spulen.
- Freier Arm: Allows for sewing cylindrical items like sleeves and pant hems.
- Foot Pedal Connector: For connecting the electric foot pedal.
- Stromschalter: Schaltet die Maschine ein/aus.
Aufstellen
1. Stromanschluss
- Stellen Sie sicher, dass sich der Netzschalter in der Position „AUS“ befindet.
- Connect the foot pedal cord to the machine's foot pedal connector.
- Stecken Sie das Netzkabel in eine geeignete Steckdose.
- Turn the power switch to "ON". The sewing light will illuminate.
2. Aufwickeln der Spule
- Place a spool of thread on the spool pin, securing it with a spool holder.
- Führen Sie den Faden durch die obere Fadenführung und um die Spulenwickel-Spannscheibe.
- Setzen Sie eine leere Spule auf die Spulenwickelspindel.
- Wrap the thread clockwise several times around the bobbin.
- Schieben Sie die Spulerspindel nach rechts.
- Press the foot pedal gently to start winding. Stop when the bobbin is full.
- Cut the thread and push the bobbin winder spindle back to the left. Remove the wound bobbin.
3. Einsetzen der Spule
- Öffnen Sie die Spulenkapselabdeckung.
- Setzen Sie die aufgewickelte Spule in das Spulengehäuse ein und achten Sie darauf, dass sich der Faden in die richtige Richtung abwickelt (normalerweise gegen den Uhrzeigersinn).
- Führen Sie den Faden durch die Spannfeder und in den Fadenführungsschlitz.
- Schließen Sie die Spulenabdeckung.
4. Einfädeln des Obergewindes
- Heben Sie den Nähfußheber an.
- Setzen Sie eine Garnrolle auf den Garnrollenstift.
- Führen Sie den Faden durch die obere Fadenführung.
- Follow the numbered threading path down to the tension discs, up to the take-up lever, and then down to the needle.
- Thread the needle from front to back. Pull about 15 cm (6 inches) of thread through the needle eye.
5. Den Unterfaden hochziehen
- Halten Sie den oberen Faden mit der linken Hand leicht fest.
- Turn the handwheel towards you (counter-clockwise) to lower the needle into the needle plate and then raise it again.
- The needle thread will catch the bobbin thread, forming a loop. Pull the loop up with the upper thread.
- Ziehen Sie beide Fäden (Ober- und Unterfaden) unter dem Nähfuß hindurch und in Richtung der Rückseite der Maschine.
Bedienungsanleitung
1. Stichauswahl
The Necchi N82 offers 8 stitch points and 14 programs. To select a stitch, turn the Stitch Selector Dial until the desired stitch pattern aligns with the indicator mark. The visual stitch selection window allows you to see the chosen pattern.

Image: The Necchi N82 sewing machine set up on a table with fabric, scissors, and other sewing accessories, demonstrating a typical use scenario.
2. Stitch Length and Width Adjustment
Adjust the stitch length and width using the dedicated dials. Refer to the zigzag scale for precise adjustments, especially for decorative or zigzag stitches.
3. Thread Tension Adjustment
The tension dial controls the tightness of the upper thread. For balanced stitches, the upper and lower threads should interlock evenly between the fabric layers. Adjust as needed for different fabrics and threads.
4. Automatic Buttonhole Function (4-Step)
- Befestigen Sie den Knopflochfuß.
- Select the first step of the buttonhole program on the stitch selector dial.
- Follow the machine's markings or the manual's specific instructions for each of the four steps to create a complete buttonhole.
5. Freiarmnähen
To use the free arm, slide off the accessory box. This exposes the narrow free arm, perfect for sewing cuffs, sleeves, pant hems, and other small, cylindrical items.

Image: The Necchi N82 sewing machine with its removable accessory box detached, showcasing the free arm feature for sewing tubular items.
6. Rückwärtsnähen
Press and hold the reverse stitch lever to sew in reverse. This is used to secure the beginning and end of seams, preventing unraveling. Release the lever to resume forward stitching.
7. Adjustable Presser Foot Pressure
The machine features an adjustable presser foot pressure control. This allows you to fine-tune the pressure applied to the fabric, which is crucial when working with very thin or very thick materials to ensure even feeding.
Wartung
Regular maintenance ensures the longevity and optimal performance of your Necchi N82 sewing machine. Always unplug the machine before performing any maintenance.
1. Reinigung
- Feed Dogs: Remove the needle plate and use the small brush (included) to clean lint and dust from the feed dogs.
- Spulenbereich: Remove the bobbin and bobbin case. Clean any lint or thread scraps from this area with the brush.
- Maschinenoberfläche: Wischen Sie die Außenseite des Geräts mit einem weichen, trockenen Tuch ab. Verwenden Sie keine scharfen Chemikalien oder Scheuermittel.
2. Ölen
Your machine comes with an oiler. Apply a small drop of sewing machine oil to the moving metal parts in the bobbin area and other designated oiling points as indicated in a more detailed diagram (if available in a physical manual). Over-oiling can cause stains on fabric.
3. Nadelwechsel
- Schalten Sie die Maschine aus und ziehen Sie den Stecker.
- Lösen Sie die Nadel clamp mit dem Schraubendreher festschrauben.
- Die alte Nadel entfernen.
- Setzen Sie eine neue Nadel so ein, dass die flache Seite zur Rückseite der Maschine zeigt, und schieben Sie sie so weit wie möglich nach oben.
- Ziehen Sie die Nadel clamp fest verschrauben.
Fehlerbehebung
Dieser Abschnitt behandelt häufig auftretende Probleme. Sollten Ihre Probleme hier nicht aufgeführt sein, wenden Sie sich bitte an den Kundensupport.
| Problem | Mögliche Ursache | Lösung |
|---|---|---|
| Übersprungene Stiche | Falsche Nadel, verbogene Nadel, falsches Einfädeln, falsche Nadelgröße für den Stoff. | Nadel durch die richtige Nadelart/-größe ersetzen, Maschine korrekt neu einfädeln, sicherstellen, dass die Nadel vollständig eingeführt ist. |
| Gewindebruch (oben) | Incorrect upper thread tension, poor quality thread, needle bent or blunt, improper threading, burr on needle plate. | Fadenspannung einstellen, hochwertiges Garn verwenden, Nadel austauschen, neu einfädeln, auf Grate prüfen. |
| Thread Breakage (Bobbin) | Bobbin wound unevenly, bobbin inserted incorrectly, lint in bobbin case, incorrect bobbin tension. | Rewind bobbin evenly, re-insert bobbin correctly, clean bobbin case, check bobbin tension. |
| Ungleichmäßige Stiche / Kräuseln | Incorrect thread tension, wrong needle size, fabric not feeding smoothly, incorrect presser foot pressure. | Adjust tension, use appropriate needle, ensure fabric is not pulled/pushed, adjust presser foot pressure. |
| Maschine startet nicht | Power cord not plugged in, foot pedal not connected, power switch off, bobbin winder engaged. | Check all connections, turn power on, disengage bobbin winder. |
Technische Daten
Technical specifications for the Necchi N82 Automatic Sewing Machine:
| Besonderheit | Detail |
|---|---|
| Marke | Necchi |
| Modellnummer | N82 |
| Farbe | Weiß |
| Produktabmessungen (L x B x H) | 38 x 30 x 17 cm |
| Artikelgewicht | 6 kg |
| Material | Plastik |
| Stitch-Programme | 14 (including 8 stitch points) |
| Knopflochtyp | 4-step Automatic |
| Stromquelle | Kabelgebundene Elektrik |
| Automatische Abschaltung | NEIN |
| GTIN | 08031204113885 |
Garantie und Support
For warranty information, please refer to the warranty card included with your purchase or contact your retailer.
If you require technical assistance or have questions regarding the operation or maintenance of your Necchi N82 sewing machine, please contact Necchi customer support or your authorized service center.