
1. Sicherheitshinweise
Please read all instructions carefully before operating the appliance to ensure safe and efficient use. Retain this manual for future reference.
- Elektrische Sicherheit: Stellen Sie sicher, dass das Gerät an eine ordnungsgemäß geerdete Steckdose mit der korrekten Spannung angeschlossen ist.tage as specified on the product label. Do not use extension cords.
- Belüftung: Maintain adequate clearance around the unit for proper ventilation. Blocked vents can lead to overheating and reduced efficiency.
- Schweres Gerät: This appliance is heavy. Use appropriate lifting techniques and equipment when moving to prevent injury.
- Reinigung: Disconnect power before cleaning or performing any maintenance. Use non-abrasive cleaners.
- Brennbare Materialien: Explosive Stoffe oder brennbare Materialien dürfen nicht im oder in der Nähe des Kühlschranks gelagert werden.
2. Produktüberschreitungview
The True TUC-60-HC is a 60-inch two-section undercounter refrigerator designed for commercial use, featuring solid stainless steel doors and a robust construction for durability and performance.
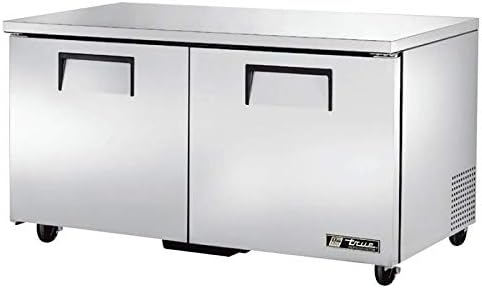
Front view of the True TUC-60-HC undercounter refrigerator, showcasing its stainless steel finish and two solid doors.
Hauptmerkmale:
- 60-inch width, two-section design
- Solid stainless steel doors
- 15.5 Cubic Feet capacity
- Automatisches Abtausystem
- Undercounter installation type
- Langlebige Edelstahlkonstruktion
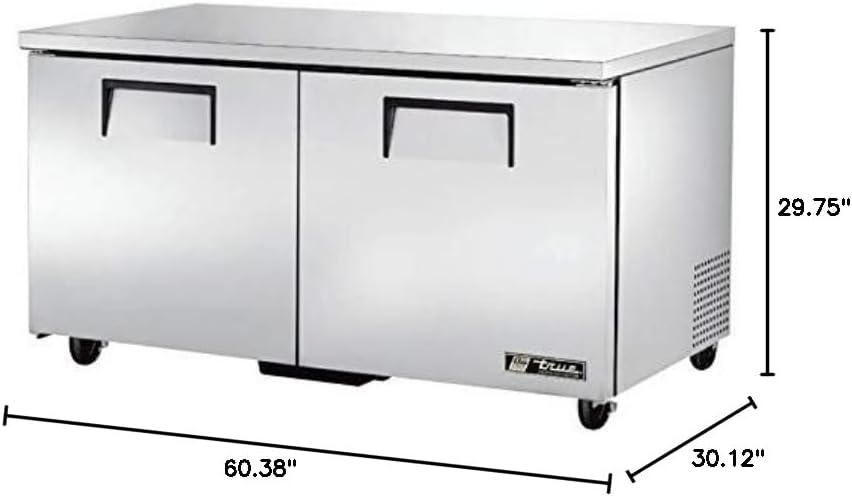
Diagram showing the dimensions of the True TUC-60-HC refrigerator: 60.38 inches width, 30.13 inches depth, and 29.75 inches height.
3. Einrichtung
3.1 Auspacken
- Sämtliches Verpackungsmaterial, einschließlich Klebeband und Schutzfolien, muss sorgfältig entfernt werden.
- Prüfen Sie das Gerät auf Transportschäden. Melden Sie etwaige Schäden unverzüglich dem Transportunternehmen.
- Entfernen Sie sämtliches Verpackungsmaterial und Zubehör aus dem Inneren.
3.2 Platzierung
- Stellen Sie den Kühlschrank auf eine stabile, ebene Fläche, die sein Gewicht im voll beladenen Zustand tragen kann.
- Ensure adequate air circulation around the unit. Do not block the condenser air intake or exhaust vents.
- Avoid direct sunlight or proximity to heat-generating appliances (ovens, stoves) to maintain optimal performance.
3.3 Elektrischer Anschluss
- Vor dem Anschließen sicherstellen, dass das Netzteil zur Spannung passt.tage und amperage requirements listed on the unit's serial tag.
- Plug the unit directly into a dedicated, grounded electrical outlet. Do not use adapter plugs or extension cords.
3.4 Erstreinigung
- Before first use, clean the interior and exterior surfaces with a mild soap and water solution.
- Mit einem weichen Tuch trocken wischen.
4. Bedienungsanleitung
4.1 Einschalten und Temperaturregelung
- After setup, plug in the unit. The compressor will start automatically.
- Allow the refrigerator to run for several hours (typically 2-4 hours) to reach its set temperature before loading products.
- Temperature settings are typically adjusted via a digital controller located on the front or interior of the unit. Refer to the specific controller's instructions for detailed adjustment procedures.
4.2 Beladen des Kühlschranks
- Distribute items evenly on the shelves to ensure proper air circulation.
- Die Regale dürfen nicht über ihre Tragfähigkeit hinaus überladen werden.
- Um eine gleichmäßige Temperatur zu gewährleisten, sollten die internen Lüftungsöffnungen nicht blockiert werden.
4.3 Türbedienung
- Ensure doors close completely after each use to maintain internal temperature and energy efficiency.
- Check door gaskets regularly for wear or damage that could compromise the seal.
5. Wartung
5.1 Regelmäßige Reinigung
- Innere: Clean the interior weekly with a mild, non-abrasive cleaner and warm water. Rinse thoroughly and dry.
- Exterieur: Wipe down stainless steel surfaces regularly with a soft cloth and a stainless steel cleaner to maintain appearance.
- Kondensatorschlange: The condenser coil should be cleaned monthly or quarterly, depending on the operating environment. Disconnect power, locate the coil (usually at the rear or bottom), and use a brush or vacuum cleaner to remove dust and debris. A dirty coil reduces efficiency and can lead to compressor failure.
5.2 Dichtungsprüfung
- Inspect door gaskets monthly for cracks, tears, or stiffness. Damaged gaskets can lead to air leaks and increased energy consumption.
- Clean gaskets with warm, soapy water to keep them pliable and ensure a good seal.
5.3 Automatische Abtauung
This unit features an automatic defrost system, eliminating the need for manual defrosting. Ensure the drain pan is clear and the drain line is not obstructed to allow proper water evaporation.
6. Fehlerbehebung
Bevor Sie den Kundendienst kontaktieren, ...view diese häufigen Probleme und Lösungen:
| Problem | Mögliche Ursache | Lösung |
|---|---|---|
| Gerät kühlt nicht | No power; thermostat set too high; dirty condenser coil; door left open | Check power supply; adjust thermostat; clean condenser coil; ensure door is closed |
| Übermäßiger Lärm | Unit not level; loose components; fan obstruction | Level the unit; check for loose parts; clear fan obstruction |
| Wasser auf dem Boden | Verstopfter Abfluss; Überlauf der Auffangwanne | Clear drain line; ensure drain pan is correctly positioned |
7. Spezifikationen
| Besonderheit | Detail |
|---|---|
| Marke | WAHR |
| Modellnummer | TUC-60-HC |
| Technische Daten | 30.13"T x 60.38"B x 29.75"H |
| Kapazität | 15.5 Kubikfuß |
| Installationstyp | Untertisch |
| Formfaktor | Untertisch |
| Besonderheit | Kompakt |
| Farbe | Edelstahl |
| Auftausystem | Automatisch |
| Türmaterialtyp | Edelstahl |
| Anzahl der Einlegeböden | 5 |
| Anzahl der Türen | 2 |
| Zertifizierung | NEMA |
8. Garantie und Support
For warranty information or technical support, please refer to the warranty card included with your product or visit the official TRUE webDie Kontaktdaten des Kundendienstes finden Sie in der Regel auf der Website des Herstellers. webWebsite.