1. Einleitung
Thank you for choosing the tectake CD/DVD Storage Shelf Unit. This manual provides essential information for the safe assembly, proper use, and maintenance of your new storage unit. Please read these instructions carefully before beginning assembly and retain them for future reference.
2. Sicherheitshinweise
- Montieren Sie das Gerät immer auf einer sauberen, ebenen und weichen Oberfläche, um Kratzer zu vermeiden.
- Vor der Montage sicherstellen, dass alle Bauteile vorhanden und unbeschädigt sind. Beschädigte Teile dürfen nicht verwendet werden.
- Kleinteile und Verpackungsmaterialien von Kindern und Haustieren fernhalten, um Erstickungsgefahr zu vermeiden.
- Do not overload the shelves. The maximum load capacity per shelf is approximately 17 kg.
- For optimal stability, especially in households with children or in earthquake-prone areas, secure the unit to a wall using the provided anti-tip strap.
- Verwenden Sie für die Montage die in der Anleitung angegebenen geeigneten Werkzeuge.
3. Aufbau und Montage
3.1. Packungsinhalt
Before starting, verify that all parts listed below are included in your package:
- 1 x CD/DVD Storage Unit (main panels)
- Assembly Hardware (screws, dowels, shelf pins, anti-tip strap)
- Montageanleitung (diese Anleitung)
- Verstellbare Regalböden (5 Stück)
3.2. Benötigtes Werkzeug
- Kreuzschlitzschraubendreher
- Hammer (optional, für Dübel)
- Drill (for wall mounting, if using anti-tip strap)
3.3. Montageschritte
- Bereiten Sie die Basis vor: Attach the side panels to the base panel using the provided screws. Ensure they are aligned correctly.
- Rückwand montieren: Slide the thin back panel into the grooves of the side panels. Secure it with small nails or screws if provided. This panel significantly enhances stability.
- Befestigen Sie die obere Platte: Secure the top panel to the side panels using the remaining screws.
- Regalstifte einsetzen: Determine your desired shelf heights. The side panels feature pre-drilled holes at regular intervals for customizable shelf placement. Insert the metal shelf pins into the chosen holes.
- Platzieren Sie verstellbare Regalböden: Carefully place the adjustable shelves onto the inserted pins. Ensure they are level and securely seated.
- Wandmontage (empfohlen): For added safety and stability, attach the anti-tip strap to the top rear of the unit and secure it to a wall stud or using appropriate wall anchors.
4. Betrieb und Nutzung
This tectake storage unit is designed for versatile use, primarily for organizing CDs and DVDs, but also suitable for small books or decorative items. Its compact design makes it ideal for various rooms.
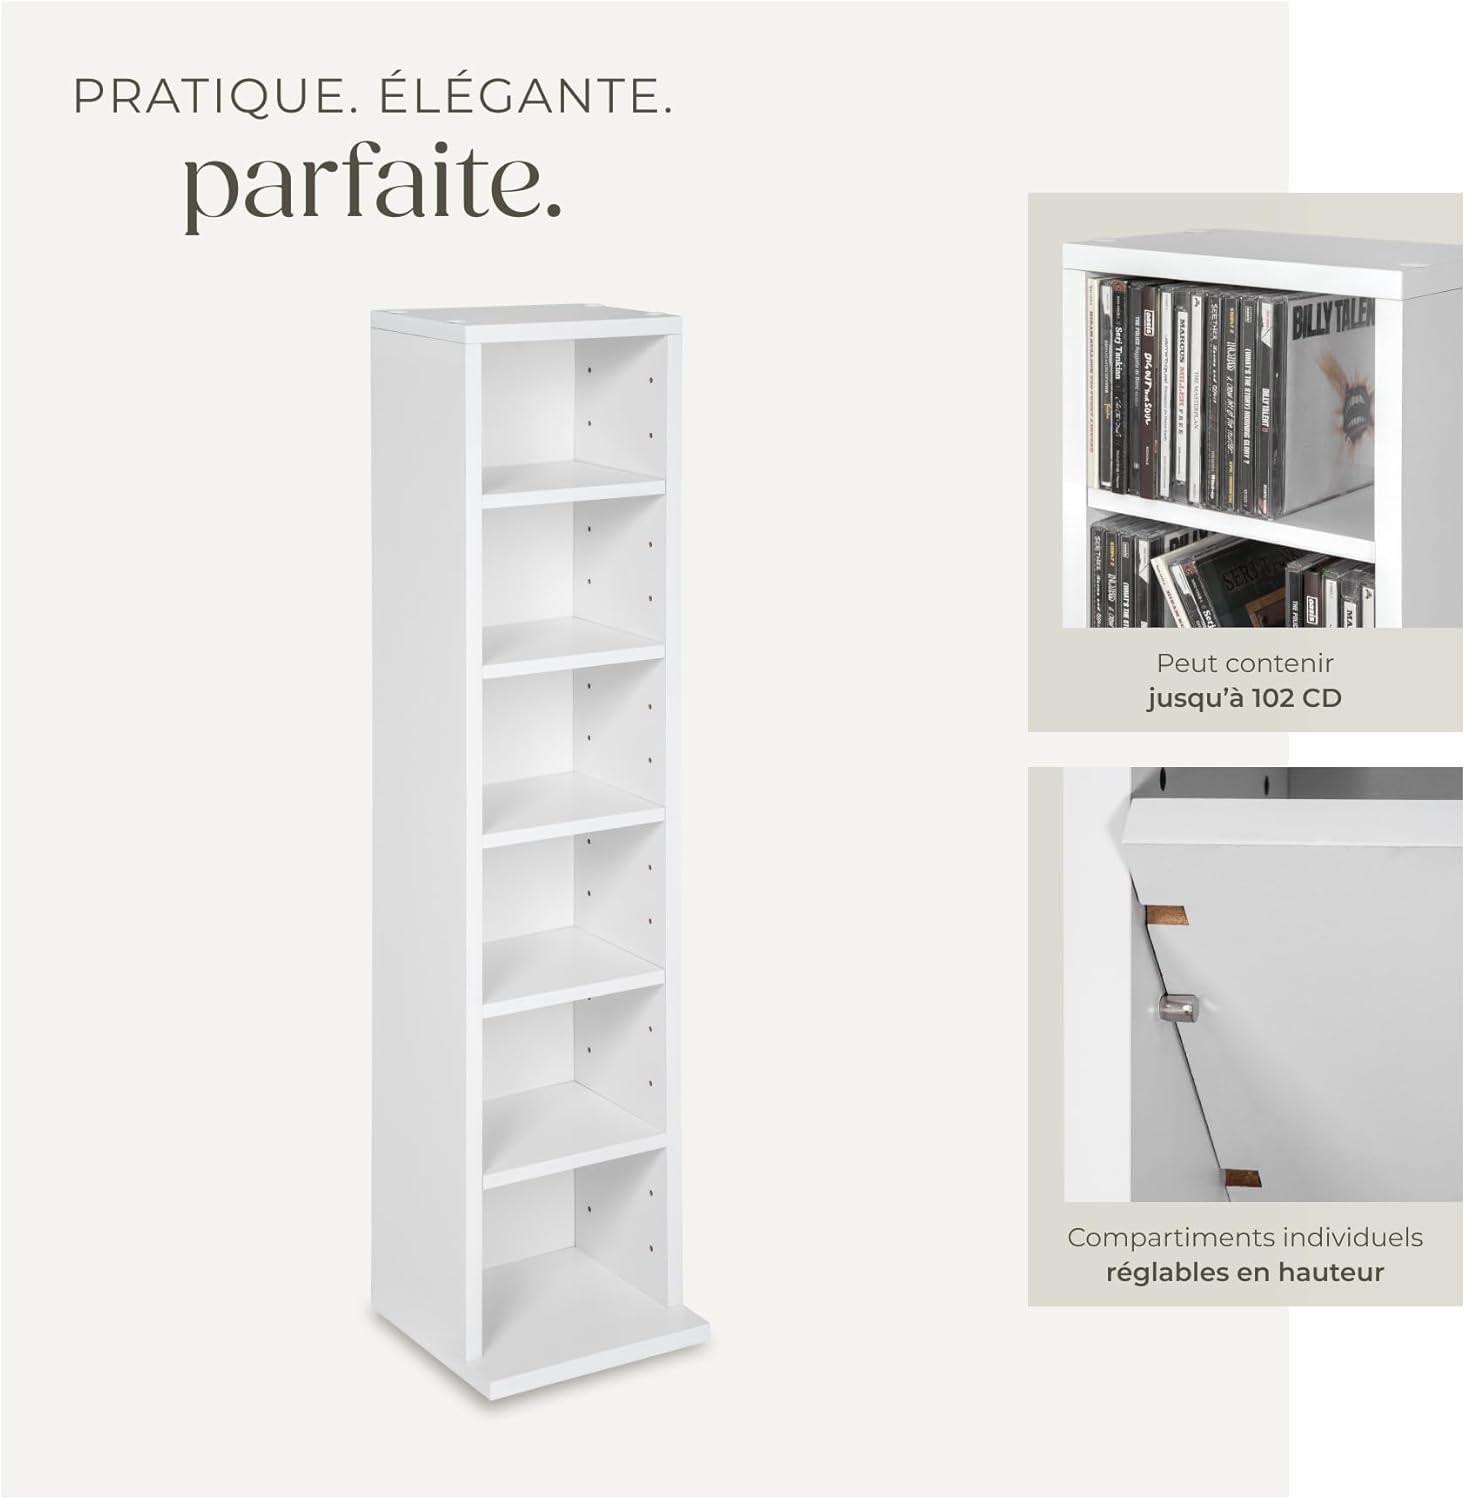
- CD/DVD Storage: The unit features 6 compartments. With 5 adjustable shelves, you can customize the height of each section to perfectly fit your CD or DVD collection. The unit can store up to 102 CDs.
- Verstellbare Einlegeböden: To adjust a shelf, simply remove the items, lift the shelf, reposition the metal pins into the desired holes, and then place the shelf back onto the pins.
- Platzierung: The unit's slim profile (21 cm width x 20 cm depth x 90 cm height) allows it to fit into narrow spaces in living rooms, bedrooms, offices, or hallways.

5. Wartung
To ensure the longevity and appearance of your tectake storage unit, follow these simple maintenance guidelines:
- Reinigung: Wischen Sie die Oberflächen mit einem weichen, damp cloth. Avoid using abrasive cleaners, harsh chemicals, or solvents, as these can damage the plastic coating.
- Abstauben: Um Staubansammlungen zu vermeiden, wischen Sie das Gerät regelmäßig mit einem trockenen, weichen Tuch ab.
- Verschüttungen: In case of spills, wipe them immediately with a dry cloth to prevent moisture absorption into the MDF.
- Inspektion: Überprüfen Sie regelmäßig alle Schrauben und Verbindungsstücke, um sicherzustellen, dass sie fest sitzen. Ziehen Sie sie gegebenenfalls nach.
6. Fehlerbehebung
| Problem | Mögliche Ursache | Lösung |
|---|---|---|
| Das Gerät wirkt instabil oder wackelig. | Screws are loose; unit is not level; unit is not wall-mounted. | Ensure all screws are tightened. Place the unit on a level surface. Utilize the anti-tip strap to secure the unit to a wall. |
| Difficulty inserting shelf pins or shelves. | Holes are misaligned; pins are not fully inserted. | Ensure pins are pushed firmly into the holes. If holes seem misaligned, double-check the orientation of the side panels during assembly. |
| Visible screw heads on the top panel. | Plastic caps not used or not fitting properly. | Ensure the small plastic caps provided are firmly pressed into the screw heads for a more aesthetic finish. |
| Stickers on panels are difficult to remove. | Adhesive is strong. | Carefully peel off stickers. If residue remains, use a small amount of rubbing alcohol or a specialized adhesive remover on a soft cloth, testing on an inconspicuous area first to avoid damaging the finish. |
7. Spezifikationen
| Besonderheit | Spezifikation |
|---|---|
| Modellnummer | B01AT4VYBU |
| Gesamtabmessungen (B x H x T) | Ca. 21 cm x 90 cm x 20 cm |
| Regaltiefe | Ca. 16 cm |
| Material | MDF with plastic coating |
| Farbe | Weiß |
| Gewicht | Ca. 5.5 kg |
| Anzahl der Einlegeböden | 6 (5 verstellbar) |
| Tragfähigkeit der Regale | Bis zu 17 kg pro Regalboden |
| Montage erforderlich | Ja |
| Ursprungsland | China |

8. Garantieinformationen
This tectake product is covered by the standard manufacturer's warranty. Please refer to your purchase documentation or contact your retailer for specific warranty terms and conditions. The warranty typically covers defects in materials and workmanship under normal use.
9. Kundendienst
If you encounter any issues with your tectake CD/DVD Storage Shelf Unit, require replacement parts, or have questions not covered in this manual, please contact the retailer where you purchased the product or the tectake customer service department. Have your model number (B01AT4VYBU) and purchase date ready when contacting support.