
KICKER 42IQ5004
Kicker IQ500.4 Q-Class Amplifier-Benutzerhandbuch
Model: 42IQ5004
1. Einleitung
This manual provides detailed instructions for the installation, operation, and maintenance of your Kicker IQ500.4 Q-Class AmpVerstärker. Bitte lesen Sie diese Bedienungsanleitung sorgfältig durch, bevor Sie mit der Installation oder Inbetriebnahme beginnen, um eine ordnungsgemäße Verwendung zu gewährleisten und Schäden zu vermeiden.
The Kicker IQ500.4 is a 4-channel car amplifier featuring advanced digital signal processing (DSP) capabilities, designed to deliver high-quality audio performance in automotive environments.
2. Sicherheitshinweise
Beachten Sie immer die folgenden Sicherheitsvorkehrungen:
- Disconnect the vehicle's battery before making any power connections.
- Sorgen Sie für eine ordnungsgemäße Erdung, um elektrische Gefahren zu vermeiden.
- Setzen Sie die ampSchützt vor Feuchtigkeit oder extremen Temperaturen.
- Use appropriate gauge wiring for power and speaker connections as specified in the installation section.
- Ziehen Sie einen professionellen Installateur zu Rate, wenn Sie sich bei irgendeinem Teil des Installationsprozesses unsicher sind.
- Dieses Produkt enthält Chemikalien, die dem Staat Kalifornien als krebserregend und fortpflanzungsschädigend bekannt sind (Warnung gemäß Proposition 65).
3. Packungsinhalt
Überprüfen Sie, ob alle Artikel im Paket vorhanden sind:
- Kicker IQ500.4 Q-Class Ampschwerer
- Montagezubehör
- Benutzerhandbuch (dieses Dokument)
- USB Cable (for TWEEQ app connection)
4. Einrichtung und Installation
4.1 Montage der Ampschwerer
Select a dry, stable location for mounting the amplifier, ensuring adequate ventilation. Avoid mounting in direct sunlight or areas prone to vibration.
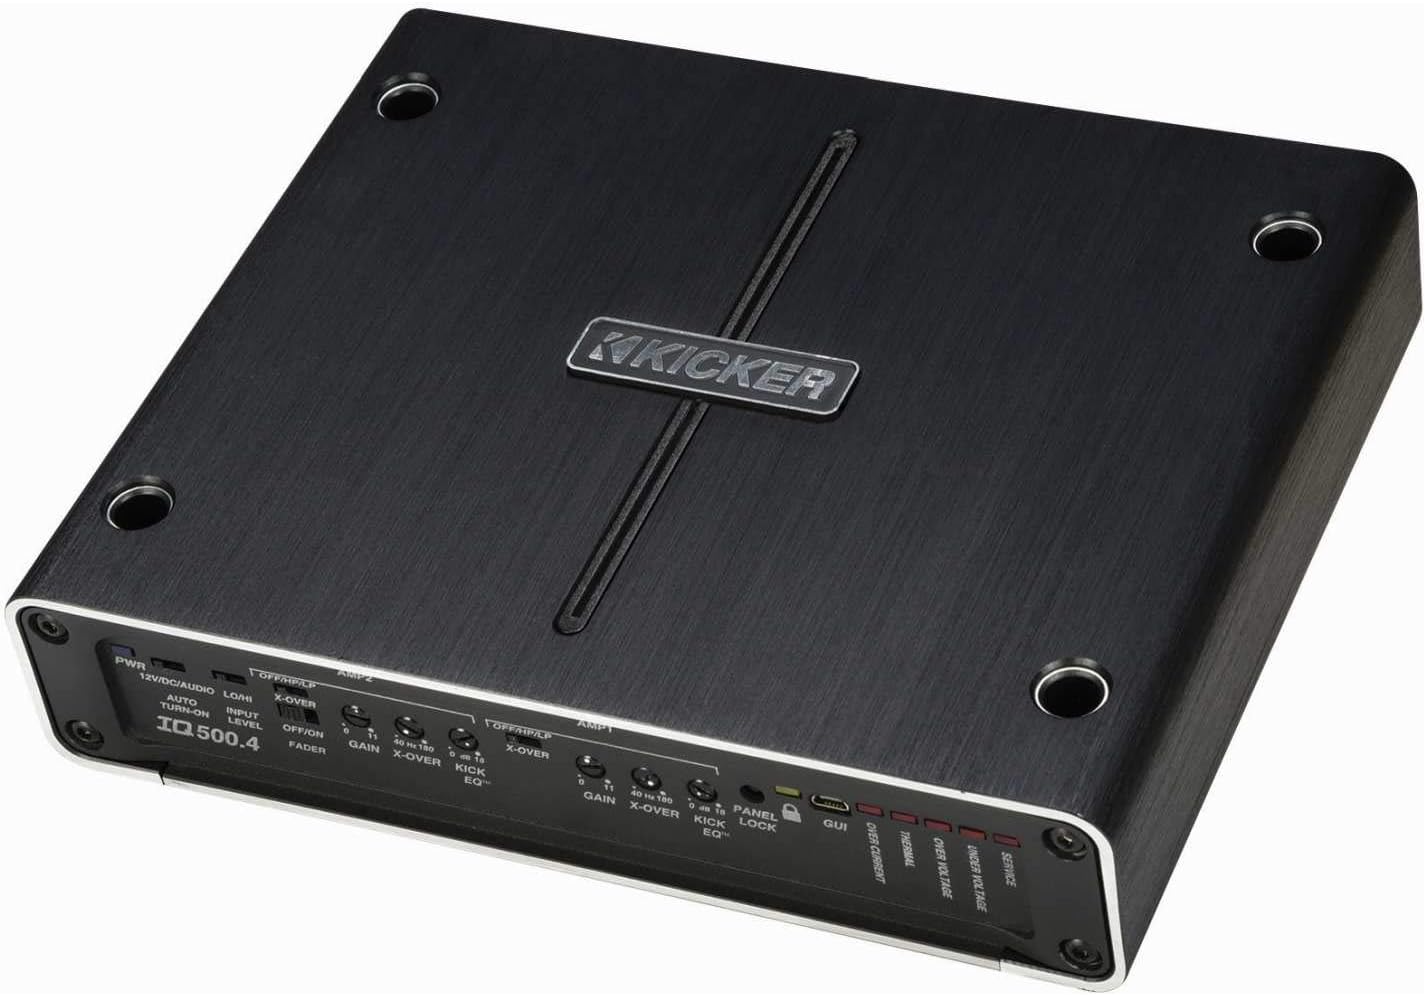
Abbildung 4.1: Oben view of the Kicker IQ500.4 Q-Class Amplifier, highlighting the control panel and overall design.
4.2 Kabelverbindungen
Ensure all connections are secure and properly insulated. Refer to the diagram below for typical wiring configurations.

Abbildung 4.2: Rückseite view of the Kicker IQ500.4 Q-Class Amplifier, detailing the power, ground, remote, input, and output connections.
Stromanschlüsse:
- +12V (Stromversorgung): Connect to the positive terminal of the vehicle's battery using appropriate gauge wire (e.g., 4-gauge for optimal performance).
- GND (Masse): Connect to a clean, unpainted metal surface of the vehicle chassis. Ensure a solid connection.
- REM (Ferneinschalten): Connect to the remote turn-on lead from your head unit.
Ein-/Ausgangsanschlüsse:
- Eingang (Cinch): Connect to the RCA outputs of your head unit or signal processor.
- Output (Speaker): Connect to your speakers. The amplifier supports 4-ohm stable bridged mode.
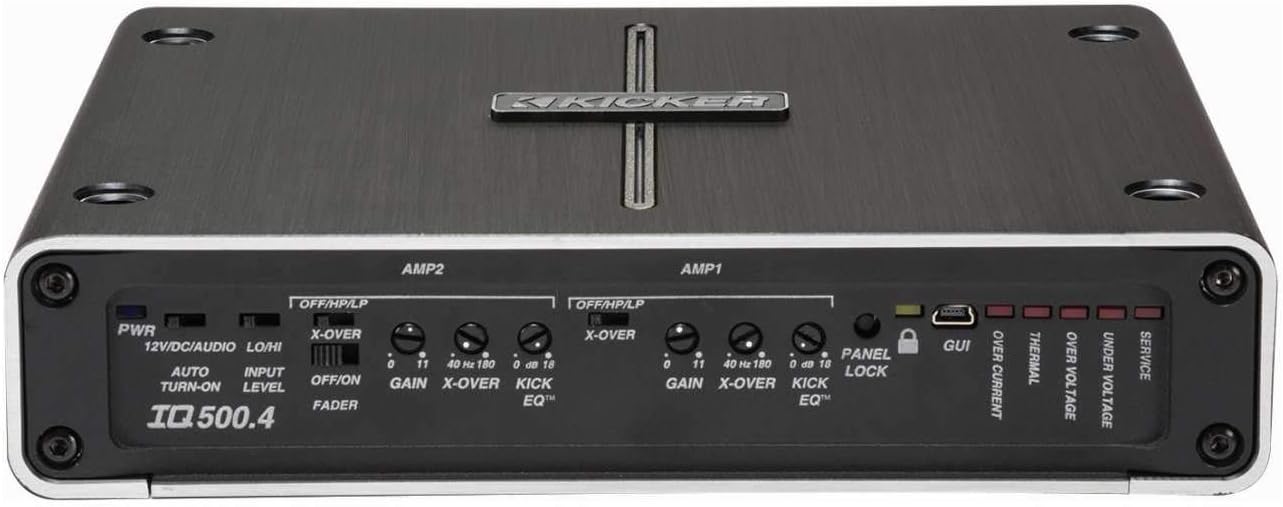
Abbildung 4.3: Ausführlich view der amplifier's control panel, showing gain, crossover, and KickEQ adjustments.

Figure 4.4: Close-up of the input and output terminals, including RCA inputs and speaker wire connections.
5. Bedienung des Ampschwerer
5.1 Initial Setup and Gain Matching
After installation, set the gain controls to match the output voltage of your head unit. Start with the gain at minimum and slowly increase until distortion is heard, then back off slightly.
5.2 Digital Signal Processing (DSP) with TWEEQ App
The IQ500.4 features advanced DSP capabilities accessible via the TWEEQ app for PC, iOS, or Android. Download the app from kicker.com/tweeq. Connect your device to the ampDer Verstärker ist über USB mit einem handelsüblichen Netzteil verbunden.
TWEEQ App Features:
- TWEEQ Wizard: Automatically sets basic tune, including speaker type/size and time-alignment based on listening position.
- Input Signal Routing and Mixing: Customize signal paths.
- Variable High- and Low-Pass Filters: Adjustable from 10-20,000 Hz with selectable crossover characteristics (Butterworth, Linkwitz) and slopes (6, 12, 18, 24 dB/octave).
- Variable KickEQ+ Bass Boost: Adjustable from 0-18 dB, 24-80 Hz, with 0.5-10 Q.
- Einstellbare Zeitverzögerung: Fine-tune sound staging (0-20 ms in 0.02, 0.1, and 1.0 ms increments).
- 31-Band-Grafik-Equalizer: +/-12 dB/band for precise frequency adjustments.
- Dynamic Compressor/Limiter: Fully adjustable (1:1 to 10:1 ratio).
The Panel Lock function disables onboard controls when using the TWEEQ app, ensuring settings are managed digitally.
6. Wartung
- Behalten Sie die ampDer Verstärker muss sauber und staubfrei sein. Verwenden Sie zum Reinigen ein weiches, trockenes Tuch.
- Sorgen Sie für ausreichende Belüftung um das ampKühlmittel, um eine Überhitzung zu verhindern.
- Überprüfen Sie regelmäßig alle Kabelverbindungen auf festen Sitz und Korrosion.
7. Fehlerbehebung
| Problem | Mögliche Ursache | Lösung |
|---|---|---|
| Kein Strom | Sicherung durchgebrannt; Lose Strom-/Masseverbindung; Kein Ferneinschaltsignal. | Check/replace fuse; Secure connections; Verify remote wire connection to head unit. |
| Keine Audioausgabe | Incorrect input/output connections; Gain set too low; Speaker wires shorted. | Verify RCA and speaker connections; Adjust gain; Check speaker wiring for shorts. |
| Verzerrter Klang | Gain set too high; Incorrect crossover settings; Speaker impedance mismatch. | Reduce gain; Adjust crossover settings via TWEEQ app; Ensure speaker impedance is compatible. |
| AmpVerstärkerüberhitzung | Insufficient ventilation; Low impedance load; Prolonged high-volume use. | Ensure clear airflow around amplifier; Check speaker impedance; Reduce volume or allow cool-down period. |
8. Spezifikationen
| Besonderheit | Detail |
|---|---|
| Modell | IQ500.4 |
| Kanäle | 4-Kanal |
| RMS Power (4 ohms) | 65 Watt x 4 |
| RMS Power (2 ohms) | 125 Watt x 4 |
| RMS Power (Bridged 4 ohms) | 250 Watt x 2 |
| CEA-2006-konform | Ja |
| Variable High-Pass Filter | 40–180 Hz, 24 dB/Oktave |
| Variabler Tiefpassfilter | 40–180 Hz, 24 dB/Oktave |
| KickEQ Bass Boost | 0-18 dB bei 40 Hz |
| Digitale Signalverarbeitung (DSP) | Via TWEEQ app (PC, iOS, Android) |
| Equalizer | 31-band graphic (+/-12 dB/band) |
| Zeitverzögerung | 0-20 ms |
| Abmessungen (L x B x H) | 9.45 x 7.52 x 2.05 Zoll |
| Artikelgewicht | 6.67 Pfund |
| Bandtage | 14.4 Volt |
9. Garantie und Support
For warranty information and technical support, please refer to the official Kicker website or contact Kicker customer service directly. Keep your proof of purchase for warranty claims.
Kicker Official WebWebsite: www.kicker.com
Ask a question about this manual
Ask about setup, troubleshooting, compatibility, parts, safety, or missing instructions. Manuals+ will review the question and use this page’s manual context to help answer it.