1. Einleitung
This manual provides comprehensive instructions for the installation, operation, and maintenance of the HP Aruba 2930F 24G 4SFP+ Switch (Model JL253A). Please read this manual thoroughly before using the device to ensure proper setup and optimal performance. Retain this manual for future reference.
2. Produktüberschreitungview
The HP Aruba 2930F 24G 4SFP+ Switch is a high-performance network switch designed for enterprise edge deployments. It features 24 Gigabit Ethernet ports and 4 SFP+ ports for high-speed uplinks, providing reliable and secure connectivity.

Abbildung 2.1: Vorderseite view of the HP Aruba 2930F 24G 4SFP+ Switch, showing 24 RJ45 Gigabit Ethernet ports, 4 SFP+ uplink ports, and LED indicators.

Abbildung 2.2: Schräg view of the HP Aruba 2930F 24G 4SFP+ Switch, highlighting its compact design suitable for rack mounting.
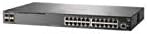
Abbildung 2.3: Seite view of the HP Aruba 2930F 24G 4SFP+ Switch, showing ventilation slots for heat dissipation.
3. Einrichtung
3.1 Auspacken und Inhaltsprüfung
Packen Sie den Switch vorsichtig aus und überprüfen Sie, ob alle Komponenten vorhanden sind. Die Verpackung sollte Folgendes enthalten:
- HP Aruba 2930F 24G 4SFP+ Switch (Model JL253A)
- Stromkabel
- Rack-Montage-Kit
- Konsolenkabel
Falls Artikel fehlen oder beschädigt sind, kontaktieren Sie umgehend Ihren Händler.
3.2 Physische Installation
- Rackmontage: Use the provided rack-mount kit to secure the switch in a standard 19-inch equipment rack. Ensure adequate ventilation around the switch.
- Stromanschluss: Connect the power cable to the switch's power input and then to a grounded AC power outlet.
- Erste Netzwerkverbindung: Connect a computer to the switch's console port using the console cable for initial configuration, or connect to any RJ45 port for network access if DHCP is available.
Ensure all cables are securely connected and routed to prevent accidental disconnections.
4. Bedienungsanleitung
4.1 Einschalten und erster Startvorgang
Once the power cable is connected, the switch will automatically power on. Observe the LED indicators on the front panel. The Power LED should illuminate, indicating the device is receiving power. Other LEDs will indicate port status and activity.
4.2 Portkonnektivität
- RJ45 Ports (10/100/1000BASE-T): Connect standard Ethernet cables (Cat5e or higher) to these ports for connecting network devices such as computers, servers, and other switches. These ports support auto-negotiation for speed and duplex settings.
- SFP+ Ports (10 Gigabit Ethernet): Use compatible SFP+ transceivers and fiber optic cables for high-speed uplinks to core switches or servers.
- PoE+ (Power over Ethernet Plus): If your model supports PoE+, these ports can provide power to compatible devices like IP phones, wireless access points, and security cameras, eliminating the need for separate power supplies.
4.3 LED-Anzeigen
The front panel LEDs provide visual status of the switch and its ports:
- Betriebs-LED: Zeigt den Betriebszustand (Ein/Aus) an.
- Fehler-LED: Indicates system errors or malfunctions.
- Port-Verbindungs-/Aktivitäts-LEDs: Indicate link status (solid green for link) and network activity (flashing green). Different colors or patterns may indicate different speeds (e.g., amber for 100Mbps, green for 1Gbps). Refer to the device's specific LED guide for detailed interpretation.
5. Wartung
5.1 Reinigung
Regularly clean the exterior of the switch with a soft, dry cloth. Do not use liquid or aerosol cleaners. Ensure ventilation openings are free from dust and obstructions to maintain proper airflow.
5.2 Firmware-Updates
Periodically check the Hewlett Packard (Aruba) support webWebsite für Firmware-Updates. Durch die Aktualisierung der Firmware gewährleisten Sie optimale Leistung, Sicherheit und Zugriff auf neue Funktionen. Befolgen Sie die Anweisungen im Firmware-Update-Paket sorgfältig.
6. Fehlerbehebung
This section addresses common issues you might encounter with your HP Aruba 2930F switch.
- Kein Strom:
- Verify the power cable is securely connected to both the switch and a working power outlet.
- Prüfen Sie die Steckdose mit einem anderen Gerät, um sicherzustellen, dass sie funktionsfähig ist.
- Kein Link an einem Port:
- Stellen Sie sicher, dass das Ethernet-Kabel an beiden Enden ordnungsgemäß angeschlossen ist.
- Versuchen Sie es mit einem anderen Ethernet-Kabel.
- Test the connected device with another port or switch to isolate the issue.
- Vergewissern Sie sich, dass das angeschlossene Gerät eingeschaltet ist und ordnungsgemäß funktioniert.
- Slow Network Connection:
- Check for excessive network traffic or bottlenecks.
- Ensure cables are Cat5e or higher for Gigabit speeds.
- Verify duplex settings on connected devices match the switch's auto-negotiated settings.
- Consider updating the switch firmware.
For more advanced troubleshooting or persistent issues, consult the official Hewlett Packard (Aruba) support documentation or contact technical support.
7. Spezifikationen
| Besonderheit | Wert |
|---|---|
| Marke | HEWLETT PACKARD |
| Modellnummer | JL253A |
| Artikelgewicht | 2.4 Kilogramm (5.28 Pfund) |
| Produktabmessungen (L x B x H) | 17.42 x 7.88 x 1.73 Zoll |
| Bandtage | 200 Volt |
| Schnittstellentyp | RJ45, SFP+, PoE+ |
| Datenübertragungsrate | 100 Megabits Per Second (per port, supports Gigabit on RJ45 and 10 Gigabit on SFP+) |
| RAM | 1024 MB |
| Anzahl der Ports | 24 Gigabit Ethernet, 4 SFP+ (Total 28 logical ports) |
| Im Lieferumfang enthaltene Komponenten | Power cable, rack-mount kit, console cable |
| Farbe | Schwarz |
| Kompatible Geräte | Desktop (general network devices) |
Note: Data Transfer Rate of "100 Megabits Per Second" may refer to a baseline or specific port type; the switch supports Gigabit Ethernet on RJ45 ports and 10 Gigabit Ethernet on SFP+ ports.
8. Garantie und Support
This HP Aruba 2930F 24G 4SFP+ Switch is manufactured by HEWLETT PACKARD. For warranty information, please refer to the warranty card included with your product or visit the official Hewlett Packard Enterprise (Aruba) website. Technical support and additional resources can be found on their support portal.
Für Unterstützung besuchen Sie bitte: Aruba-Netzwerkunterstützung