
1. Einleitung
This manual provides detailed instructions for the installation, operation, and maintenance of your Night Owl WM-8HD10L-4720 8-Channel Wired Security System. This system is designed to provide reliable surveillance with high-definition video quality, motion detection, and night vision capabilities. Please read this manual thoroughly before setting up and operating your system to ensure proper functionality and safety.
The Night Owl WM-8HD10L-4720 system includes an 8-channel Digital Video Recorder (DVR) and four wired security cameras, offering comprehensive coverage for your property.
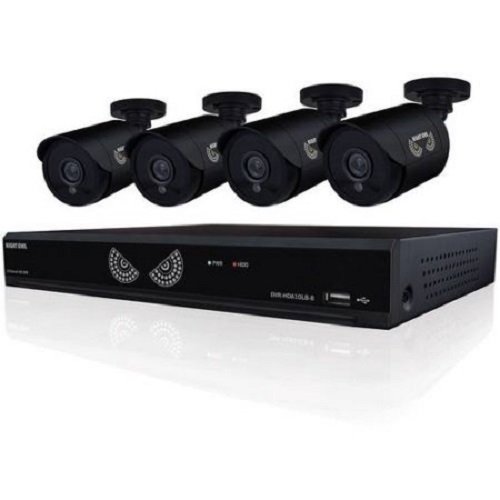
Figure 1: Night Owl WM-8HD10L-4720 8-Channel Wired Security System components, including the DVR and cameras.
2. Sicherheitshinweise
Beachten Sie bei der Verwendung dieses Produkts stets die grundlegenden Sicherheitsvorkehrungen, um das Risiko von Bränden, Stromschlägen und Verletzungen zu verringern.
- Lesen Sie alle Anweisungen, bevor Sie das System in Betrieb nehmen.
- Keep the system away from water and moisture.
- Versuchen Sie nicht, dieses Produkt selbst zu warten. Überlassen Sie alle Wartungsarbeiten qualifiziertem Servicepersonal.
- Verwenden Sie ausschließlich das mit dem System gelieferte Netzteil.
- Sorgen Sie für ausreichende Belüftung des DVR, um eine Überhitzung zu vermeiden.
Warnung gemäß California Proposition 65:
ATTN CA RESIDENTS: WARNING: This product can expose you to Polybrominated biphenyls, which is known to the State of California to cause Cancer and birth defects or other reproductive harm. For more information go to www.p65warnings.ca.gov.
3. Einrichtung
Follow these steps to set up your Night Owl security system.
3.1 Auspacken und Prüfen
- Entnehmen Sie vorsichtig alle Komponenten aus der Verpackung.
- Prüfen Sie, ob alle in der Produktinhaltsbeschreibung aufgeführten Artikel vorhanden sind.
- Inspect all components for any signs of damage. Do not use damaged components.
3.2 Anschließen des DVR
- Connect a monitor to the DVR's video output port (VGA or HDMI, if available).
- Connect a USB mouse to the DVR's USB port for navigation.
- Connect the DVR to your network router using an Ethernet cable (optional, for remote viewing).
3.3 Kameras anschließen
Each camera connects to the DVR using a wired connection. The system supports up to 8 cameras, and comes with 4.
- Mount each camera in your desired location, ensuring a clear field of view.
- Run the camera's video/power cable to the DVR.
- Connect the video connector from the camera cable to an available video input port on the back of the DVR.
- Connect the power connector from the camera cable to the power splitter, and then connect the splitter to the camera power adapter.
3.4 Einschalten
- Once all connections are secure, connect the DVR power adapter to the DVR and then to a power outlet.
- The system will power on automatically. Follow the on-screen prompts for initial setup, including setting the date, time, and creating a password.
4. Betrieb des Systems
This section covers the basic operation of your Night Owl security system.
4.1 Live View
After powering on, the DVR will display the live view von allen angeschlossenen Kameras auf dem Monitor. Sie können zwischen Einzelkamera-Ansicht und Einzelkamera-Ansicht umschalten. view und Mehrkamera view über die Bedienelemente auf dem Bildschirm oder mit der Maus.
4.2 Aufnahmemodi
The system supports various recording modes, including continuous recording and motion-activated recording.
- Motion Sensor Recording: The system is equipped with motion sensors. When motion is detected in a camera's field of view, the DVR will automatically begin recording. You can configure motion detection zones and sensitivity settings in the DVR's menu.
- Geplante Aufnahme: Set specific times for the DVR to record continuously or based on motion.
4.3 Nachtsicht
The cameras are equipped with low light technology for night vision. In low-light conditions, the cameras automatically switch to infrared (IR) mode, providing clear black and white video surveillance.
4.4 Fernbedienung Viewing (optional)
If your DVR is connected to the internet, you may be able to access live camera feeds and recorded footage remotely via a compatible mobile application. Refer to the Night Owl website or app store for specific instructions on setting up remote access.
5. Wartung
Durch sachgemäße Wartung wird die Langlebigkeit und optimale Leistung Ihres Sicherheitssystems gewährleistet.
- Reinigung: Regularly clean the camera lenses with a soft, dry cloth to remove dust and smudges. Ensure the DVR is free from dust buildup, especially around ventilation areas.
- Firmware-Updates: Periodically check the Night Owl official website for available firmware updates for your DVR. Firmware updates can improve system performance, add new features, and enhance security.
- Festplattenzustand: The DVR's hard drive stores all recorded footage. Monitor its health through the DVR's system settings and ensure there is sufficient space for recordings.
6. Fehlerbehebung
This section addresses common issues you might encounter with your security system.
- Kein Videosignal von der Kamera:
- Check all cable connections between the camera and the DVR.
- Stellen Sie sicher, dass die Kamera mit Strom versorgt wird.
- Test the camera with a different cable or DVR port if available.
- DVR lässt sich nicht einschalten:
- Verify the power adapter is securely connected to the DVR and a working power outlet.
- Stellen Sie sicher, dass die Steckdose funktionsfähig ist.
- Remote App Password Error:
- The password for the mobile app may be different from the DVR's local password. Refer to the app's specific setup instructions or the Night Owl support resources for remote access password management.
- Ensure your DVR has an active internet connection.
- Schlechte Nachtsichtqualität:
- Stellen Sie sicher, dass die Kameralinse sauber und frei von Verunreinigungen ist.
- Prüfen Sie, ob sich in der Nähe der Kamera starke Lichtquellen befinden, die die Infrarotbeleuchtung beeinträchtigen könnten.
7. Spezifikationen
Technical specifications for the Night Owl WM-8HD10L-4720 security system.
| Besonderheit | Beschreibung |
|---|---|
| Modellnummer | WM-8HD10L-4720 |
| Marke | Nachteule |
| Konnektivitätstechnologie | Verdrahtet |
| Auflösung der Videoaufnahme | 720p |
| Besondere Merkmale | Bewegungssensor, Nachtsicht |
| Anzahl der Kanäle | 8 |
| Farbe | Schwarz |
| Stromquelle | Kabelgebundene Elektrik |
| Empfohlene Verwendung | Überwachung |
| Low-Light-Technologie | Nachtsicht |
| Bildfrequenz | 30 fps |
| Aufnahmemodus | Bewegungssensor |
| Objektivtyp | Gleitsichtbrille |
| Technische Daten | 18.3 x 8.7 x 12.2 Zoll |
| Artikelgewicht | 2 Pfund |
| Batterien erforderlich | 1 Lithium Polymer (for internal clock/memory backup) |
| UPC | 810830023137 |
8. Garantieinformationen
Night Owl products typically come with a limited manufacturer's warranty. For specific details regarding the warranty period, coverage, and terms for your WM-8HD10L-4720 system, please refer to the warranty card included with your product or visit the official Night Owl webBewahren Sie Ihren Kaufbeleg für Garantieansprüche auf.
9. Unterstützung
For technical assistance, customer service, or additional resources, please visit the official Night Owl support website or contact their customer service department. You can often find FAQs, video tutorials, and downloadable software/firmware updates on their support portal.
Online-Hilfe: Visit the Night Owl official webSite für Supportressourcen.
Kontaktinformationen: Refer to the Night Owl webAuf dieser Website finden Sie aktuelle Kontaktnummern und Öffnungszeiten.