
1. Einleitung
Thank you for choosing the ROGER TECHNOLOGY R41/831 Electromechanical Motor. This manual provides essential information for the correct installation, safe operation, and proper maintenance of your motor. Please read these instructions carefully before beginning any installation or operation procedures. Keep this manual in a safe place for future reference.
1.1 Sicherheitshinweise
WARNUNG: Incorrect installation or improper use can cause serious injury or damage. All installation and maintenance procedures must be performed by qualified personnel in compliance with local safety regulations.
- Always disconnect power before performing any work on the motor.
- Stellen Sie sicher, dass alle elektrischen Verbindungen sicher und ordnungsgemäß isoliert sind.
- Do not allow children or unauthorized persons to operate the system.
- Regularly inspect the system for signs of wear or damage.
2. Produktüberschreitungview
The ROGER TECHNOLOGY R41/831 is a fast 230V AC electromechanical gear motor designed for automating overhead doors up to 8 square meters. It features an irreversible mechanism, an integrated control unit, an encoder for precise positioning, and mechanical micro-switch limit switches.
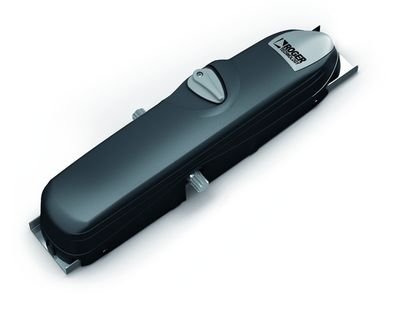
Abbildung 1: ROGER TECHNOLOGY R41/831 Electromechanical Motor. This image shows the compact design of the motor unit, typically mounted for overhead door automation. It highlights the main casing und Verbindungspunkte.
2.1 Schlüsselkomponenten
- Motorblock: The primary drive mechanism.
- Steuereinheit: Integrated electronic board for system management.
- Encoder: Provides precise feedback on door position.
- Endschalter: Mechanical micro-switches to define open and closed positions.
- Freigabemechanismus: Manual override for emergency operation.
3. Einrichtung und Installation
Installation should only be carried out by qualified technicians. Ensure all necessary tools and safety equipment are available before starting.
3.1 Prüfungen vor der Installation
- Verify the overhead door is in good working condition and moves freely.
- Confirm the power supply (230V AC) is available at the installation site.
- Ensure adequate space for motor mounting and maintenance access.
3.2 Montage des Motors
- Securely attach the motor bracket to the ceiling or appropriate support structure above the door.
- Mount the motor unit onto the bracket, ensuring it is level and aligned with the door's center.
- Connect the drive arm from the motor to the door's top panel, allowing for smooth articulation.
3.3 Elektrische Anschlüsse
Refer to the wiring diagram provided with the motor for specific connection details. Ensure power is OFF before making any connections.
- Connect the 230V AC main power supply to the designated terminals on the control unit.
- Connect safety devices such as photocells or safety edges to their respective inputs.
- Connect any external control devices (e.g., push buttons, remote receivers).
3.4 Einstellung des Endschalters
The mechanical limit switches define the fully open and fully closed positions of the door. Adjust them carefully to prevent over-travel.
- Manually move the door to the desired fully open position.
- Adjust the open limit switch until it activates.
- Manually move the door to the desired fully closed position.
- Adjust the closed limit switch until it activates.
- Test the door movement to confirm correct limit switch operation.
4. Bedienungsanleitung
Once installed and configured, the R41/831 motor provides automated operation of your overhead door.
4.1 Normalbetrieb
- Press the designated button on your remote control or wall switch to open or close the door.
- The door will automatically stop at the programmed limit switch positions.
- Safety devices (e.g., photocells) will prevent the door from closing if an obstruction is detected.
4.2 Manuelle Freigabe
In case of power failure or malfunction, the door can be operated manually using the release mechanism.
- Locate the manual release handle or lever on the motor unit.
- Pull or activate the release mechanism to disengage the motor from the door.
- The door can now be opened or closed by hand.
- To re-engage, push or reset the release mechanism and operate the door electrically once.
5. Wartung
Regular maintenance ensures the longevity and safe operation of your R41/831 motor. Always disconnect power before performing any maintenance.
5.1 Regelmäßige Kontrollen (monatlich)
- Inspect the door's mechanical components (springs, cables, rollers) for wear or damage.
- Check the motor mounting bolts for tightness.
- Verify the proper functioning of safety devices (photocells, safety edges).
- Ensure the manual release mechanism operates correctly.
5.2 Annual Servicing (By Qualified Technician)
- Lubricate moving parts of the door and motor as recommended by the door manufacturer.
- Inspect electrical connections for corrosion or loose wiring.
- Check motor gear integrity and wear.
- Perform a full operational test, including limit switch accuracy and safety reversal.
6. Fehlerbehebung
This section provides solutions to common issues. For complex problems, contact a qualified technician.
| Problem | Mögliche Ursache | Lösung |
|---|---|---|
| Der Motor reagiert nicht auf Befehle. | No power supply; Remote control battery flat; Safety device activated. | Check power connection and circuit breaker; Replace remote battery; Check photocells for obstruction. |
| Die Tür stoppt oder fährt unerwartet zurück. | Obstruction detected by safety device; Limit switches incorrectly set. | Remove obstruction; Re-adjust limit switches (refer to Section 3.4). |
| Door operates slowly or with difficulty. | Door mechanism friction; Motor wear. | Lubricate door components; Contact technician for motor inspection. |
7. Spezifikationen
| Besonderheit | Detail |
|---|---|
| Modell | R41/831 |
| Stromversorgung | 230 V Wechselspannung |
| Motortyp | Electromechanical, Irreversible |
| Max Door Surface Area | 8 m² |
| Steuereinheit | Integriert |
| Encoder | Ja |
| Endschalter | Mechanical Micro-switch |
| Verpackungsabmessungen | 14 x 7 x 5 cm |
| Gewicht | 0.15 kg |
8. Garantie und Support
ROGER TECHNOLOGY products are manufactured to high standards and are covered by a manufacturer's warranty against defects in materials and workmanship. Please refer to your purchase documentation for specific warranty terms and duration.
For technical assistance, spare parts, or warranty claims, please contact your authorized ROGER TECHNOLOGY dealer or visit the official ROGER TECHNOLOGY website for support contact information. When contacting support, please have your product model (R41/831) and purchase details available.
Hinweis: Informationen zur Verfügbarkeit von Ersatzteilen sind in den Produktdetails nicht enthalten.