AIBOO YK-300000197
AIBOO Linkable Under Cabinet LED Lighting System User Manual
Modell: YK-300000197
1. Einleitung
This manual provides comprehensive instructions for the installation, operation, and maintenance of your AIBOO Linkable Under Cabinet LED Lighting System. This system features hardwired 12V slim aluminum dimmable puck lights with a wireless controller, designed for ambiance lighting in various indoor settings. Please read this manual thoroughly before installation and use.
2. Wichtige Sicherheitshinweise
- Elektrische Sicherheit: This product is designed for 110V/120Vac input and requires hardwiring. Installation should be performed by a qualified electrician or an individual with intermediate knowledge of electrical wiring to prevent electric shock or fire hazards. Ensure power is disconnected at the circuit breaker before any installation or maintenance.
- Kein Wandstecker: This system does NOT include a wall plug power adapter. It is intended for direct wiring into your electrical system.
- Nur zur Verwendung im Innenbereich: This lighting system is designed for indoor use in dry locations. Do not expose to moisture or water.
- Belüftung: Ensure adequate ventilation around the LED driver to prevent overheating.
- Komponentenkompatibilität: Use only the components provided or specified by AIBOO. Using incompatible parts may damage the system or pose a safety risk.
3. Packungsinhalt
Bitte überprüfen Sie, ob alle unten aufgeführten Artikel in Ihrem Paket enthalten sind:
- LED Puck Lights (6 units)
- RF Wireless Remote Control (1 unit)
- LED Controller (1 unit)
- 12V 1A Hardwired LED Driver (Power Adapter) (1 unit)
- 5ft Extension Cords (2 units)
- 6-Way Splitter (1 unit)
- Mounting Stickers (12 units)
- Befestigungsschrauben (12 Stück)

4. Produktspezifikationen
| Marke | AIBOO |
| Modellnummer | YK-300000197 |
| Lichtfarbe | 6000K Tageslichtweiß |
| Material | Metal (Puck Light Housing), Plastic (Shade) |
| Puck Light Dimensions | 2.36"L x 2.36"B x 0.31"H (6 cm x 6 cm x 0.8 cm) |
| Stromquelle | Kabelgebunden (festverdrahtet) |
| Bandtage | 12 Volts (DC output from driver) |
| Lichtquellentyp | LED |
| Helligkeit | 1200 Lumens (Total for 6 lights) |
| Besondere Merkmale | Dimmable, Linkable, Remote Control |
| Kontrollmethode | RF-Funkfernbedienung |
| UPC | 712411875756 |

5. Einrichtung und Installation
Vor Beginn der Installation muss sichergestellt werden, dass die Hauptstromversorgung des Installationsbereichs am Leitungsschutzschalter abgeschaltet ist.
5.1 Schaltplan (siehe oben)view

5.2 Hardwired Power Adapter Connection
The system includes a hardwired power adapter (LED Driver) designed to connect directly to a 110V/120Vac circuit. This adapter converts AC power to 12V DC for the LED lights. A wall plug is not included.
- Schalten Sie den Strom am Hauptschalter aus.
- Connect the input wires of the LED driver to your 110V/120Vac circuit wiring. Ensure proper polarity (live to live, neutral to neutral, ground to ground) according to local electrical codes.
- Secure all connections with appropriate wire connectors.
5.3 Connecting the Puck Lights
The puck lights can be connected in two primary configurations: Series Connection or Parallel Connection.
5.3.1 Reihenschaltung
In a series connection, the puck lights are linked one after another. This method is suitable for linear installations where lights are spaced evenly in a line.

- Connect the LED controller to the output of the hardwired LED driver.
- Connect the first puck light to the LED controller.
- Connect the subsequent puck lights to each other using their integrated cables.
- Use extension cords if additional length is required between lights.
5.3.2 Parallelschaltung
For installations requiring lights to branch out from a central point, the 6-way splitter allows for parallel connection.
- Connect the LED controller to the output of the hardwired LED driver.
- Connect the 6-way splitter to the LED controller.
- Connect individual puck lights to the available ports on the 6-way splitter.
- Use extension cords if additional length is required for individual lights.
5.4 Mounting the Puck Lights
The puck lights can be mounted using either the provided screws or adhesive stickers.
- Oberflächenvorbereitung: Stellen Sie sicher, dass die Montagefläche sauber, trocken und glatt ist.
- Klebemontage: Peel the backing from the adhesive sticker and firmly press the puck light onto the desired surface. Hold for 30 seconds to ensure a strong bond.
- Schraubmontage: Use the provided screws to secure the puck lights to the surface. Pre-drilling pilot holes may be necessary depending on the material.
6. Bedienungsanleitung
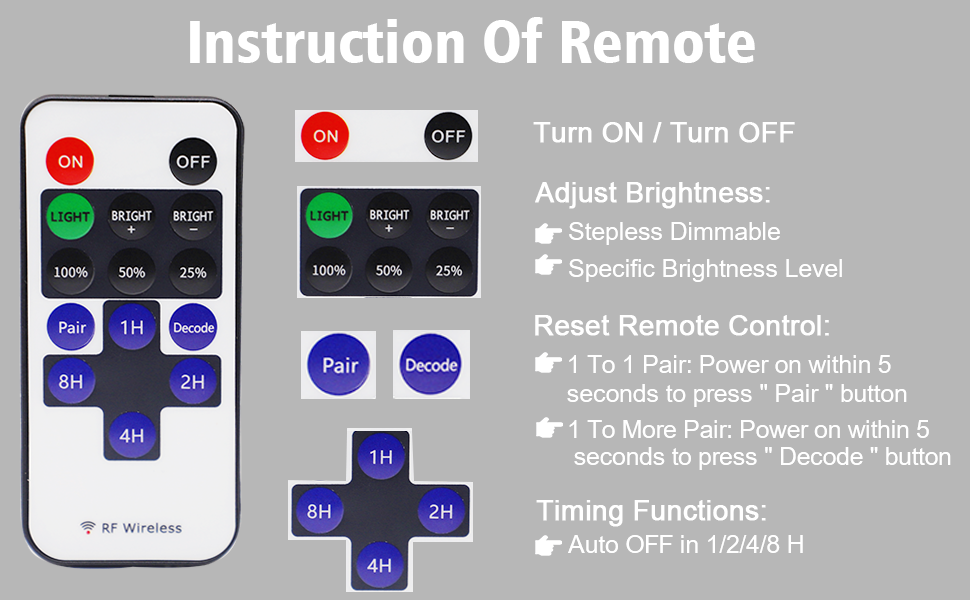
The AIBOO LED Lighting System is controlled by an RF wireless remote control.
6.1 Fernbedienungsfunktionen

- EIN/AUS: Drücken Sie die ON Knopf zum Einschalten des Lichts und der AUS Knopf zum Ausschalten.
- Helligkeitsanpassung:
- Drücken LIGHT + or LIGHT - to gradually increase or decrease brightness (stepless dimming).
- Verwenden Sie die 100 %, 50 %, 25 % Tasten für schnelle Helligkeitsvoreinstellungen.
- Paarung: To pair the remote with the controller, press the Paar button within 5 seconds of powering on the lights until the lights flicker.
- Decoding (1 to More Pair): To pair one remote with multiple controllers, press the Dekodieren button within 5 seconds of powering on the lights until the lights flicker.
- Zeitfunktionen: Drücken 1H, 2H, 4H, oder 8H to set the lights to automatically turn off after 1, 2, 4, or 8 hours, respectively.


7. Wartung
The AIBOO LED Lighting System requires minimal maintenance.
- Reinigung: Ensure the lights are off and cool before cleaning. Wipe the puck lights and controller with a soft, dry cloth. Do not use abrasive cleaners or solvents.
- Inspektion: Periodically check all connections for tightness and inspect cables for any signs of damage.
- Batteriewechsel: The remote control requires 1 CR2 battery. Replace the battery when the remote's range decreases or it stops responding.
8. Fehlerbehebung
If you encounter issues with your AIBOO LED Lighting System, refer to the following common problems and solutions:
| Problem | Mögliche Ursache | Lösung |
|---|---|---|
| Das Licht geht nicht an. | No power to the LED driver; Remote control battery is dead; Remote not paired; Loose connections. | Check circuit breaker. Replace remote battery. Re-pair remote (see Section 6.1). Verify all cable connections are secure. |
| Lights are flickering or strobing. | Too many lights connected to a single power supply; Faulty power supply. | Ensure no more than 6 lights are connected to one power supply. If flickering persists, inspect the power supply for signs of damage (e.g., warped casing, discoloration). A damaged power supply may need replacement. |
| Die Fernbedienung reagiert nicht. | Remote control battery is dead; Remote is out of range; Remote is not paired with the controller. | Replace the CR2 battery in the remote. Move closer to the LED controller. Re-pair the remote with the controller (see Section 6.1). |
| Lights do not dim or respond to brightness controls. | Remote not paired correctly; Controller malfunction. | Re-pair the remote (see Section 6.1). If the issue persists, contact customer support. |
9. Garantieinformationen
AIBOO products are manufactured to high-quality standards. For specific warranty details regarding your Linkable Under Cabinet LED Lighting System, please refer to the warranty card included with your purchase or visit the official AIBOO webBewahren Sie Ihren Kaufbeleg als Kaufnachweis für eventuelle Garantieansprüche auf.
10. Kundendienst
For technical assistance, troubleshooting, or product inquiries, please contact AIBOO customer support.
- U.S. Live Customer Support: Montag - Freitag, 9:00 - 17:00 Uhr (EST)
- Online-Ressourcen: Besuchen Sie die AIBOO Store on Amazon für zusätzliche Produktinformationen und Support.

Ask a question about this manual
Ask about setup, troubleshooting, compatibility, parts, safety, or missing instructions. Manuals+ will review the question and use this page’s manual context to help answer it.