
1. Einleitung
This manual provides detailed instructions for the installation, operation, and maintenance of your ASRock AB350M-HDV MicroATX Motherboard. The ASRock AB350M-HDV is designed to support AMD Socket AM4 A-Series APUs (Bristol Ridge) and Ryzen Series CPUs (Summit Ridge), featuring a Digi Power design and 7 Power Phase design for stable performance. It supports DDR4 memory and offers various connectivity options including SATA3, USB 3.0, and an Ultra M.2 slot.
2. Produktüberschreitungview
The ASRock AB350M-HDV motherboard is a MicroATX form factor board, ideal for compact PC builds. It features essential components for a modern computing system.

Abbildung 2.1: Schräg view of the ASRock AB350M-HDV Motherboard, showcasing its compact MicroATX design and various components.
Hauptmerkmale:
- Supports AMD Socket AM4 A-Series APUs (Bristol Ridge) and Ryzen Series CPUs (Summit Ridge).
- DDR4 memory support up to 3200+ (OC) for Ryzen CPUs and 2400 for A-series APUs.
- 1 PCIe 3.0 x16 slot and 1 PCIe 2.0 x1 slot for expansion cards.
- 4 SATA3 ports and 1 Ultra M.2 (PCIe Gen3 x4 & SATA3) slot for storage.
- 6 USB 3.0 ports (2 front, 4 rear) and 2 USB 2.0 ports for peripheral connectivity.
- Integrated Gigabit Ethernet for network connectivity.
- Video outputs: VGA, DVI, HDMI.

Abbildung 2.2: Draufsicht view of the ASRock AB350M-HDV Motherboard, highlighting the CPU socket, RAM slots, M.2 slot, and PCIe slots.
3. Einrichtung und Installation
Follow these steps carefully to install your ASRock AB350M-HDV motherboard and its components.
3.1 CPU-Installation
- Suchen Sie den AM4-CPU-Sockel auf dem Motherboard.
- Heben Sie den Lasthebel an der Seite der Steckdose an.
- Richten Sie die dreieckige Markierung auf der CPU an der entsprechenden Markierung am Sockel aus. Setzen Sie die CPU vorsichtig in den Sockel ein, ohne sie mit Gewalt einzusetzen.
- Senken Sie den Lasthebel ab, um die CPU zu fixieren.
- Installieren Sie den CPU-Kühler gemäß den Anweisungen des Herstellers.
3.2 RAM (Arbeitsspeicher) Installation
- Locate the DDR4 DIMM slots. This motherboard has 4 slots.
- Öffnen Sie die Klemmen an beiden Enden des DIMM-Steckplatzes.
- Richten Sie die Kerbe am RAM-Modul an der Nut im DIMM-Steckplatz aus.
- Insert the RAM module firmly into the slot until the clips snap into place. Ensure both clips are closed.
3.3 Installation von Speichermedien (SATA & M.2)
SATA-Laufwerke:
- Verbinden Sie ein Ende eines SATA-Datenkabels mit einem SATA3-Anschluss auf dem Motherboard.
- Verbinden Sie das andere Ende des SATA-Datenkabels mit Ihrer Festplatte oder SSD.
- Verbinden Sie das Speichermedium mit einem SATA-Stromkabel von Ihrem Netzteil (PSU).
M.2-SSD:
- Locate the Ultra M.2 slot on the motherboard.
- Remove the M.2 screw and standoff from the slot.
- Setzen Sie die M.2 SSD in einem Winkel von 30 Grad in den Steckplatz ein.
- Push the M.2 SSD down and secure it with the screw and standoff.
3.4 Stromanschlüsse
- Connect the 24-pin ATX power connector from your PSU to the 24-pin power socket on the motherboard.
- Connect the 8-pin (or 4-pin) ATX 12V power connector from your PSU to the corresponding socket near the CPU.
3.5 Anschlüsse an der Vorderseite
Connect the cables from your PC case (Power Button, Reset Button, HDD LED, Power LED, USB, Audio) to the corresponding headers on the motherboard. Refer to the motherboard layout diagram in your physical manual for exact header locations.
3.6 Grafikkarteninstallation
- Suchen Sie den PCIe 3.0 x16-Steckplatz.
- Entfernen Sie die entsprechende Erweiterungssteckplatzabdeckung von Ihrem PC-Gehäuse.
- Align the graphics card with the PCIe slot and press it down firmly until it clicks into place.
- Befestigen Sie die Grafikkarte mit einer Schraube am Gehäuse.
- Schließen Sie alle erforderlichen PCIe-Stromkabel von Ihrem Netzteil an die Grafikkarte an.
4. Bedienungsanleitung
4.1 Erster Start und BIOS/UEFI-Einrichtung
- Nachdem Sie alle Komponenten zusammengebaut haben, schließen Sie Monitor, Tastatur und Maus an.
- Schalten Sie Ihr System ein.
- Drücken Sie während des Startvorgangs wiederholt die Taste DEL or F2 Taste zum Aufrufen des BIOS/UEFI-Setup-Dienstprogramms.
- In the BIOS, you can configure boot order, system time, and other advanced settings. Save changes and exit to boot into your operating system installation media.
4.2 Treiberinstallation
After installing your operating system, install the necessary drivers for the motherboard components. These typically include chipset drivers, audio drivers, LAN drivers, and any specific utility drivers. Drivers can be found on the ASRock official webWebsite für Ihr spezifisches Motherboard-Modell.
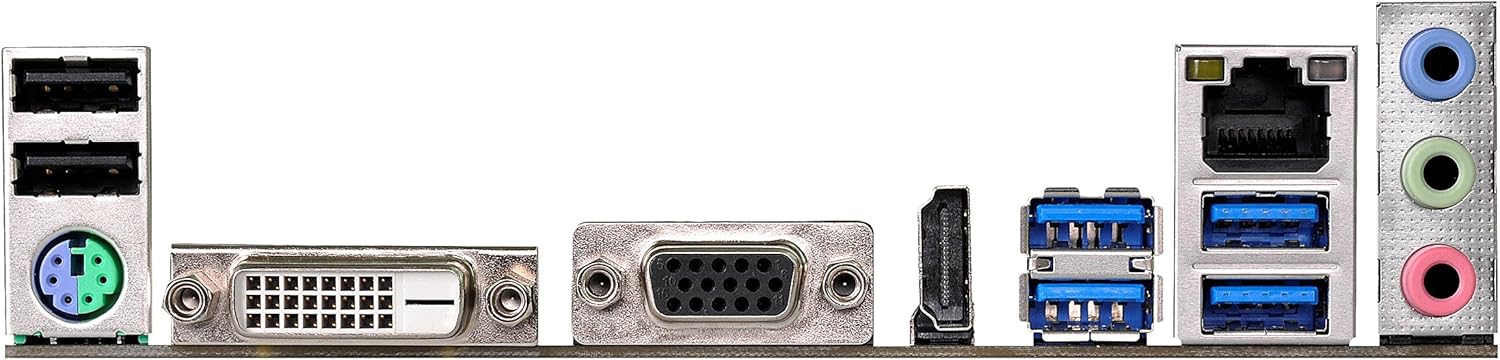
Figure 4.1: Rear I/O panel of the ASRock AB350M-HDV Motherboard, showing USB ports, video outputs (VGA, DVI, HDMI), LAN port, and audio jacks.
5. Wartung
Durch sachgemäße Wartung wird die Langlebigkeit und optimale Leistung Ihres Motherboards sichergestellt.
5.1 Reinigung
- Entfernen Sie regelmäßig mit Druckluft Staub von der Hauptplatine und den Komponenten.
- Vor der Reinigung sicherstellen, dass das System ausgeschaltet und vom Stromnetz getrennt ist.
- Vermeiden Sie es, flüssige Reinigungsmittel direkt auf Bauteile aufzutragen.
5.2 BIOS/UEFI-Updates
Überprüfen Sie regelmäßig das ASRock-System. website for BIOS/UEFI updates. Updates can improve compatibility, stability, and performance. Follow the instructions provided by ASRock carefully when performing a BIOS update to avoid system damage.
6. Fehlerbehebung
Dieser Abschnitt bietet Lösungen für häufig auftretende Probleme.
6.1 Kein Strom / Kein POST (Selbsttest beim Einschalten)
- Stromanschlüsse prüfen: Ensure the 24-pin and 8-pin (or 4-pin) CPU power connectors are securely seated.
- Netzteil prüfen: Test your power supply unit (PSU) to ensure it is functional and providing adequate power.
- Komponenten neu einsetzen: Remove and re-install the CPU, RAM, and graphics card to ensure they are properly seated.
- CMOS löschen: Refer to your physical manual for instructions on how to clear the CMOS (Complementary Metal-Oxide-Semiconductor) settings, which can resolve boot issues.
6.2 Keine Displayausgabe
- Monitorverbindung: Ensure your monitor is correctly connected to the graphics card or motherboard (if using an APU with integrated graphics).
- Grafikkarte: If using a dedicated graphics card, ensure it is properly installed and has sufficient power. Test with another graphics card if possible.
- APU Compatibility: If using an AMD A-Series APU, ensure your monitor is connected to the motherboard's video outputs (VGA, DVI, HDMI). Ryzen CPUs without integrated graphics require a dedicated graphics card.
6.3 Betriebssystem startet nicht
- Reihenfolge der Stiefel: Check the BIOS/UEFI settings to ensure the correct boot device (e.g., SSD/HDD with OS) is prioritized.
- Speichergerät: Verify that your storage device is detected in the BIOS.
- Betriebssysteminstallation: If the OS is newly installed, ensure the installation process completed successfully.
7. Spezifikationen
| Marke | ASRock |
| Modellname | AB350M-HDV |
| CPU-Sockel | Sockel AM4 |
| Chipsatztyp | AMD Vorgebirge B350 |
| Kompatible Prozessoren | AMD A-Series APUs (Bristol Ridge), Ryzen Series CPUs (Summit Ridge) |
| RAM-Speichertechnologie | DDR4 |
| Speichertaktfrequenz | 2133 MHz (Base), up to 3200+ (OC) for Ryzen CPU |
| Verfügbare Speichersteckplätze | 4 |
| Grafikkartenschnittstelle | PCI Express (1x PCIe 3.0 x16, 1x PCIe 2.0 x1) |
| Total SATA Ports | 4 (SATA3) |
| M.2-Steckplatz | 1 (Ultra M.2, PCIe Gen3 x4 & SATA3) |
| Anzahl USB-Anschlüsse | 8 (6x USB 3.0, 2x USB 2.0) |
| Videoausgänge | VGA, DVI, HDMI |
| Hauptstromanschlusstyp | 24-Pin ATX |
| Formfaktor | MicroATX |
| Artikelgewicht | 1.3 Pfund |
8. Garantieinformationen
The ASRock AB350M-HDV Motherboard comes with a 1 Jahr Garantie. For specific terms and conditions, please refer to the warranty card included with your product or visit the official ASRock webWebsite.
9. Unterstützung
For further assistance, technical support, or driver downloads, please visit the official ASRock webWebsite:
You can also find contact information for customer service and support resources on their webWebsite.