1. Einleitung
Thank you for choosing the DIGOO PPT1 Remote Dog Training Collar. This manual provides detailed instructions for the safe and effective use of your training system. Please read this manual thoroughly before operating the device to ensure proper function and to maximize training effectiveness for your dog. This system is designed to assist in training dogs and correcting undesirable behaviors through beep, vibration, and static stimulation modes.

Image: The DIGOO PPT1 remote dog training collar system, showing the handheld remote transmitter and the receiver collar.
2. Packungsinhalt
Bitte überprüfen Sie, ob alle unten aufgeführten Artikel in Ihrem Paket enthalten sind:
- 1 x DIGOO DG-PPT1 Remote Transmitter
- 1 x DIGOO DG-PPT1 Waterproof Receiver Collar
- 4 x DIGOO DG-PPT1 Contact Screws (two sizes)
- 1 x DIGOO DG-PPT1 USB Charge Cable (Y-splitter)
- 1 x DIGOO DG-PPT1 Test Light
- 1 x Benutzerhandbuch (dieses Dokument)
3. Produktüberschreitungview
3.1 Fernsender

Image: Detailed diagram of the remote transmitter, highlighting its components such as the LCD screen, antenna, LED light, indicator, up/down buttons for vibration/shock, vibration button, shock button, LED light button, channel switch button, light/sound button, and charging port.
- Antenne: Zur Signalübertragung.
- LED-Licht: Indicates operation and battery status.
- Indikator: Shows current mode and level.
- LCD Bildschirm: Blue backlit display for day and night visibility, showing channel, mode, level, and battery status.
- Auf/Ab-Tasten: Adjust vibration and static stimulation levels (0-100).
- Vibrationstaste: Aktiviert den Vibrationsmodus.
- Schocktaste: Activates static stimulation mode.
- LED-Lichttaste: Activates the receiver's LED light.
- Channel Switch Button (1-2-3): Selects the receiver collar to control (up to 3 collars).
- Light/Sound Button: Activates beep sound mode.
- Ladeloch: USB-Ladeanschluss.
3.2 Empfängerkragen
- Kontaktstellen: Deliver static stimulation.
- Netzschalter: Schaltet den Receiver ein/aus.
- Ladeanschluss: USB-Ladeanschluss.
- Kontrollleuchte: Shows power and operational status.
- Verstellbarer Riemen: Fits neck sizes from 11.8 inches (30cm) to 23.6 inches (60cm).
- Wasserdichtes Design: Allows use in wet conditions, including swimming.
4. Einrichtung
4.1 Aufladen der Geräte
Both the remote transmitter and receiver collar use rechargeable lithium-ion batteries. Use the provided Y-splitter USB charging cable to charge both devices simultaneously.
- Connect the Y-splitter USB cable to a standard USB power adapter (not included) or a computer USB port.
- Plug one micro-USB end into the charging port of the remote transmitter.
- Plug the other micro-USB end into the charging port of the receiver collar.
- Charge for approximately 3-4 hours until fully charged. The indicator lights will change to indicate full charge (refer to device indicators for specific behavior).
Note: A full charge typically provides up to 2 weeks of use, depending on frequency.
4.2 Ein-/Ausschalten
- Fernsender: Press any button to activate. It will automatically enter standby mode after 5 minutes of inactivity to save power.
- Empfängerhalsband:
- Zum Einschalten: Press and hold the power button on the receiver until the working indicator light illuminates.
- Ausschalten: When the working indicator is not shining, press and hold the power button for a few seconds until the working indicator flashes twice, then release.
4.3 Koppeln von Fernbedienung und Empfänger
The remote and receiver are typically pre-paired from the factory. If re-pairing is needed or if you are adding additional collars:
- Stellen Sie sicher, dass beide Geräte vollständig aufgeladen und ausgeschaltet sind.
- Turn on the remote transmitter. Select the desired channel (1, 2, or 3) using the channel switch button.
- Drücken und halten Sie den Ein-/Ausschalter am Empfängerhalsband, bis die Kontrollleuchte schnell blinkt.
- Within 10 seconds, press the "Shock" or "Vibration" button on the remote transmitter.
- If pairing is successful, the receiver's indicator light will stop flashing and remain solid for a moment, then flash slowly.
- To pair additional collars, repeat the process, selecting a different channel on the remote for each new collar.

Image: Illustration demonstrating how one remote transmitter can be paired with and control up to three separate receiver collars, each on its own channel.
4.4 Anpassen des Halsbandes
Proper fit of the receiver collar is crucial for effective and safe operation. The contact points must have direct contact with your dog's skin.

Image: Visual guide for adjusting the collar strap and selecting the appropriate contact screw length (6mm or 14mm) to ensure proper fit for dogs of various sizes, from 10 to 150 lbs.
- Stellen Sie sicher, dass das Halsband ausgeschaltet ist.
- Select the appropriate length of contact screws (6mm or 14mm) based on your dog's coat length. Longer screws are for thicker coats.
- Attach the chosen contact screws securely to the receiver.
- Place the receiver collar around your dog's neck, ensuring the contact points are positioned underneath the neck.
- Stellen Sie den Riemen so ein, dass er eng anliegt, aber nicht zu fest sitzt. Sie sollten bequem zwei Finger zwischen Riemen und Hundehals schieben können.
- The collar should not be worn for more than 12 hours a day to prevent skin irritation. Regularly check your dog's neck for any signs of irritation.
5. Bedienungsanleitung
The DIGOO PPT1 offers three training modes: Beep, Vibration, and Static Stimulation.
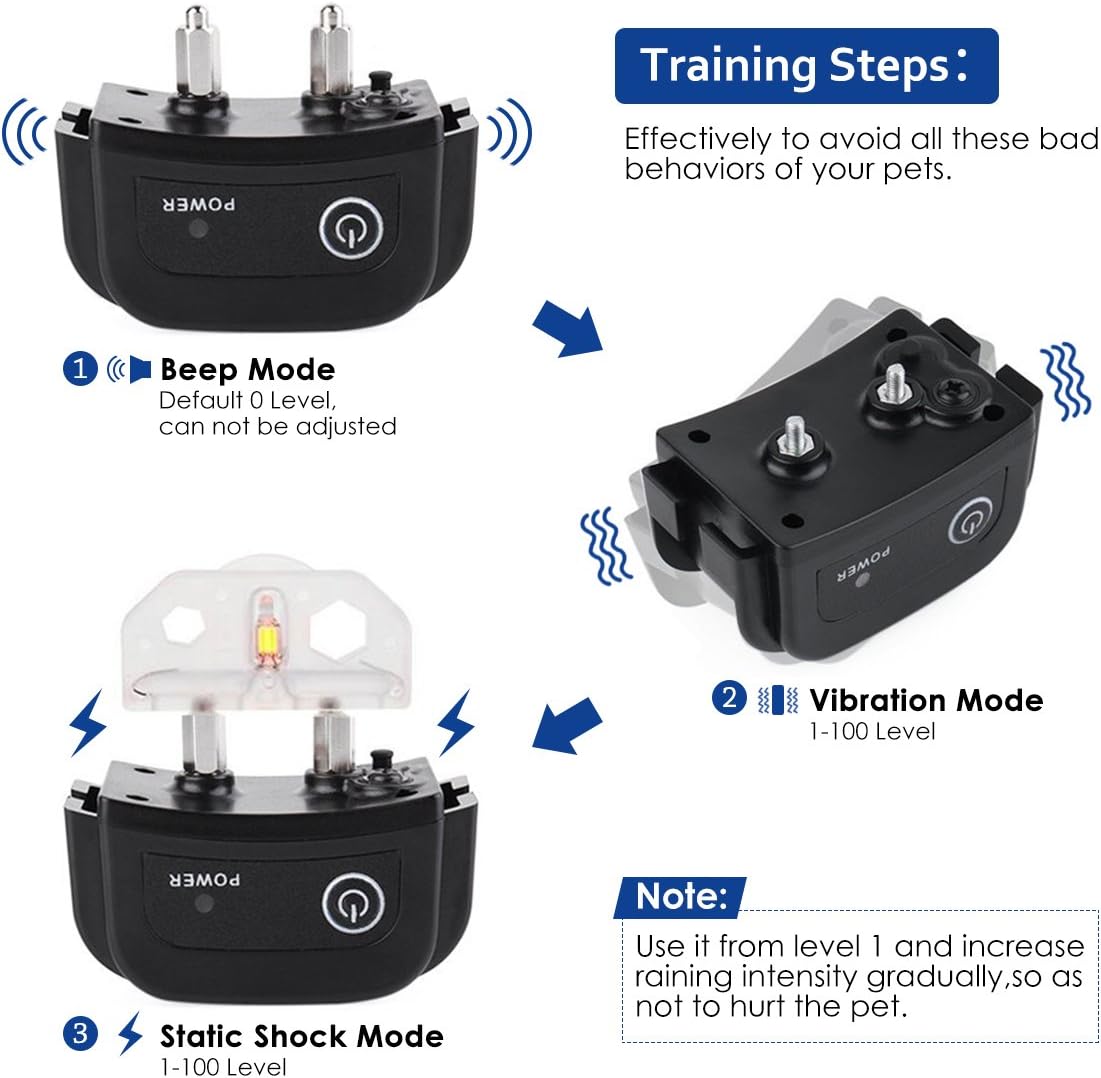
Image: Visual representation of the three training modes: Beep (default level 0, not adjustable), Vibration (levels 1-100), and Static Shock (levels 1-100). A note advises to start with level 1 and gradually increase intensity.
5.1 Beep Mode
- Drücken Sie die Light/Sound Button auf der Fernbedienung.
- The receiver will emit an audible beep sound.
- This mode is ideal for giving warnings or attracting your dog's attention. The beep level is fixed and not adjustable.
5.2 Vibrationsmodus
- Drücken Sie die Vibrationstaste auf der Fernbedienung.
- Verwenden Sie die Auf/Ab-Tasten to select a vibration level from 0 to 100.
- The receiver will vibrate according to the selected intensity.
- Beginnen Sie mit der niedrigsten wirksamen Stufe und erhöhen Sie diese gegebenenfalls schrittweise.
5.3 Static Stimulation Mode
- Drücken Sie die Schocktaste auf der Fernbedienung.
- Verwenden Sie die Auf/Ab-Tasten to select a static stimulation level from 0 to 100.
- The receiver will deliver a static pulse according to the selected intensity.
- Always start with the lowest effective level (level 1) and increase gradually. Use the included test light to verify static function.
- This mode should be used cautiously and only when necessary for correcting serious undesirable behaviors.
5.4 Fernbedienungsreichweite
The remote control has an effective range of up to 330 yards (approximately 300 meters) in open areas. Environmental factors and obstacles can affect this range.

Image: Visual representation of the remote control's effective range, showing a dog being trained in an open field up to 330 yards away, and a smaller range of 165 yards in areas with barriers.
6. Trainingstipps
- Konsistenz ist der Schlüssel: Use the collar consistently for specific behaviors you want to correct.
- Positive Verstärkung: Always pair corrections with positive reinforcement when your dog performs the desired action.
- Niedrig anfangen: Begin with the lowest effective stimulation level and only increase if your dog does not respond.
- Kurzsitzungen: Halten Sie die Trainingseinheiten kurz und positiv, um die Motivation Ihres Hundes aufrechtzuerhalten.
- Aufsicht: Never leave the collar on an unsupervised dog for extended periods.
- Not for Punishment: Dieses Gerät ist ein Trainingshilfsmittel, kein Bestrafungsinstrument. Verwenden Sie es verantwortungsvoll und human.
7. Wartung
7.1 Reinigung
- Reinigen Sie Fernbedienung und Empfänger mit dem Desinfektionsmittel.amp Tuch. Verwenden Sie keine aggressiven Chemikalien.
- Reinigen Sie die Kontaktstellen am Hörer regelmäßig, um eine einwandfreie Funktion zu gewährleisten und Hautirritationen vorzubeugen.
7.2 Abdichtung
The receiver collar is designed to be waterproof, allowing your dog to swim or be in rainy conditions while wearing it. The remote transmitter is not waterproof and should be kept dry.

Image: A golden retriever splashing in water, wearing the DIGOO PPT1 waterproof receiver collar. A close-up inset shows the special rubber cover on the receiver, ensuring its waterproof capability even during swimming.
7.3 Batteriepflege
- Laden Sie die Geräte vor dem ersten Gebrauch vollständig auf.
- Laden Sie den Akku auf, wenn die Akkuanzeige einen niedrigen Ladestand anzeigt.
- If storing for extended periods, charge the devices every few months to maintain battery health.
8. Spezifikationen
| Besonderheit | Spezifikation |
|---|---|
| Anzeige | Blau hinterleuchtetes LCD |
| Arbeitsmodi | Beep, Vibration, Static Stimulation |
| Vibrationspegel | 0-100 Stufen |
| Static Stimulation Levels | 0-100 Stufen |
| Minimum Collar Size | 11.8 Zoll (30 cm) |
| Maximum Collar Size | 23.6 Zoll (60 cm) |
| Ladezeit | 3-4 Stunden |
| Arbeitszeit | Up to 2 weeks (with typical use) |
| Stromquelle | USB-Ladekabel |
| Reichweite der Fernbedienung | Up to 330 yards (open area) |
| Wasserdichtigkeit des Empfängers | Waterproof (suitable for swimming) |
| Geeignetes Hundegewicht | 10 Pfund - 150 Pfund |
| Technische Daten | 19 x 14 x 5.99 cm |
| Produktgewicht | 260 g |
| Modellnummer | DIGOOWolifui147 |
9. Fehlerbehebung
| Problem | Mögliche Ursache | Lösung |
|---|---|---|
| Collar not working / No response | Low battery; Not turned on; Not paired; Out of range. | Charge both devices; Turn on both devices; Re-pair the remote and receiver; Move closer to the receiver. |
| Static stimulation not felt | Collar not fitted properly; Contact points too short; Low battery; Level too low. | Adjust collar fit; Use longer contact screws; Charge receiver; Increase stimulation level (gradually). Use test light to verify function. |
| Remote LCD screen is dim or blank | Low battery; Auto-standby mode. | Charge the remote; Press any button to wake it up. |
| Shortened remote range | Environmental interference; Obstacles; Low battery. | Move to an open area; Charge both devices. |
10. Garantie und Support
DIGOO offers a 1-year worry-free return/refund policy for the dog training collar. For any problems or questions, please contact customer support at support@mydigoo.comAntworten erfolgen in der Regel innerhalb von 24 Stunden.
For further details, please visit the manufacturer's official webWebsite.