
1. Einleitung
Thank you for choosing the XTUGA BK510 Single Channel Wireless In-Ear Monitor System. This system is designed to provide professional-grade audio monitoring for musicians, performers, and presenters. It features UHF wireless technology with 100 selectable channels, ensuring clear and reliable sound transmission. This manual will guide you through the setup, operation, and maintenance of your new in-ear monitor system.
2. Sicherheitshinweise
Bitte lesen und verstehen Sie alle Sicherheitshinweise, bevor Sie dieses Gerät in Betrieb nehmen. Bewahren Sie diese Bedienungsanleitung zum späteren Nachschlagen auf.
- FCC-Konformität: Most users do not need a license to operate this wireless microphone system. However, operation is subject to certain restrictions: the system must not cause harmful interference, must operate at a low power level (not exceeding 50 milliwatts), and has no protection from interference received from any other device.
- FCC-Bestimmungen: Purchasers should be aware that the FCC is currently evaluating the use of wireless microphone systems, and these rules are subject to change. For more information, contact the FCC at 1-888-CALL-FCC (TTY: 1-888-TELL-FCC) or visit the FCC's wireless microphone webWebsite: fcc.gov/cgb/wirelessmicrophones.
- Elektrische Sicherheit: To prevent electric shock, do not open the device casing. Alle Wartungsarbeiten sind qualifiziertem Personal zu überlassen.
- Energiequelle: Verwenden Sie ausschließlich das mitgelieferte Netzteil. Stellen Sie sicher, dass die LautstärketagEs entspricht den Geräteanforderungen.
- Wasser und Feuchtigkeit: Das Gerät darf weder Wasser, Regen noch übermäßiger Feuchtigkeit ausgesetzt werden.
- Hitze: Halten Sie das Gerät von Wärmequellen wie Heizkörpern, Heizlüftern, Öfen oder anderen wärmeerzeugenden Geräten fern.
- Belüftung: Ensure proper ventilation around the transmitter unit. Do not block any ventilation openings.
- Lautstärke der Kopfhörer: Vermeiden Sie es, längere Zeit bei hoher Lautstärke zu hören, um Gehörschäden vorzubeugen.
3. Packungsinhalt
Bitte prüfen Sie, ob alle unten aufgeführten Artikel in Ihrem Paket enthalten sind. Sollten Artikel fehlen oder beschädigt sein, wenden Sie sich bitte an Ihren Händler.
- 1x XTUGA BK510 Transmitter Unit
- 1x XTUGA BK510 Bodypack Receiver
- 1x Detachable Antenna
- 1x Power Adapter (DC 12V-18V)
- 2x Audio Cables (1/4" TS to 1/4" TS)
- 1x Pair of Earbud Headphones (White)

Bild: XTUGA BK510 Single Channel Wireless In-Ear Monitor System package contents, showing the transmitter, bodypack receiver, antenna, power adapter, two audio cables, and white earbud headphones.
4. Produktüberschreitungview
4.1 Sendereinheit
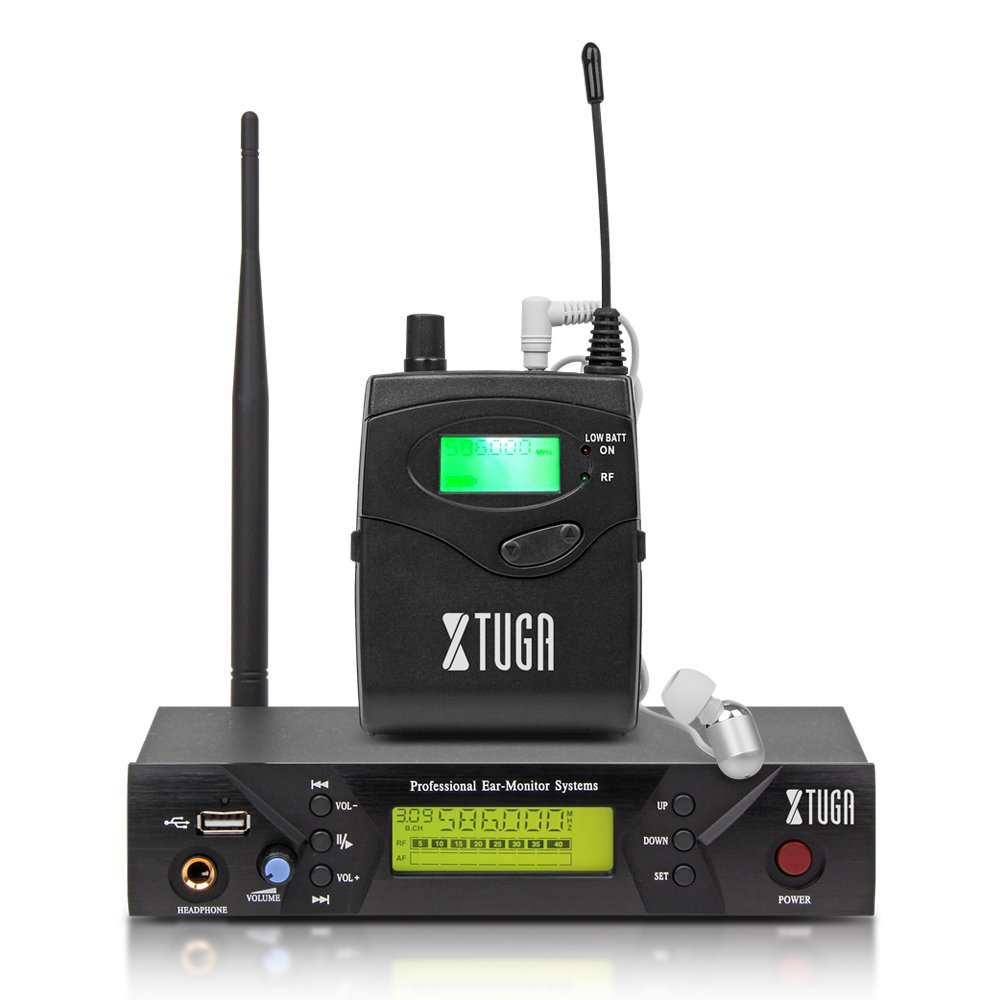
Bild: Front panel of the XTUGA BK510 transmitter unit, featuring a USB port, headphone output, volume control, channel selection buttons (UP/DOWN), SET button, power button, and an LCD display.
- USB-Anschluss: For connecting USB devices (e.g., for playback or recording, specific functionality may vary).
- Kopfhörerausgang: 3.5mm jack for wired headphone monitoring directly from the transmitter.
- Lautstärkeregler: Adjusts the output volume for the HEADPHONE output.
- AUF/AB-Tasten: Used to navigate and select channels or frequencies.
- Set-Taste: Bestätigt die Auswahl oder ruft die Einstellungsmenüs auf.
- POWER-Taste: Turns the transmitter unit on or off.
- LCD Anzeige: Shows current channel, frequency, and other operational information.

Bild: Rear panel of the XTUGA BK510 transmitter unit, showing the DC IN power input, AF IN (L) and AF IN (R) combo XLR/TRS inputs, AF LEVEL (Left/Right) adjustment knobs, and the ANTENNA connector.
- DC IN (12V-18V): Stromanschluss für das mitgelieferte Netzteil.
- AF IN (L)/(R): Combo XLR/TRS inputs for connecting audio sources (e.g., mixer output).
- AF LEVEL (Left/Right): Rotary knobs to adjust the input audio level for each channel.
- ANTENNA Connector: For attaching the detachable antenna.
4.2 Bodypack-Empfänger

Bild: Front view of the XTUGA BK510 bodypack receiver, showing the LCD display, LOW BATT indicator, RF indicator, and control buttons.
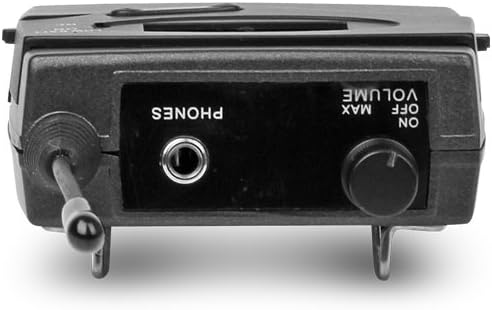
Bild: Spitze view of the XTUGA BK510 bodypack receiver, showing the PHONES output jack and the ON/OFF/VOLUME knob.

Bild: XTUGA BK510 bodypack receiver with the battery compartment open, showing slots for two AA batteries and the belt clip on the back.
- LCD Anzeige: Shows current channel, frequency, and battery status.
- Anzeige für niedrigen Batteriestand: Leuchtet auf, wenn der Batteriestand niedrig ist.
- HF-Anzeige: Illuminates when receiving a radio frequency signal from the transmitter.
- ON/OFF/VOLUME Knob: Turns the receiver on/off and adjusts the headphone volume.
- TELEFON-Ausgang: 3.5mm jack for connecting in-ear headphones.
- Batteriefach: Bietet Platz für zwei AA-Batterien.
- Gürtelschnalle: For attaching the bodypack to clothing or a belt.
5. Installationsanleitung
- Connect Transmitter Antenna: Screw the detachable antenna onto the ANTENNA connector on the rear panel of the transmitter unit. Ensure it is securely fastened.
- Sender mit Strom versorgen: Connect the provided power adapter to the DC IN (12V-18V) port on the rear of the transmitter, then plug the adapter into a suitable power outlet.
- Audioquelle anschließen: Use the included 1/4" TS cables (or XLR cables, not included) to connect your audio source (e.g., mixer's auxiliary output, monitor send) to the AF IN (L) and/or AF IN (R) inputs on the transmitter's rear panel. For mono operation, typically use AF IN (L).
- Batterien im Empfänger einlegen: Open the battery compartment on the bodypack receiver and insert two AA batteries, observing correct polarity (+/-). Close the compartment securely.
- Kopfhörer an den Empfänger anschließen: Plug your in-ear headphones into the PHONES output jack on the bodypack receiver.
6. Bedienungsanleitung
- Sender einschalten: Press the POWER button on the transmitter's front panel. The LCD display will illuminate.
- Empfänger einschalten: Rotate the ON/OFF/VOLUME knob on the bodypack receiver clockwise until it clicks and the LCD display illuminates.
- Select Channel/Frequency (Transmitter):
- Use the UP/DOWN buttons on the transmitter to browse through the available 100 UHF channels.
- Press the SET button to confirm your desired channel. The display will show the selected frequency.
- Choose a channel that is clear of interference in your operating environment.
- Sync Receiver to Transmitter: The bodypack receiver should automatically sync to the transmitter's frequency. If not, consult the receiver's specific instructions (often involves holding a SET or SYNC button on the receiver while the transmitter is broadcasting). Ensure the RF indicator on the receiver is lit, indicating a successful connection.
- Adjust Audio Input Level (Transmitter): Play audio through your connected source. Adjust the AF LEVEL (Left/Right) knobs on the rear of the transmitter until the audio level is appropriate without clipping (distortion). Monitor the audio through the transmitter's HEADPHONE output if desired.
- Adjust Monitoring Volume (Receiver): Put on your in-ear headphones. Slowly rotate the ON/OFF/VOLUME knob on the bodypack receiver to adjust the listening volume to a comfortable level. Avoid excessively high volumes to protect your hearing.
- Überwachung starten: Your XTUGA BK510 system is now ready for use.
7. Wartung
- Reinigung: Wischen Sie die Geräte mit einem weichen, trockenen Tuch ab. Verwenden Sie keine flüssigen Reiniger oder Lösungsmittel.
- Batteriewechsel: When the LOW BATT indicator on the bodypack receiver illuminates, replace both AA batteries with fresh ones. Remove batteries if the receiver will not be used for an extended period.
- Lagerung: Lagern Sie das System an einem kühlen, trockenen Ort, geschützt vor direkter Sonneneinstrahlung und extremen Temperaturen.
- Antennenpflege: Behandeln Sie die Antenne vorsichtig, um ein Verbiegen oder Brechen zu vermeiden.
8. Fehlerbehebung
| Problem | Mögliche Ursache | Lösung |
|---|---|---|
| Kein Ton vom Empfänger. |
|
|
| Störungen oder statische Aufladung. |
|
|
| Low audio quality (e.g., lack of bass). |
|
|
| LOW BATT indicator on receiver is lit. | Die Batterien sind schwach. | Tauschen Sie beide AA-Batterien umgehend aus. |
9. Spezifikationen
| Besonderheit | Detail |
|---|---|
| Modell | BK510 |
| Marke | XTUGA |
| Konnektivitätstechnologie | Kabelgebunden, Drahtlos (RF) |
| Drahtlose Kommunikation | UHF (100 Channels) |
| Sendermaterial | Metall |
| Bodypack Receiver Batteries | 2 AA-Batterien (erforderlich) |
| Sender-Stromeingang | Gleichstrom 12 V bis 18 V |
| Senderabmessungen | 17.72 x 11.81 x 4.72 Zoll |
| Artikelgewicht (ca.) | 3.34 Pfund (Gesamtpaket) |
| Besondere Merkmale | Lightweight (receiver), Volume Control |
| Hersteller | In China hergestellt |
10. Garantie und Support
Garantie: No specific warranty information is provided within this user manual. For details regarding warranty coverage, terms, and conditions, please refer to the product packaging, the purchase receipt, or contact the manufacturer directly.
Unterstützung: For technical assistance, troubleshooting beyond this guide, or inquiries about your XTUGA BK510 system, please contact XTUGA customer support. You may find contact information on the official XTUGA weboder über Ihre ursprüngliche Verkaufsstelle.
FCC-Informationen: For regulatory questions concerning wireless microphone systems, you can contact the FCC at 1-888-CALL-FCC (TTY: 1-888-TELL-FCC) or visit fcc.gov/cgb/wirelessmicrophones.