
1. Einleitung
Welcome to the AudioOrigin Mirror Chrome Plated Headshell and Audio Technica Cartridge. This product is engineered to deliver high-fidelity audio reproduction for compatible turntables. It features a high-quality Audio Technica cartridge and Furukawa 5N Pure Soft Annealed Silver Litz Cartridge wires, designed for optimal sound clarity and dynamic range. This manual provides essential information for installation, operation, and maintenance to ensure the best performance from your new audio component.
2. Sicherheitshinweise
- Always handle the cartridge and stylus with extreme care. The stylus tip is delicate and can be easily damaged.
- Keep the product out of reach of children and pets to prevent accidental damage or injury.
- Before performing any installation, maintenance, or cleaning, ensure your turntable is powered off and disconnected from the mains electricity supply.
- Avoid touching the stylus tip with your fingers, as oils and dirt can degrade sound quality and damage the stylus.
3. Packungsinhalt
Bitte überprüfen Sie, ob alle Artikel in Ihrem Paket vorhanden sind:
- 1 x AudioOrigin Mirror Chrome Plated Headshell (pre-assembled with cartridge wires)
- 1 x Audio Technica Cartridge (pre-mounted on headshell)
- 1 x Stylus (pre-installed on cartridge, with protective guard)
- Befestigungsmaterial (Schrauben, Muttern, Unterlegscheiben)
4. Einrichtung
4.1 Attaching the Headshell to the Tonearm
The AudioOrigin headshell is designed for turntables with a standard SME-type bayonet mount tonearm. Ensure your turntable is powered off before proceeding.
- Gently slide the headshell connector into the tonearm socket.
- Rotate the locking collar on the tonearm clockwise until the headshell is securely fastened. Do not overtighten.
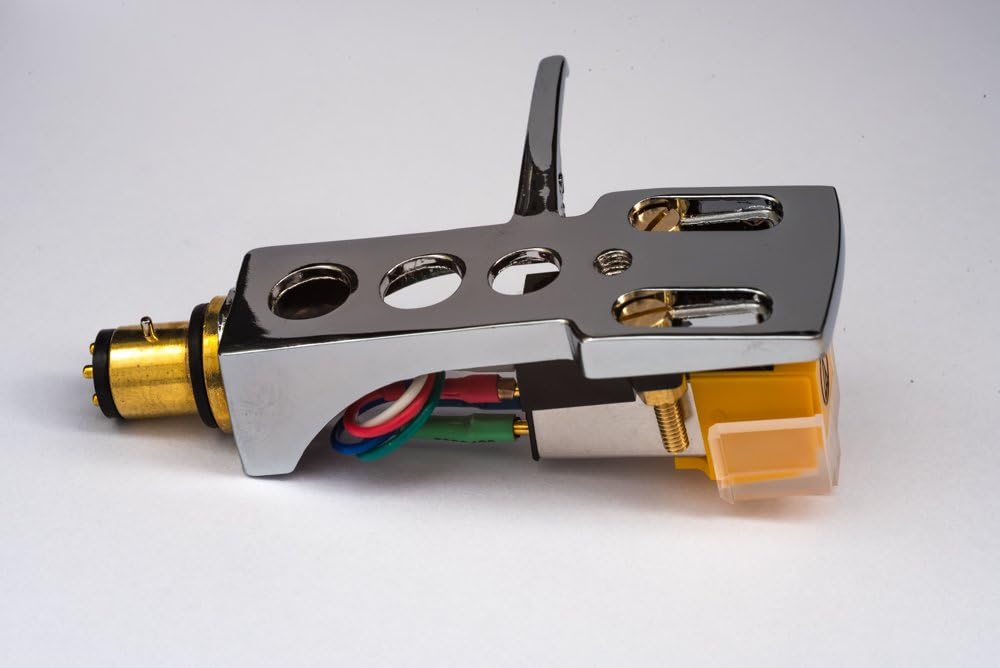
Abbildung 1: Seite view of the headshell and cartridge assembly, showing the chrome finish, cartridge body, and colored wiring connections.
4.2 Cartridge Alignment
For optimal sound reproduction and to minimize record wear, proper cartridge alignment is crucial. Refer to your specific turntable's instruction manual for detailed alignment instructions, including recommended overhang and offset settings. The headshell features slotted mounting holes to allow for precise adjustment of the cartridge position.
- Use the provided mounting screws to adjust the cartridge position within the headshell slots.
- Utilize an alignment protractor (often included with turntables or available separately) to achieve accurate alignment.
4.3 Tracking Force Adjustment
The tracking force (downforce) ensures the stylus maintains proper contact with the record groove. Refer to the specifications for your Audio Technica cartridge (typically found in the cartridge's documentation or online) for the recommended tracking force range (e.g., 1.5-2.5 grams).
- Balance your tonearm according to your turntable's instructions until it floats freely.
- Set the tracking force using your turntable's counterweight and anti-skate mechanisms to the recommended value.
4.4 Stylus Guard Removal
Before playing any records, carefully remove the clear plastic stylus guard. This guard protects the delicate stylus during shipping and handling.
- Gently grasp the stylus guard and pull it forward, away from the cartridge body, as indicated by the "PULL" marking on the guard.
- Store the stylus guard in a safe place for future use (e.g., when transporting the turntable or for extended periods of non-use).

Bild 2: Schräg view highlighting the Audio Technica cartridge and the clear plastic stylus guard with the 'PULL' indicator.
5. Betrieb
5.1 Abspielen einer Schallplatte
- Ensure the stylus guard has been removed.
- Place a clean record onto the turntable platter.
- Using the tonearm lift mechanism, gently raise the tonearm and position the stylus over the record's lead-in groove.
- Slowly lower the tonearm lift to allow the stylus to descend onto the record.
5.2 Lifting the Tonearm
Always use the tonearm lift mechanism to raise and lower the tonearm. Manually dropping or lifting the tonearm can damage the stylus, cartridge, or your records.
5.3 Stylus Care During Playback
- Vermeiden Sie es, den Stift mit den Fingern zu berühren.
- Ensure the record surface is clean before playback to prevent dirt and dust from accumulating on the stylus.
6. Wartung
6.1 Reinigung der Stiftspitze
Regular stylus cleaning is essential for maintaining optimal sound quality and extending the life of your stylus and records.
- Use a soft stylus brush, brushing gently from the back of the stylus towards the front (in the direction of play). Never brush from front to back or side to side.
- Specialized stylus cleaning fluids can be used sparingly if necessary, following the product's instructions.
6.2 Cartridge and Headshell Cleaning
Wipe the headshell and cartridge body with a soft, dry, lint-free cloth. Avoid using harsh chemicals or abrasive materials, as these can damage the finish or internal components.

Bild 3: Draufsicht view of the headshell and cartridge, showing the mounting screws and overall construction.
6.3 Nadelwechsel
The stylus is a consumable component and will wear out over time, typically after 500-1000 hours of playback, depending on usage and care. A worn stylus can damage your records and degrade sound quality. Replace it when you notice a decline in audio performance.
- Ensure the turntable is powered off and the tonearm is secured.
- Gently grasp the old stylus assembly (the colored plastic part with the needle) and pull it forward and slightly downward, away from the cartridge body.
- Align the new stylus assembly with the cartridge body and gently push it into place until it clicks securely. Do not force it.
7. Fehlerbehebung
- Kein oder nur schwacher Ton:
- Check all connections from the headshell to the tonearm, and from the turntable to your amplifier/receiver. Ensure they are secure.
- Überprüfen Sie, ob Ihr amplifier's input is set to the correct 'Phono' input.
- Ensure the stylus is properly seated on the cartridge body.
- Verzerrter Klang:
- Check your tracking force and anti-skate settings. Incorrect settings can cause distortion.
- Clean the stylus thoroughly. Accumulated dust and debris can cause distortion.
- Inspect the stylus for any visible damage or excessive wear. A worn stylus needs replacement.
- Verify cartridge alignment. Improper alignment can lead to tracking errors and distortion.
- Skipping or Jumping:
- Check the tracking force; it might be too light or too heavy.
- Ensure the record is clean and free of scratches or debris.
- Verify that your turntable is placed on a stable, level surface.
- Inspect the stylus for any damage or bent cantilever.
8. Spezifikationen
| Produkttyp | Mirror Chrome Plated Headshell with Audio Technica Cartridge |
| Marke | AudioOrigin |
| Patronentyp | Beweglicher Magnet (MM) |
| Stifttyp | Refer to Audio Technica cartridge specifications for exact stylus profile |
| Interne Verkabelung | Furukawa 5N Pure Soft Annealed Silver Litz Cartridge Wires |
| Headshell Material | Chrome Plated Metal |
| Kompatibilität | Standard SME-type bayonet mount tonearms; specifically compatible with Optonica and Sharp RP-series turntables including RP-2626, RP-144H, RP-7505, RP-2727, RP-1818, RP-105H, RP-1144, RP-3500, RP-1122, RP-2000, RP-5100, RP-203R. |
| Herkunft | Hergestellt in England |
9. Gewährleistung
This AudioOrigin product is covered by a standard manufacturer's warranty against defects in materials and workmanship. Please retain your proof of purchase for warranty claims. For specific warranty terms and conditions, refer to the documentation provided with your purchase or contact AudioOrigin customer support directly.
10. Unterstützung
For technical assistance, troubleshooting, or any inquiries regarding your AudioOrigin product, please visit the official AudioOrigin website or contact their customer support team. Contact details can typically be found on the product packaging or the official AudioOrigin webWebsite.