
AudioOrigin Mirror Chrome Plated Headshell, Cartridge, Needle Assembly
AudioOrigin Mirror Chrome Plated Headshell, Cartridge, and Needle Instruction Manual
For Optonica Sharp Turntables: RP-3636, RP-5200H, RP-7205, RP-1000, RP-1414, RP-4705, RP-7100, RP-9100, RP-9705, RP-7705
1. Einleitung
This manual provides detailed instructions for the proper installation, operation, and maintenance of your AudioOrigin Mirror Chrome Plated Headshell, Cartridge, and Needle assembly. This product is designed to enhance the audio performance of compatible Optonica Sharp turntable models. Please read this manual thoroughly before use to ensure optimal performance and longevity of your equipment.
2. Packungsinhalt
Überprüfen Sie, ob alle Artikel in Ihrem Paket vorhanden sind:
- 1 x AudioOrigin Mirror Chrome Plated Headshell
- 1 x Audio Technica Cartridge (pre-installed)
- 1 x Stylus (needle, pre-installed)
- 4 x Furukawa 5N Pure Soft Annealed Silver Litz Cartridge Wires (pre-installed)
- Befestigungsmaterial (Schrauben, Muttern, Unterlegscheiben)
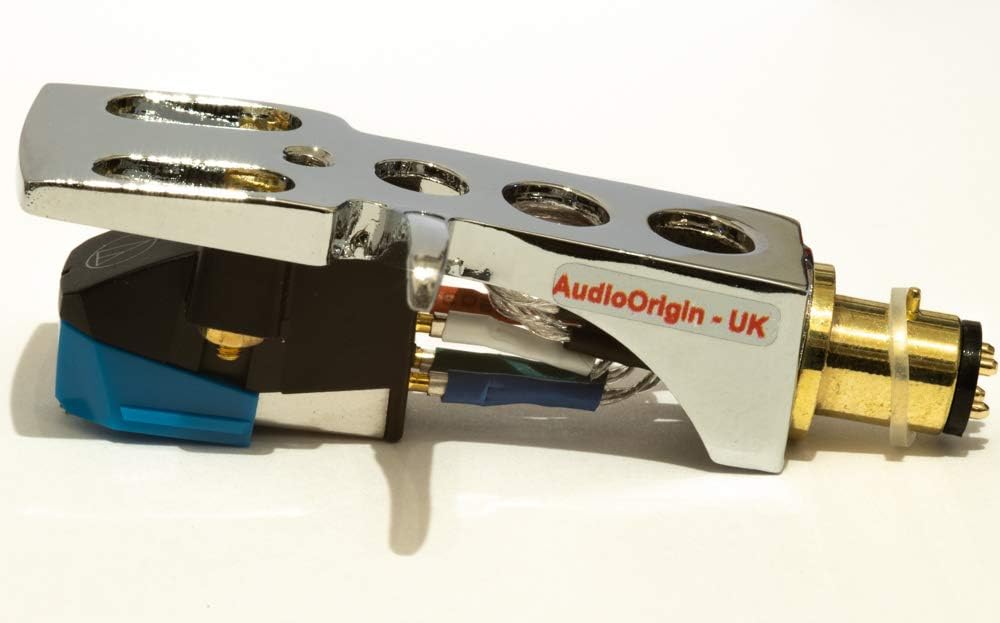
Figure 1: Complete AudioOrigin headshell assembly with pre-installed cartridge and needle. This image shows the chrome-plated headshell with the blue Audio Technica cartridge attached, ready for installation onto a turntable tonearm.
3. Einrichtung und Installation
Proper installation is crucial for optimal sound quality and to prevent damage to your turntable or the cartridge. Ensure your turntable is powered off and unplugged before beginning installation.
3.1 Attaching the Headshell to the Tonearm
- Identify the Tonearm Collar: Locate the collar at the end of your turntable's tonearm. This is where the headshell connects.
- Richten Sie die Stifte aus: Carefully align the four gold-plated pins on the rear of the AudioOrigin headshell with the corresponding receptacles inside the tonearm collar.
- Zum Sichern drehen: Gently push the headshell into the tonearm collar and then twist the locking ring (if present on your tonearm) clockwise until the headshell is firmly secured. Do not overtighten.

Abbildung 2: Rückseite view of the AudioOrigin headshell, highlighting the gold-plated connector pins that interface with the turntable's tonearm. This view also shows the finger lift for easy handling.
3.2 Cartridge Alignment and Tracking Force
The cartridge is pre-installed and wired. However, fine-tuning alignment and tracking force is essential for optimal sound and record preservation. Refer to your turntable's specific manual for detailed instructions on adjusting tracking force, anti-skate, and cartridge alignment using a protractor.
- Tracking-Kraft: Typically, a tracking force of 1.5 to 2.5 grams is recommended for most moving magnet cartridges. Consult your turntable's manual or cartridge specifications for the precise range.
- Antiskating: Adjust the anti-skate setting to match the tracking force. This prevents the tonearm from pulling towards the center or edge of the record.
- Patronenausrichtung: Use a cartridge alignment protractor (often included with turntables or available separately) to ensure the stylus is perfectly perpendicular to the record grooves at various points.

Abbildung 3: Draufsicht view of the AudioOrigin headshell and cartridge assembly. This perspective shows the mounting screws and the general orientation of the cartridge within the headshell, important for alignment.
4. Bedienungsanleitung
Once the headshell and cartridge are properly installed and aligned, you can begin playing records.
- Einschalten: Turn on your turntable and ampschwerer.
- Ortsrekord: Carefully place a record on the turntable platter.
- Stiftschutz entfernen: Gently remove the clear stylus guard from the cartridge. Store it in a safe place.
- Unterer Tonarm: Using the tonearm lift lever, carefully lower the stylus onto the lead-in groove of the record. Avoid dropping the tonearm directly onto the record.
- Lautstärke anpassen: Stellen Sie die Lautstärke an Ihrem ein ampauf eine angenehme Hörlautstärke ein.
- Spielende: At the end of the record, use the tonearm lift lever to raise the tonearm and return it to its rest. Replace the stylus guard when finished listening.
5. Wartung
Regular maintenance ensures optimal performance and extends the life of your cartridge and records.
5.1 Reinigung der Stiftspitze
Dust and debris can accumulate on the stylus, affecting sound quality and potentially damaging records. Clean the stylus regularly.
- Use a dedicated stylus cleaning brush or fluid.
- Always brush from back to front (from the pivot point towards the stylus tip). Never brush side-to-side or front-to-back, as this can damage the cantilever.
- Replace the stylus guard after cleaning.
5.2 Cartridge Wire Care
The Furukawa 5N Pure Soft Annealed Silver Litz Cartridge Wires are designed for superior signal transfer. Handle them with care.
- Avoid excessive bending or pulling of the wires.
- Ensure connections to the cartridge pins are secure but not overly tight.

Abbildung 4: Nahaufnahme view of the high-quality Furukawa 5N Pure Soft Annealed Silver Litz Cartridge Wires. These wires are crucial for signal integrity between the cartridge and the tonearm.
5.3 Nadelwechsel
The stylus is a consumable part and will wear out over time, typically after 500-1000 hours of play. A worn stylus can damage your records and degrade sound quality. Consult your cartridge manufacturer's guidelines for replacement stylus models.
6. Fehlerbehebung
Sollten Sie auf Probleme stoßen, konsultieren Sie bitte die folgenden häufigen Probleme und Lösungen:
| Problem | Mögliche Ursache | Lösung |
|---|---|---|
| Kein Ton oder sehr leiser Ton | Loose connections, incorrect input selection on amplifier, damaged wires. | Check all connections (headshell to tonearm, turntable to amplifier). Ensure amplifier is set to "Phono" input. Inspect cartridge wires for damage. |
| Verzerrter oder gedämpfter Klang | Dirty stylus, incorrect tracking force, improper alignment, worn stylus. | Clean stylus. Re-adjust tracking force and anti-skate. Verify cartridge alignment. Consider stylus replacement if worn. |
| Seilspringen oder Springen | Incorrect tracking force, anti-skate setting, dirty record, damaged record, turntable not level. | Adjust tracking force and anti-skate. Clean record. Ensure turntable is on a level surface. |
| Summendes oder brummendes Geräusch | Grounding issue, interference, loose connections. | Ensure turntable is properly grounded to the amplifier. Check all cable connections. Move turntable away from other electronic devices. |
7. Spezifikationen
- Produktart: Headshell, Cartridge, and Needle Assembly
- Headshell Material: Mirror Chrome Plated Aluminum
- Patronentyp: Audio Technica (Moving Magnet)
- Stift: Conical or Elliptical (depending on specific Audio Technica model)
- Cartridge Wires: Furukawa 5N Pure Soft Annealed Silver Litz
- Kompatibilität: Optonica Sharp Turntables (RP-3636, RP-5200H, RP-7205, RP-1000, RP-1414, RP-4705, RP-7100, RP-9100, RP-9705, RP-7705)
- Hersteller: AudioOrigin (Made in England)
8. Garantie und Support
AudioOrigin products are manufactured to high standards. For warranty information or technical support, please contact your retailer or visit the official AudioOrigin webBewahren Sie Ihren Kaufbeleg für Garantieansprüche auf.
Kontaktinformationen:
- Marke: AudioOrigin
- WebWebsite: www.audioorigin.co.uk (Example, actual link not provided in data)
- E-Mail: support@audioorigin.co.uk (Example, actual email not provided in data)
keine relevanten Dokumente
Ask a question about this manual
Ask about setup, troubleshooting, compatibility, parts, safety, or missing instructions. Manuals+ will review the question and use this page’s manual context to help answer it.