Einführung
This manual provides detailed instructions for the setup, operation, and maintenance of your Digoo DG-C3 Wireless Weather Station. This device integrates a hygrometer, thermometer, weather forecast station, and alarm clock functions, offering comprehensive environmental monitoring and timekeeping capabilities. Please read this manual thoroughly before using the product to ensure correct operation and to maximize its features.
Packungsinhalt
- Digoo DG-C3 Wireless Weather Station Unit
- USB-Stromkabel
- Benutzerhandbuch (dieses Dokument)
Hinweis: Batterien (3x AAA) sind nicht im Lieferumfang enthalten und müssen separat erworben werden.
Produkt überview
Familiarize yourself with the various components of your Digoo DG-C3 weather station.
Frontdisplay
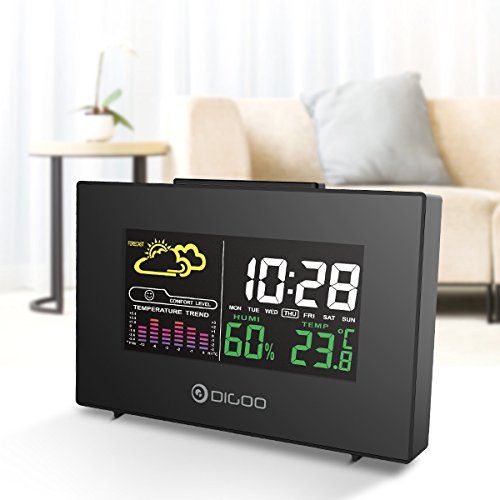
The front display features a color backlit screen showing the current time, day of the week, indoor humidity, indoor temperature, and a weather forecast icon. It also includes a comfort level indicator and a temperature trend graph.
- Zeit Datum: Digital display of current time and day.
- Wettervorhersage: Symbole, die die vorhergesagten Wetterbedingungen anzeigen (z. B. sonnig, bewölkt, regnerisch).
- Komfortniveau: Gibt den Komfort in Innenräumen auf Basis von Temperatur und Luftfeuchtigkeit an.
- Temperaturtrend: Bar graph showing recent temperature changes.
- Luftfeuchtigkeit: Prozenttage display of indoor humidity.
- Temperatur: Digital display of indoor temperature (Celsius or Fahrenheit).
Rückseite
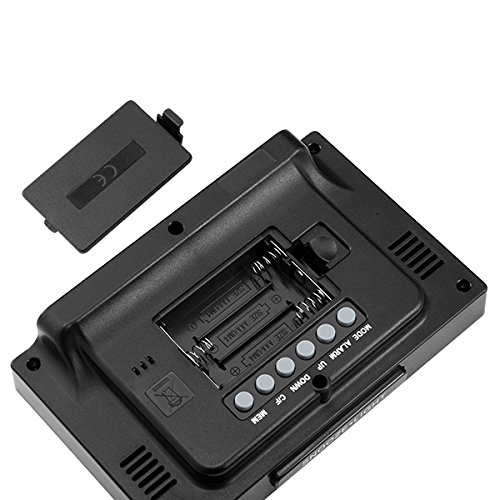
The back of the unit houses the battery compartment and various control buttons for setting the device.
- Batteriefach: Holds 3x AAA batteries for power backup.
- MODE-Taste: Used to switch between display modes and enter setting mode.
- Alarmknopf: Dient zum Einstellen und Aktivieren/Deaktivieren des Alarms.
- AUF-Taste: Used to increase values during settings or view maximum records.
- AB-Taste: Used to decrease values during settings or view minimum records.
- °C/°F-Taste: Schaltet zwischen Celsius und Fahrenheit als Temperatureinheiten um.
- MEM-Taste: Gewöhnt an view memory records for temperature and humidity.
Oberes Bedienfeld
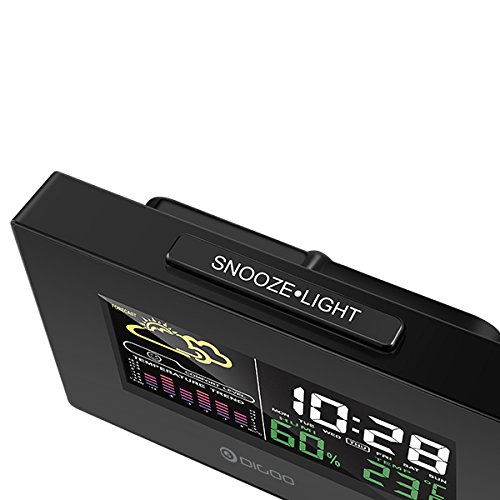
The top of the unit features a single button for snooze and backlight functions.
- SNOOZE·LIGHT Button: Press to activate the backlight or snooze the alarm.
Aufstellen
1. Einschalten
- Einlegen der Batterie: Open the battery compartment cover on the back of the unit. Insert 3x AAA batteries, ensuring correct polarity (+/-). Close the cover. Batteries provide backup power and allow for portability.
- USB-Stromanschluss: For continuous power and backlight, connect the provided USB cable to the USB port on the unit and to a compatible USB power adapter (not included) or a computer USB port.
- The display will light up and show default settings.
2. Initial Settings (Time, Date, Unit)
- Zeiteinstellung:
- Halten Sie die MODUS button for approximately 3 seconds to enter time setting mode. The hour digit will flash.
- Verwenden Sie die UP or RUNTER Tasten zum Einstellen der Stunde.
- Drücken MODUS again to confirm the hour and move to minute setting. The minute digit will flash.
- Verwenden Sie die UP or RUNTER Tasten zum Einstellen der Minuten.
- Drücken MODUS again to confirm and move to 12/24 hour format selection.
- Verwenden Sie die UP or RUNTER buttons to select 12-hour or 24-hour format.
- Drücken MODUS um die Einstellung für die Beendigungszeit zu bestätigen und zu beenden.
- Datumseinstellung:
- Drücken Sie nach dem Einstellen der Uhrzeit MODUS again to enter date setting mode. The year will flash.
- Verwenden Sie die UP or RUNTER Tasten, um das Jahr einzustellen.
- Drücken MODUS to confirm and move to month setting.
- Verwenden Sie die UP or RUNTER Mit den Tasten können Sie den Monat einstellen.
- Drücken MODUS to confirm and move to day setting.
- Verwenden Sie die UP or RUNTER Tasten zum Einstellen des Tages.
- Drücken MODUS to confirm and exit date setting.
- Auswahl der Temperatureinheit:
- Drücken Sie die ° C / ° F button on the back of the unit to switch between Celsius (°C) and Fahrenheit (°F) temperature display.
Bedienungsanleitung
1. Weckerfunktion
- Einstellen des Alarms:
- Drücken Sie die ALARM Einmaliges Drücken zeigt die aktuelle Alarmzeit an.
- Halten Sie die ALARM button for approximately 3 seconds. The hour digit will flash.
- Verwenden Sie die UP or RUNTER Tasten, um die Weckstunde einzustellen.
- Drücken ALARM again to confirm the hour and move to minute setting. The minute digit will flash.
- Verwenden Sie die UP or RUNTER Tasten zum Einstellen der Alarmminuten.
- Drücken ALARM um die Alarmeinstellung zu bestätigen und zu verlassen.
- Alarm aktivieren/deaktivieren:
- Drücken Sie im normalen Zeitanzeigemodus die Taste ALARM button repeatedly to toggle the alarm ON or OFF. An alarm icon will appear on the display when the alarm is active.
- Schlummerfunktion:
- Wenn der Alarm ertönt, drücken Sie die SCHLAF·LICHT button on the top of the unit to activate the snooze function. The alarm will temporarily stop and sound again after a few minutes (typically 5-10 minutes).
- To stop the alarm completely, press any other button on the back panel.
2. Wettervorhersage
The weather station provides a weather forecast based on internal atmospheric pressure changes. The forecast icons (e.g., sunny, cloudy, rainy) are predictions for the next 12-24 hours and may not always match local weather services, which use more comprehensive data.
- The forecast icon is displayed on the upper left of the screen.
- The device requires a period of stable operation (typically 24 hours) to calibrate and provide accurate forecasts.
3. Temperatur- und Feuchtigkeitsanzeige
- The current indoor temperature and humidity are continuously displayed on the screen.
- Viewing Min/Max Records:
- Drücken Sie die MEM button once to display the maximum recorded temperature and humidity.
- Drücken MEM again to display the minimum recorded temperature and humidity.
- Drücken MEM a third time to return to current readings.
- To clear the min/max records, press and hold the MEM 3 Sekunden lang drücken, während viewdie Aufzeichnungen.
4. Steuerung der Hintergrundbeleuchtung
- When powered by USB, the backlight will remain on.
- When powered by batteries only, press the SCHLAF·LICHT button to temporarily activate the backlight for a few seconds.
Wartung
- Reinigung: Wipe the unit with a soft, dry cloth. Do not use abrasive cleaners or solvents. Avoid getting moisture into the unit.
- Batteriewechsel: When the display becomes dim or functions irregularly, replace the 3x AAA batteries in the back compartment. Ensure correct polarity.
- Lagerung: If not using the device for an extended period, remove the batteries to prevent leakage. Store in a cool, dry place.
Fehlerbehebung
| Problem | Mögliche Ursache | Lösung |
|---|---|---|
| Das Display ist leer oder dunkel. | Low batteries or no power connection. | Replace batteries or connect the USB power cable. |
| Falsche Uhrzeit/falsches Datum. | Nach Stromausfall oder Ersteinrichtung wurden Uhrzeit und Datum nicht korrekt eingestellt. | Folgen Sie den Anweisungen im Abschnitt „Ersteinstellungen“, um Datum und Uhrzeit zurückzusetzen. |
| Die Wettervorhersage scheint ungenau zu sein. | Device needs calibration time; local conditions may differ from pressure-based forecast. | Allow 24 hours for calibration. Understand that the forecast is based on internal pressure changes. |
| Der Alarm ertönt nicht. | Der Alarm ist nicht aktiviert oder die Lautstärke ist zu niedrig (sofern einstellbar). | Ensure the alarm icon is displayed. Check alarm settings. |
Technische Daten
| Modell: | DG-C3 |
| Konnektivität: | USB (zur Stromversorgung) |
| Energiequelle: | 3x AAA Batteries (not included) or USB Power |
| Besondere Merkmale: | Hygrometer, Thermometer, Weather Forecast, Alarm Clock, Color Backlight, Portable |
| Anzeige: | Color Backlit LCD |
| Temperatureinheit: | °C / °F wählbar |
Garantie und Support
Informationen zur Garantie und zum technischen Support finden Sie in der Ihnen beim Kauf ausgehändigten Dokumentation oder wenden Sie sich an Ihren Händler. Bewahren Sie Ihren Kaufbeleg als Kaufnachweis auf.