
Einführung
This manual provides detailed instructions for the installation, operation, and maintenance of the ECS Elitegroup B350AM4-M2 Micro ATX Motherboard. This motherboard is designed to support AMD AM4 socket processors, including AMD Ryzen and 7th Gen Athlon processors. It features a 4+2 phase thermal design, 100% solid capacitor design, and dual-channel DDR4 memory architecture supporting up to 64 GB across four DIMM sockets.
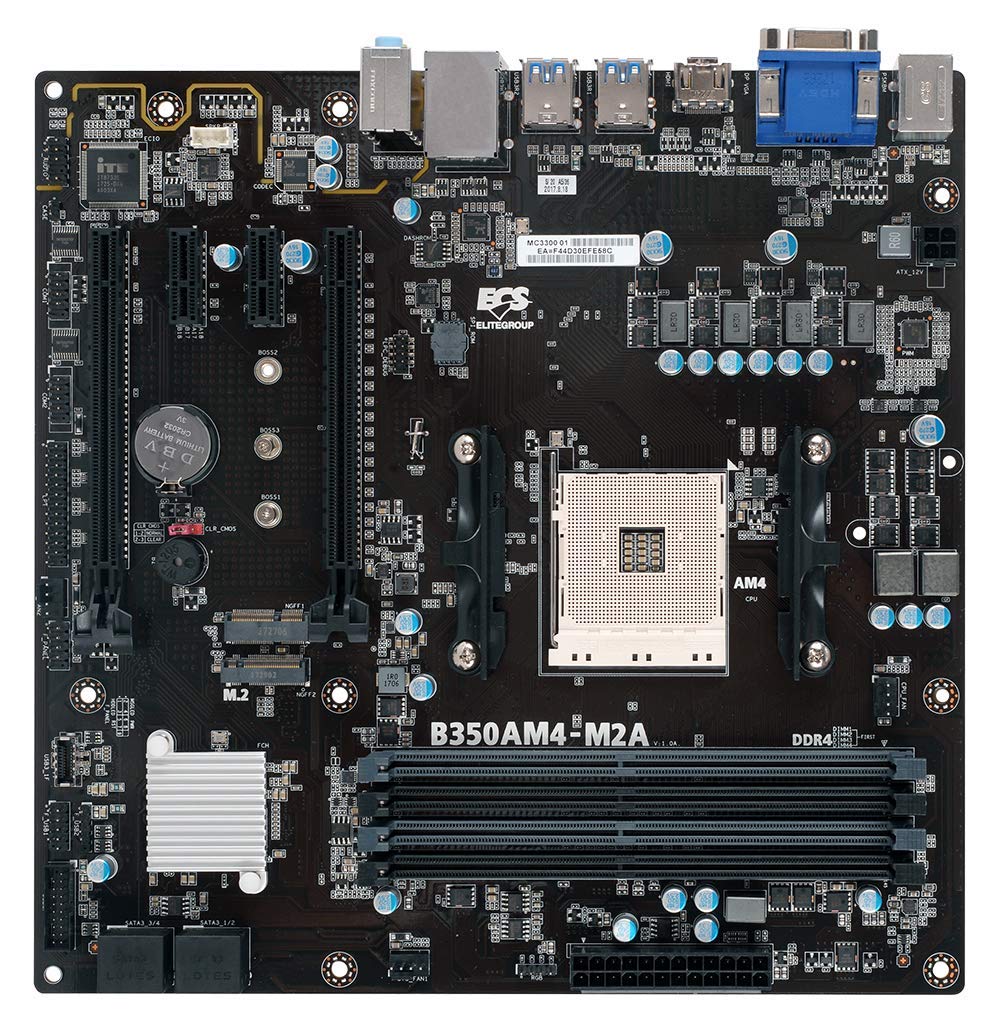
Abbildung 1: Überview of the ECS B350AM4-M2 Motherboard, showing its general layout and components.
Packungsinhalt
Verify that all items listed below are present in the package. If any item is missing or damaged, contact your retailer.
- ECS B350AM4-M2 Motherboard
- Treiber-CD
- Benutzerhandbuch (dieses Dokument)
- SATA-Kabel
Setup und Installation
Before beginning installation, ensure your system is powered off and disconnected from the power outlet. Wear an anti-static wrist strap to prevent electrostatic discharge (ESD) damage to components.
1. CPU-Installation
- Suchen Sie den AM4-CPU-Sockel auf dem Motherboard.
- Heben Sie den Lasthebel an der Seite der Steckdose an.
- Richten Sie die dreieckige Markierung auf der CPU sorgfältig an der entsprechenden Markierung auf dem Sockel aus.
- Setzen Sie die CPU vorsichtig in den Sockel ein, ohne sie mit Gewalt einzusetzen.
- Lower the load lever back into its locked position to secure the CPU.
- Tragen Sie Wärmeleitpaste auf die CPU-Oberfläche auf und installieren Sie den CPU-Kühler gemäß den Anweisungen des Herstellers.
Figure 2: The AM4 CPU socket and surrounding area on the motherboard, where the processor is installed.
2. Installation des Arbeitsspeichers (RAM)
The B350AM4-M2 motherboard has four 288-pin DDR4 DIMM sockets. For optimal performance, install memory modules in pairs for dual-channel operation. Refer to the motherboard's silkscreen for recommended slot population order.
- Open the clips at both ends of the DIMM socket.
- Align the notch on the DDR4 memory module with the key in the DIMM socket.
- Insert the module firmly into the socket until the clips snap into place.
- Repeat for additional memory modules.
Figure 3: Location of the four DDR4 DIMM slots for memory installation.
3. Storage Device Installation (SATA & M.2)
Connect SATA storage devices (HDDs/SSDs) to the SATA 6Gb/s ports. For M.2 SSDs, locate the M.2 slot.
- For SATA devices: Connect one end of the SATA data cable to the storage device and the other end to a SATA port on the motherboard. Connect the SATA power cable from your power supply to the device.
- For M.2 SSDs: Insert the M.2 SSD into the M.2 slot at an angle. Push it down and secure it with the provided screw.
4. Installation der Erweiterungskarte (PCIe)
Install graphics cards or other expansion cards into the appropriate PCI Express slots.
- Richten Sie die Erweiterungskarte am gewählten PCIe-Steckplatz aus.
- Press down firmly until the card is seated correctly and the retention clip (if present) locks into place.
- Befestigen Sie die Karte mit einer Schraube am Gehäuse.
5. Stromanschlüsse
Verbinden Sie die Stromversorgungskabel mit dem Motherboard.
- 24-poliger ATX-Stromanschluss: Connect the main 24-pin power cable from your power supply to the corresponding connector on the motherboard.
- 4-poliger CPU-Stromanschluss: Connect the 4-pin CPU power cable (often labeled P4 or ATX12V) from your power supply to the connector near the CPU socket.
6. Frontblende und USB-Anschlüsse
Connect your chassis's front panel connectors (power button, reset button, HDD LED, power LED, front USB ports, front audio) to the corresponding headers on the motherboard. Refer to the motherboard layout diagram in the full manual for exact header locations.
Bedienungsanleitung
1. BIOS/UEFI-Einrichtung
The BIOS (Basic Input/Output System) or UEFI (Unified Extensible Firmware Interface) is the firmware that initializes hardware during startup. To access the BIOS/UEFI setup utility:
- Schalten Sie Ihren Computer ein.
- Drücken Sie die DEL key repeatedly during the initial boot screen. The exact key may vary; consult the on-screen prompts.
Within the BIOS/UEFI, you can configure system settings such as boot order, date/time, CPU/memory frequencies, and enable/disable integrated peripherals. Save changes before exiting.
2. Installation des Betriebssystems
After assembling your system, you will need to install an operating system (e.g., Windows 10, Windows Vista, Linux).
- Insert your operating system installation media (USB drive or DVD) into the computer.
- Access the BIOS/UEFI setup and set the boot order to prioritize your installation media.
- Save changes and exit. The system will boot from the installation media.
- Befolgen Sie die Anweisungen auf dem Bildschirm, um das Betriebssystem zu installieren.
- After installation, install the necessary drivers from the provided driver CD or the ECS Elitegroup webWebsite.
Wartung
Durch sachgemäße Wartung wird die Langlebigkeit und der stabile Betrieb Ihres Motherboards sichergestellt.
- Staubentfernung: Regularly clean dust from inside your computer case using compressed air. Ensure fans and heatsinks are free from obstructions.
- BIOS-Updates: Periodically check the ECS Elitegroup webAuf dieser Website finden Sie aktualisierte BIOS-Versionen. BIOS-Updates können Kompatibilität, Stabilität und Leistung verbessern. Befolgen Sie die Update-Anweisungen sorgfältig, um Systemschäden zu vermeiden.
- Kabelmanagement: Sorgen Sie für eine ordentliche Verlegung der internen Kabel, um die Luftzirkulation zu verbessern und Störungen zu vermeiden.
Fehlerbehebung
In diesem Abschnitt werden häufig auftretende Probleme behandelt.
Kein Strom / System schaltet sich nicht ein
- Check all power connections: 24-pin ATX, 4-pin CPU, and power cables to peripherals.
- Stellen Sie sicher, dass sich der Netzschalter in der Position „EIN“ befindet.
- Verify the front panel power button connector is correctly attached to the motherboard header.
- Testen Sie das Netzteil mit einem anderen System oder, falls vorhanden, mit einem Netzteilprüfgerät.
Keine Anzeige / Kein POST (Selbsttest beim Einschalten)
- Ensure the monitor is connected to the correct display output (motherboard integrated graphics or discrete graphics card).
- Setzen Sie die Grafikkarte und die Speichermodule neu ein.
- Check if the CPU cooler is properly installed and connected.
- Listen for beep codes. A series of 9 short beeps often indicates a BIOS ROM error, suggesting a potential issue with the motherboard's firmware.
- Try booting with only essential components (CPU, one RAM stick, graphics card if no integrated graphics) to isolate the problem.
Systeminstabilität / Abstürze
- Stellen Sie sicher, dass alle Treiber auf dem neuesten Stand sind.
- Überprüfen Sie die Temperaturen von CPU und GPU, um eine Überhitzung zu vermeiden.
- Führen Sie Speicherdiagnosetools aus, um den Arbeitsspeicher auf Fehler zu überprüfen.
- Verify that the power supply provides sufficient wattage für alle Komponenten.
Technische Daten
| Besonderheit | Detail |
|---|---|
| Marke | ECS Elitegroup |
| Modellnummer | B350AM4-M2 |
| CPU-Sockel | Sockel AM4 |
| Kompatible Prozessoren | AMD Ryzen Processors, AMD 7th Gen Athlon Processors |
| Chipsatztyp | AMD B350 |
| RAM-Speichertechnologie | DDR4 |
| Verfügbare Speichersteckplätze | 4 x 288-pin DDR4 DIMM sockets |
| Maximale Größe des RAM-Speichers | 64 GB |
| Speichertaktfrequenz | 2667/2400 MHz (non-ECC, Un-buffered SDRAM) |
| Grafikkartenschnittstelle | PCI Express |
| Total Number of HDMI Ports | 1 (HDMI 1.4a) |
| DisplayPort | Integrated DP with up to 2560x1600 resolution |
| USB 2.0-Anschlüsse | 1 (internal header, total ports may vary) |
| S/PDIF-Anschlusstyp | Optisch |
| Unterstützter Systembusstandard | SATA 3 |
| Plattform | Windows 10, Windows Vista |
| Artikelgewicht | 1.15 Pfund |
Garantie und Support
The ECS Elitegroup B350AM4-M2 Motherboard comes with a 2 Jahr Garantie from the date of purchase. This warranty covers defects in materials and workmanship under normal use. For warranty claims or technical support, please contact your retailer or visit the official ECS Elitegroup webWebsite mit Supportressourcen und Kontaktinformationen.
Online-Hilfe: For the latest drivers, BIOS updates, and additional support, please visit the ECS Elitegroup official webWebsite.