RAYSON TD-132
Bedienungsanleitung für die Rayson TD-132 Drahtbindemaschine
Modell: TD-132
1. Einleitung
Thank you for choosing the Rayson TD-132 Wire Binding Machine. This manual provides essential information for the safe and efficient operation, maintenance, and troubleshooting of your binding machine. Please read these instructions thoroughly before initial use and retain them for future reference.
2. Wichtige Sicherheitshinweise
- Always operate the machine on a stable, flat surface.
- Halten Sie Hände und lose Kleidung während des Betriebs von beweglichen Teilen fern.
- Do not exceed the maximum punching capacity of 12 sheets (80gsm/20lb paper) or 2 sheets of 230g cardboard/0.2mm/7mil plastic cover. Overloading can damage the machine.
- Ensure the paper scrap tray is regularly emptied to prevent jamming and maintain punching quality.
- Außerhalb der Reichweite von Kindern aufbewahren.
- Use only compatible 3:1 pitch binding accessories.
3. Packungsinhalt
Bitte überprüfen Sie beim Auspacken, ob alle folgenden Artikel enthalten sind:
- Rayson TD-132 Wire Binding Machine
- Bediengriff
- Corner Rounder Puncher
- Assorted 3:1 Pitch Binding Spines (Wire, Coil, Click)
- Oil Blotting Paper
- Bedienungsanleitung
Notiz: Be careful when removing the machine from its packaging, as some smaller items may be scattered within the box.
4. Produktüberschreitungview
Familiarize yourself with the components of your Rayson TD-132 binding machine:

Abbildung 4.1: Labeled diagram of the Rayson TD-132 Wire Binding Machine, showing the Punch & Wire Size Select Knob, Paper Feed Slot, Binding Plate, Metal Operation Handle, Wire Slot System, Paper Stopper, Paper Scrap Tray, and Paper Margin Adjustment.
- Punch & Wire Size Select Knob: Used to select between punching and binding modes, and to adjust the wire size for binding.
- Papiereinzugsschlitz: Where documents are inserted for punching.
- Bindungsplatte: Area where binding spines are placed for document insertion.
- Metal Operation Handle: Used to activate the punching mechanism and to close binding wires.
- Wire Slot System: Guides for holding and closing wire binding spines.
- Paper Stopper: Adjustable guide to ensure consistent paper alignment for punching.
- Paper Scrap Tray: Collects paper debris from punching. Located at the bottom of the machine.
- Paper Margin Adjustment: Knob to adjust the distance of the punched holes from the paper edge (2.5mm, 3.5mm, 4.5mm).
5. Einrichtung
- Auspacken der Maschine: Carefully remove the binding machine and all accessories from the packaging. Ensure no small parts are left behind.
- Attach the Operating Handle: The operating handle is typically stored separately. Insert the handle into its designated slot on the machine and secure it.
- Erstreinigung: Before first use, it is recommended to punch several sheets of the included oil blotting paper or scrap paper. This helps to remove any residual manufacturing oil from the punching blades, ensuring clean punches for your documents.
6. Bedienungsanleitung
6.1. Dokumente lochen
- Select Punching Mode: Turn the Punch & Wire Size Select Knob to the "PUNCHING" position. This ensures the machine is set for punching and not for closing wires.
- Papierrand anpassen: Use the Paper Margin Adjustment knob to set the desired distance of the holes from the edge of your paper (2.5mm, 3.5mm, or 4.5mm).
- Set Paper Guide: Adjust the Paper Stopper to align your document size. The machine has pre-marked guides for Letter, Junior Legal, and B5 sizes. For other sizes like A5, A6, or Half Letter, manually center the paper and adjust the guide accordingly.
- Einlegepapier: Insert up to 12 sheets of 80gsm/20lb paper (or 2 sheets of 230g cardboard/0.2mm/7mil plastic cover) into the Paper Feed Slot, ensuring it is aligned straight against the paper stopper.
- Stempel: Firmly press down the Metal Operation Handle to punch the holes.
- Schutt beseitigen: After each punch, pull the handle down completely without paper to clear any paper scraps from the punching blades. This prevents clogging and ensures clean, even holes.

Abbildung 6.1: Visual guide for the punching process, showing handle installation, knob adjustment, document insertion, and punching action.
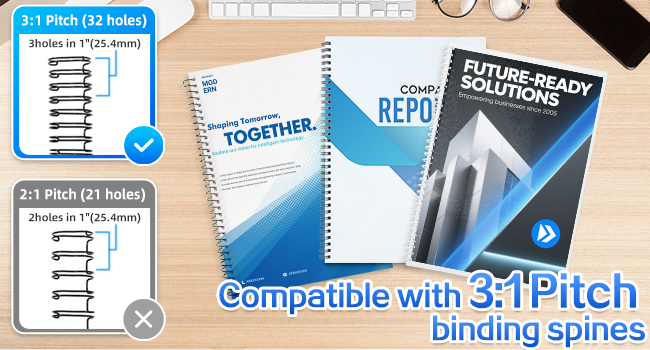
Abbildung 6.2: Indication of punching capacity (12 sheets) and binding capacity (120 sheets) for Letter size paper.

Abbildung 6.3: Close-up of the paper margin adjustment knob, showing settings for 2.5mm, 3.5mm, and 4.5mm.
6.2. Bindende Dokumente
The Rayson TD-132 supports various 3:1 pitch binding accessories, including wire binding spines, spiral coils, and click binding spines.
- Prepare Binding Spine: Place the chosen binding spine (wire, coil, or click) onto the binding plate or wire slot system.
- Open Spine: For wire binding, turn the Punch & Wire Size Select Knob to the appropriate wire size. This will open the wire loops. For click or spiral coils, manually open them if necessary.
- Insert Punched Documents: Carefully thread the punched documents onto the open binding spine. Ensure all pages are correctly aligned.
- Close Spine: For wire binding, turn the Punch & Wire Size Select Knob back to the punching position or use the handle to gently close the wire loops. For spiral coils, manually twist the coil through the holes. For click binding spines, manually close the spine.
- Bindung überprüfen: Check that all pages are securely bound and can turn freely.
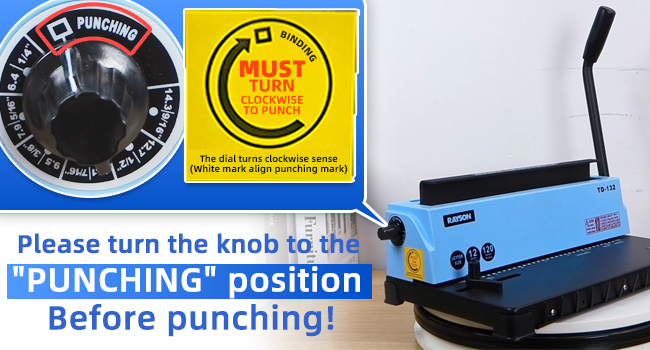
Abbildung 6.4: Illustration of 3:1 pitch with 32 square holes, compatible with Letter size documents.
Abbildung 6.5: Examples of documents bound with wire, coil, and click binding spines.
7. Wartung
- Empty Paper Scrap Tray: Regularly check and empty the paper scrap tray located at the bottom of the machine. A full tray can lead to jammed punches or slanted holes.
- Clean Punching Blades: Periodically punch a few sheets of scrap paper or oil blotting paper to keep the punching blades clean and lubricated.
- Richtig lagern: When not in use, store the machine in a clean, dry environment. The operating handle can be stored on the bottom of the machine for compactness.

Abbildung 7.1: View of the paper scrap tray, which should be emptied regularly.

Abbildung 7.2: The operating handle can be stored securely on the bottom of the machine.
8. Fehlerbehebung
| Problem | Mögliche Ursache | Lösung |
|---|---|---|
| Punch holes are slanted or uneven. |
|
|
| Machine jams during punching. |
|
|
| Binding wires do not close properly. | Incorrect wire size selected or improper closing technique. | Ensure the correct wire size is selected on the knob and apply even pressure when closing the wire. |
9. Spezifikationen
| Besonderheit | Detail |
|---|---|
| Modell | TD-132 |
| Marke | RAYSON |
| Stanzkapazität | 12 sheets (80gsm/20lb paper) |
| Bindungskapazität | Up to 120 sheets (80gsm/20lb paper) |
| Tonhöhe | 3:1 |
| Anzahl der Löcher | 32 square holes (4x4mm) |
| Max. Sheet Size | Briefgröße |
| Binding Types Supported | Wire binding spines (1/4" to 9/16"), Click binding spines, Coil binding spirals |
| Paper Margin Adjustment | 2.5 mm, 3.5 mm, 4.5 mm |
| Konstruktion | Durable metal and ABS |
| Artikelgewicht | 11.64 Pfund |
| Technische Daten | 15.75 x 9.06 x 14.57 Zoll |
10. Garantie und Support
For warranty information, technical support, or service inquiries, please refer to the contact details provided with your purchase documentation or visit the official RAYSON webBewahren Sie Ihren Kaufbeleg als Kaufnachweis für Garantieansprüche auf.