
1. Produktüberschreitungview
The Kulannder 5D Diamond Painting LED Magnifier Lamp is designed to assist with detailed tasks such as diamond painting, cross-stitch, needlework, reading, and small repairs. It features a main lens with 4X magnification and a smaller inset lens with 6X magnification, complemented by three integrated LED lights for enhanced illumination. The flexible gooseneck and strong clip allow for versatile positioning and secure attachment to various surfaces.

Image 1.1: Kulannder LED Magnifier Lamp, illustrating its flexible design and clip for attachment.
2. Packungsinhalt
- 1 x LED Light Magnifier with Clip
- 1 x Linsen-Reinigungstuch.
3. Produktspezifikationen
| Besonderheit | Spezifikation |
|---|---|
| Marke | Kulannder |
| Farbe | Schwarz |
| Magnifier Material | Acryllinse |
| Lichtquelle | 3 x LED Illuminating Lamps |
| Magnification (Large Lens) | 4X |
| Magnification (Small Lens) | 6X |
| Stromquelle | 3 x AAA-Batterien (nicht im Lieferumfang enthalten) |
| Schwanenhalslänge | Approximately 33cm / 13 inches |
| Clamp Öffnung | Approximately 6cm / 2.36 inches |
4. Einrichtungsanweisungen
Follow these steps to set up your Kulannder LED Magnifier Lamp:
- Komponenten auspacken: Carefully remove the magnifying glass head and the gooseneck with the attached clamp aus der Verpackung.
- Connect Head to Gooseneck: Securely connect the magnifying glass head to the top of the gooseneck. Ensure it clicks into place or is firmly screwed on, depending on the model.
- Batterien installieren: Locate the battery compartment on the magnifying glass head. Open it and insert three (3) AAA batteries (not included), ensuring correct polarity. Close the compartment securely.
- An Oberfläche anhängen: Use the strong clamp to attach the lamp to a stable surface such as a desk, table, or workbench. Ensure the clamp is firmly secured to prevent accidental dislodgement.
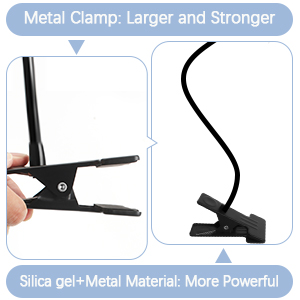
Image 4.1: Visual guide for connecting the magnifier head, installing batteries, and clamping the unit to a surface.
5. Bedienungsanleitung
Operating your LED Magnifier Lamp ist geradeaus:
- Ein-/Ausschalten: Locate the ON/OFF switch on the side of the magnifying glass head. Slide the switch to the "ON" position to turn on the LED lights. Slide it to "OFF" to turn them off.
- Position anpassen: The flexible gooseneck allows for 360-degree adjustment. Bend and position the gooseneck to direct the magnifier and light precisely over your work area. The gooseneck is designed to hold its position without collapsing.
- Utilize Magnification: Use the large 4X lens for general magnification. For finer details, utilize the smaller 6X inset lens.

Image 5.1: The flexible gooseneck allows for precise positioning of the magnifier and light.
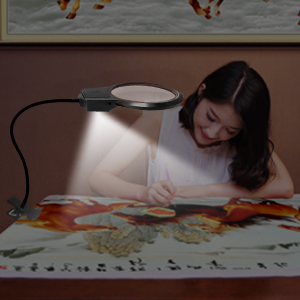
Image 5.2: The magnifier features both 4X and 6X lenses for varying levels of detail.
6. Wartung
To ensure the longevity and optimal performance of your magnifier lamp:
- Reinigung der Linse: Use the provided lens cleaning cloth to gently wipe the magnifier lenses. Avoid using abrasive materials or harsh chemical cleaners, as these can scratch or damage the acrylic lens.
- Batteriewechsel: When the LED lights dim or stop working, replace all three AAA batteries with new ones. Ensure correct polarity during installation.
- Lagerung: Bewahren Sie das Gerät bei Nichtgebrauch aufamp An einem sauberen, trockenen Ort, geschützt vor direkter Sonneneinstrahlung und extremen Temperaturen.

Image 6.1: Use the included lens cloth for gentle cleaning of the magnifier lens.
7. Fehlerbehebung
- Lichter gehen nicht an:
- Prüfen Sie, ob sich der EIN/AUS-Schalter in der Position „EIN“ befindet.
- Stellen Sie sicher, dass die Batterien richtig und mit der richtigen Polarität eingelegt sind.
- Ersetzen Sie alte Batterien durch neue.
- Lichter flackern:
- Dies deutet häufig auf einen niedrigen Batteriestand hin. Tauschen Sie die Batterien aus.
- Ensure battery compartment connections are clean and secure.
- Magnifier Not Holding Position:
- Stellen Sie sicher, dass die clamp ist sicher an einer stabilen Oberfläche befestigt.
- Adjust the gooseneck carefully to find a stable position.
8. Garantie und Support
The Kulannder LED Magnifier Lamp comes with a one-year warranty. If you encounter any quality issues or require assistance, please contact Kulannder customer support. Refer to the product packaging or the retailer's webFür spezifische Kontaktinformationen besuchen Sie bitte die entsprechende Webseite.