Einführung
Thank you for choosing the Peakeep S8 Digital Alarm Clock. This manual provides detailed instructions for setting up, operating, and maintaining your new alarm clock. Please read this manual thoroughly before use to ensure proper function and to maximize your product experience.
Produkteigenschaften
- Großer LCD-Bildschirm: Features a clear, boldface number display for easy readability.
- Intelligenter Lichtsensor: Built-in sensor automatically activates a soft backlight in dark environments, ensuring visibility without disturbing sleep.
- Gradually Strengthening Alarm: The alarm sound increases in volume gradually to gently wake you up.
- Schlummerfunktion: Gewährt zusätzliche 5 Minuten Schlaf nach dem Weckerklingeln.
- Adjustable Time and Date Format: Customize time display (12/24 hour) and date format.
- Temperaturüberwachung: Zeigt die Umgebungstemperatur in Celsius oder Fahrenheit an.
- Batteriebetrieben: Operates on 3 x AAA batteries (not included).
Packungsinhalt
- 1 x Peakeep S8 Digital Alarm Clock
- 1 x Benutzerhandbuch
Bedienelemente und Anzeige
Frontdisplay
The large LCD screen displays time, date, day of the week, alarm status, and temperature. The backlight activates automatically in low light conditions when the sensor is enabled.
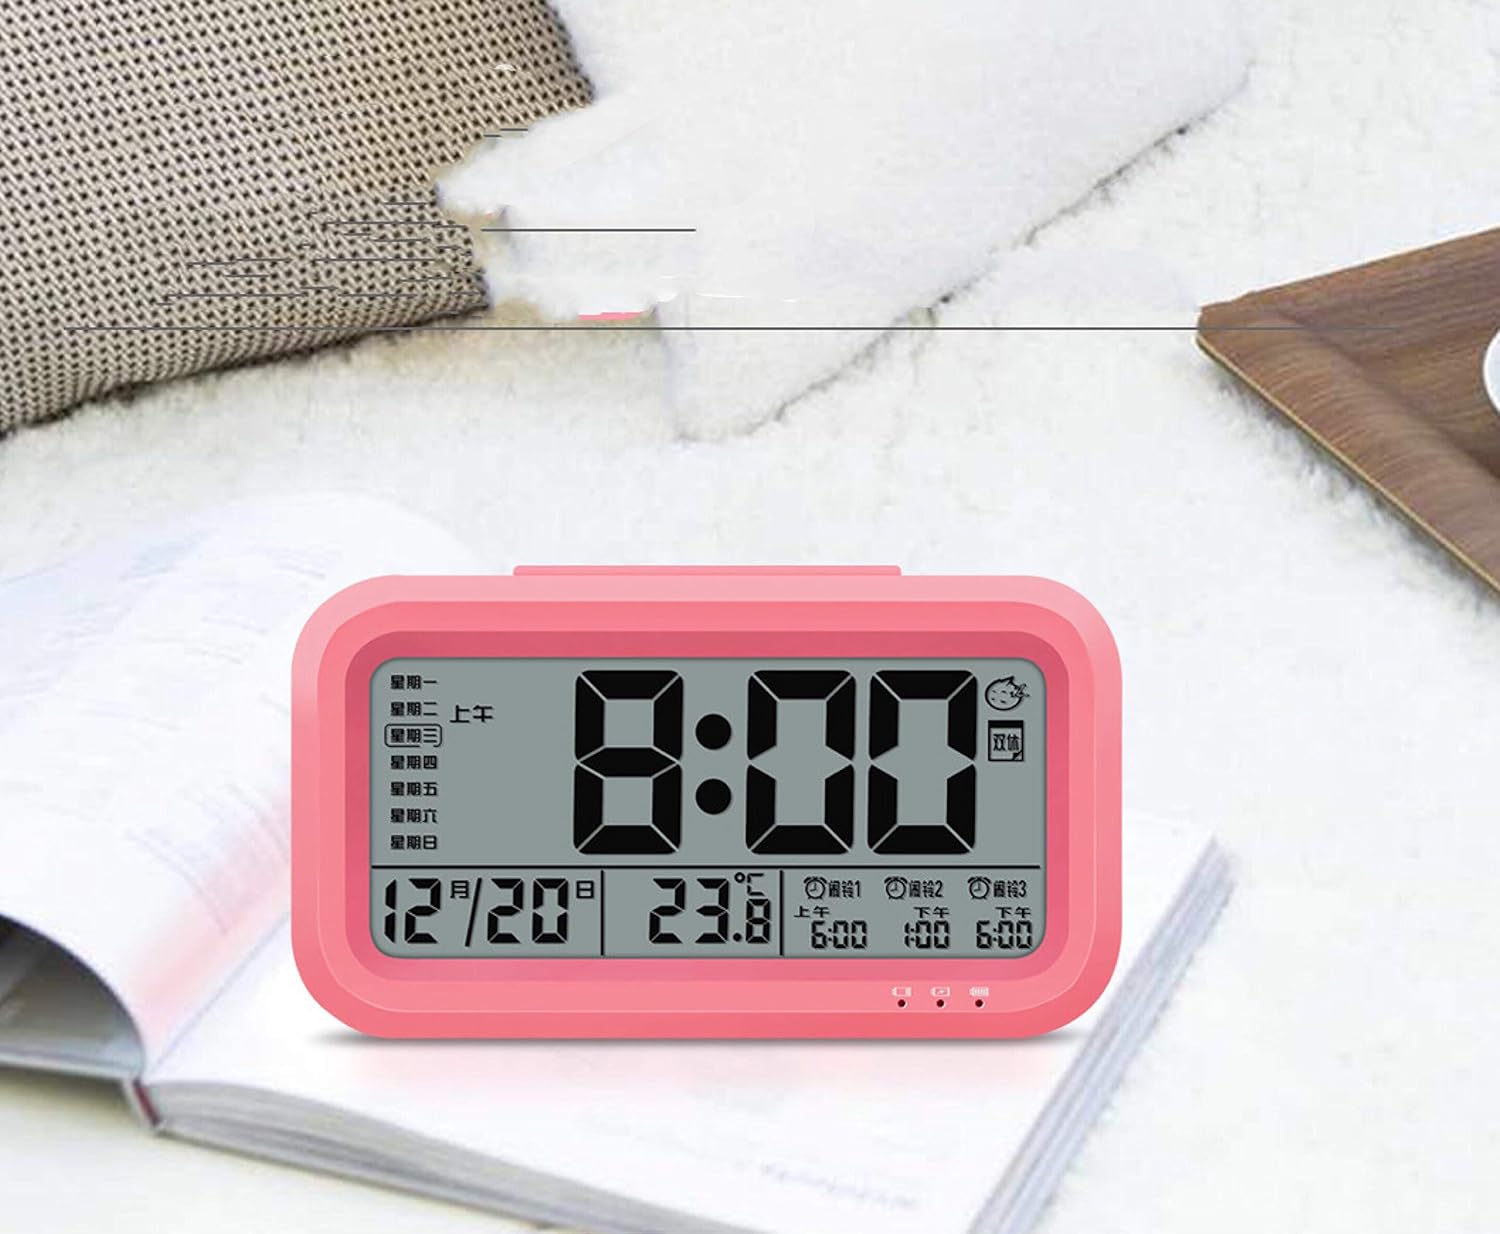
Bild: Vorderseite view of the Peakeep S8 Digital Alarm Clock. This image shows the large digital display with the time (8:00), date (12/20), and temperature (23.8°C). It also indicates alarm settings and day of the week.
Hintere Bedienelemente
The back of the clock features several buttons and switches for setting time, date, alarm, and other functions.
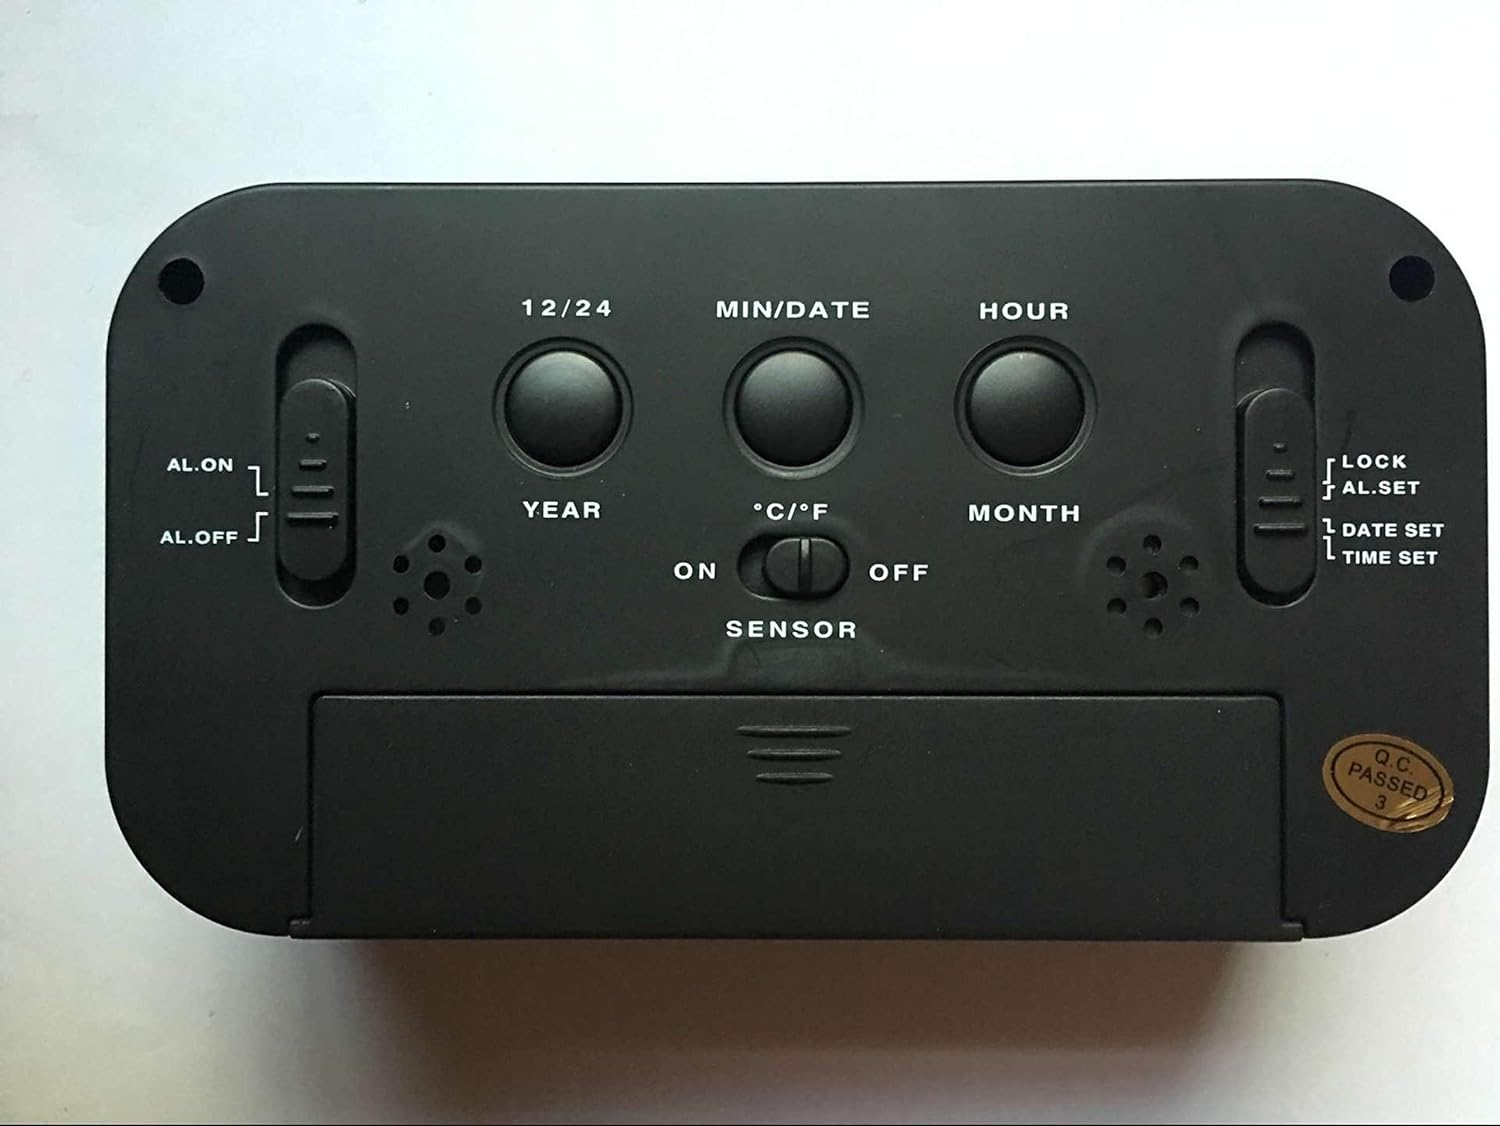
Bild: Rückseite view of the Peakeep S8 Digital Alarm Clock. This image highlights the control panel on the back, including buttons for 12/24 hour format, MIN/DATE, HOUR, YEAR, MONTH, °C/°F, and switches for AL.ON/AL.OFF, LOCK/AL.SET/DATE SET/TIME SET, and SENSOR ON/OFF.
- 12/24-Taste: Schaltet zwischen 12-Stunden- und 24-Stunden-Zeitanzeige um.
- MIN/DATUM-Schaltfläche: Used to adjust minutes during time/alarm setting, and to view Datum.
- STUNDEN-Taste: Used to adjust hours during time/alarm setting.
- JAHR-Schaltfläche: Used to set the year.
- MONAT-Schaltfläche: Used to set the month.
- °C/°F-Taste: Schaltet die Temperaturanzeige zwischen Celsius und Fahrenheit um.
- AL.ON/AL.OFF Switch: Turns the alarm function on or off.
- MODUS-Schalter (LOCK/AL.SET/DATUM EINSTELLEN/ZEIT EINSTELLEN):
- SPERREN: Sperrt die aktuellen Einstellungen, um versehentliche Änderungen zu verhindern.
- AL.SET: Wechselt in den Alarmeinstellungsmodus.
- DATE SET: Wechselt in den Datumseinstellungsmodus.
- ZEITEINSTELLUNG: Wechselt in den Zeiteinstellungsmodus.
- Sensor Ein/Aus-Schalter: Activates or deactivates the smart light sensor for automatic backlight.
- Schlummer-/Lichttaste (oben): Activates snooze when alarm sounds, or temporarily illuminates the display.
Aufstellen
1. Einlegen der Batterie
- Öffnen Sie die Batteriefachabdeckung auf der Rückseite der Uhr.
- Insert 3 new 1.5V AAA batteries, ensuring correct polarity (+ and -).
- Schließen Sie den Batteriefachdeckel fest.
- Hinweis: Batterien sind nicht im Lieferumfang enthalten.
2. Erstzeiteinstellung
- Schieben Sie den MODE-Schalter auf ZEITEINSTELLUNG.
- Drücken Sie die STUNDE Taste, um die Stunde einzustellen.
- Drücken Sie die MIN/DATUM Taste zum Einstellen der Minuten.
- Once the correct time is set, slide the MODE switch back to SPERREN.
3. Initial Date Setting
- Schieben Sie den MODE-Schalter auf DATUM EINGESTELLT.
- Drücken Sie die JAHR Knopf, um das Jahr einzustellen.
- Drücken Sie die MONAT Mit der Taste können Sie den Monat anpassen.
- Drücken Sie die MIN/DATUM Taste zum Einstellen des Tages.
- Once the correct date is set, slide the MODE switch back to SPERREN.
Bedienungsanleitung
Einstellen des Alarms
- Schieben Sie den MODE-Schalter auf AL.SET.
- Drücken Sie die STUNDE Taste, um die Weckzeit einzustellen.
- Drücken Sie die MIN/DATUM Taste zum Einstellen der Alarmminuten.
- Once the desired alarm time is set, slide the MODE switch back to SPERREN.
- Um den Alarm zu aktivieren, schieben Sie den Schieber AL.ON/AL.OFF Wechseln zu AL.ONAuf dem Display erscheint ein Alarmsymbol.
Verwendung der Schlummerfunktion
Wenn der Alarm ertönt, drücken Sie die große Taste. SNOOZE / LICHT button on top of the clock. The alarm will pause for approximately 5 minutes and then sound again. This can be repeated.
Alarm ausschalten
Um den Alarm vollständig auszuschalten, schieben Sie den AL.ON/AL.OFF Wechseln zu AL.OFF. The alarm icon will disappear from the display.
Activating the Smart Light Sensor
To enable the automatic backlight feature, slide the SENSOR Wechseln zu ON. The display will automatically illuminate with a soft glow in dark environments. Slide the switch to AUS um diese Funktion zu deaktivieren.
Ändern der Temperatureinheit
Drücken Sie die ° C / ° F button on the back of the clock to switch the temperature display between Celsius and Fahrenheit.
Changing Time Format (12/24 Hour)
Drücken Sie die 12/24 button on the back of the clock to toggle between 12-hour (with AM/PM indicator) and 24-hour time formats.
Wartung
Reinigung
Wischen Sie die Uhr mit einem weichen, trockenen Tuch ab. Verwenden Sie keine Scheuermittel oder Lösungsmittel, da diese die Oberfläche beschädigen können.
Batteriewechsel
When the display becomes dim or the clock functions erratically, it is time to replace the batteries. Follow the battery installation steps in the "Setup" section. Always replace all three AAA batteries at the same time with new ones.
Fehlerbehebung
| Problem | Mögliche Ursache/Lösung |
|---|---|
| Das Display ist leer oder dunkel. |
|
| Der Alarm ertönt nicht. |
|
| Die Uhr verliert oder gewinnt Zeit. |
|
| Tasten reagieren nicht. |
|
Technische Daten
- Marke: Spitzenreiter
- Modellnummer: S8 (Item Model Number: Crazy Curry-030)
- Anzeigetyp: Digital LCD
- Material: Plastik
- Farbe: Black (Black-a)
- Energiequelle: 3 x 1.5V AAA Batteries (Not included)
- Besondere Merkmale: Alarm, Snooze, Smart Light Sensor, Temperature Display (°C/°F), 12/24 Hour Format
- Abmessungen: (Approximate, based on typical alarm clock size and weight)
- Artikelgewicht: 178 g
- Versandgewicht: 0.18 Kilogramm
- UPC: 734602860235
Garantie und Support
This product is designed for reliability and ease of use. For specific warranty information, please refer to the documentation provided at the time of purchase or contact your retailer.
If you encounter any issues not covered in this manual, please contact the retailer or manufacturer for assistance. Keep your purchase receipt as proof of purchase for any warranty claims.