
PowMr SL03-30A
PowMr SL03-30A Solar Charge Controller User Manual
Model: SL03-30A
1. Einleitung
The PowMr SL03-30A Solar Charge Controller is designed to manage the power flow from your solar panels to your battery bank, ensuring efficient charging and protecting your batteries from overcharge and over-discharge. This controller is suitable for 12V/24V systems and supports various battery types including Lithium and Lead-Acid batteries. It features an LCD display for monitoring system parameters and offers multiple protection functions to enhance system safety and longevity.
2. Hauptmerkmale

Bild: Überview of the PowMr SL03-30A Solar Charge Controller's main features, including 12V/24V auto-detection, energy recording, temperature compensation, aluminum heat sink, eight electronic protections, compatibility with Lithium/Lead-acid batteries, and light & timer control.
- 12V/24V Auto-detection: Automatically identifies system voltage.
- Energy Recording/Current Display: Provides real-time monitoring of energy and current.
- Temperaturkompensation: Adjusts charging parameters based on ambient temperature.
- Aluminium-Kühlkörper: Gewährleistet eine effiziente Wärmeableitung für einen stabilen Betrieb.
- Eight Electronic Protections: Comprehensive safety features including overcharge, over-discharge, short-circuit, and reverse current protection.
- Batteriekompatibilität: Supports Lithium and Lead-Acid battery types (Flooded, GEL, AGM, LiFePO4).
- Light & Timer Control: Programmable load control functions.
- LCD Anzeige: Clear interface for parameter viewAnpassung und Justierung.

Bild: Intern view of the controller highlighting key components such as the copper coil for stable charge/discharge, a fuse for double protection, and MOSFETs made from good raw materials for current sensing.
3. Sicherheitshinweise
Please read all instructions carefully before installation and operation. Failure to follow these instructions may result in damage to the controller, battery, or solar panels, and may void the warranty.
- Ensure the battery is connected first to allow the controller to recognize the system voltage.
- Always connect the solar panels and load after the battery.
- Disconnect the solar panels and load before disconnecting the battery.
- Install the controller in a well-ventilated, dry, and cool environment, away from flammable materials.
- Avoid touching or short-circuiting wires or terminals.
- Verwenden Sie für alle Verbindungen geeignete Drahtquerschnitte, um eine Überhitzung zu vermeiden.
- This device is for indoor use only. Avoid exposure to water or excessive humidity.
- Außerhalb der Reichweite von Kindern aufbewahren.
4. Installation
4.1 Verdrahtungsreihenfolge
- Connect the battery to the charge controller. Ensure correct polarity (+ to + and - to -). The controller will display the battery voltage.
- Connect the solar panel to the charge controller. Ensure correct polarity. The controller will begin charging the battery.
- Connect the load to the charge controller. Ensure correct polarity.
Wichtig: Always connect the battery first and disconnect it last. This sequence prevents damage to the controller from voltage Wellen.
4.2 Montage
Mount the controller vertically on a wall or flat surface in a well-ventilated area, away from direct sunlight, high temperatures, and water. Ensure there is sufficient air circulation around the heat sink.

Image: The PowMr SL03-30A Solar Charge Controller showing its mounting holes on the sides, indicating how it can be affixed to a surface.
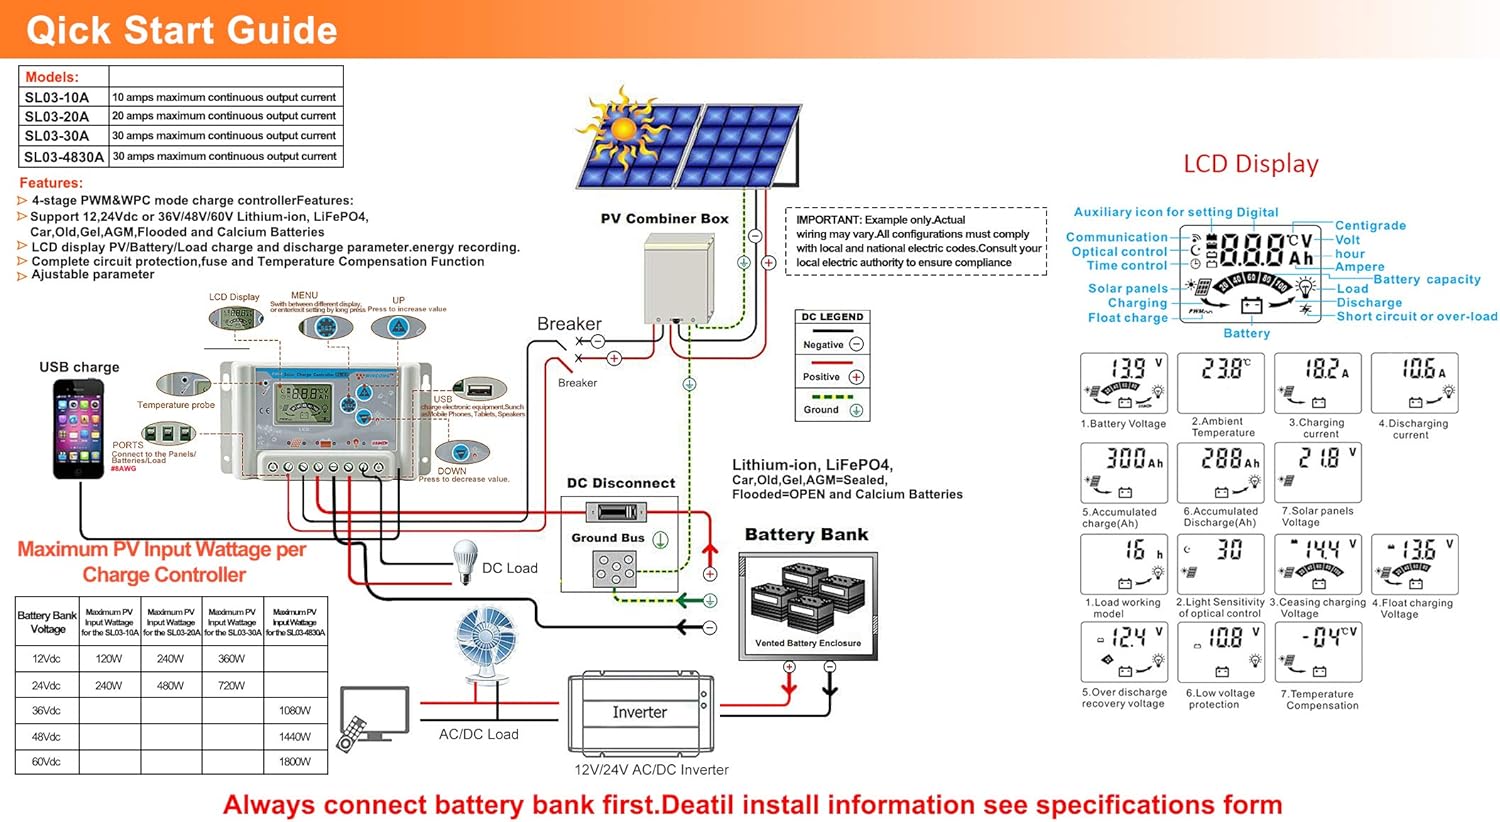
Image: A detailed wiring diagram for the solar charge controller, showing connections for PV combiner box, battery bank, DC load, and inverter. It also illustrates the LCD display and various parameters.
4.3 Video Guide: How to Connect the Controller
Video: This video demonstrates the correct wiring procedure for the PowMr SL03-30A Solar Charge Controller, showing how to connect the battery and solar panels. It also shows how to browse the interface and adjust settings.
5. Bedienung
5.1 LCD-Display und Tasten
The controller features an LCD display and three buttons for operation: UP, DOWN, and SET.
- AUF-Taste: Navigates through display interfaces, increases parameter values.
- AB-Taste: Navigates through display interfaces, decreases parameter values.
- Set-Taste: Enters/exits setting mode, confirms parameter changes.
5.2 Browsing Display Interfaces
Press the UP or DOWN button to cycle through various display interfaces, including battery voltage, charging current, accumulated discharge, and load status.
5.3 Parametereinstellungen
To enter the setting interface, long-press the SET button for 5 seconds. Use the UP and DOWN buttons to adjust values and the SET button to confirm and move to the next parameter. Long-press SET again to save changes and exit.
Zu den einstellbaren Parametern gehören:
- Akku-Typ: Select the correct battery type (e.g., Lead-Acid, Lithium).
- Laststeuerungsmodus: Set timer for load operation (e.g., 24H for continuous, 16H for dusk-to-dawn).
- Ladevolumentage: Adjust maximum charge voltage.
- Entladeschluss-Voltage: Stellen Sie die minimale Lautstärke eintage before load disconnection.
- Entladung Wiederverbindung Voltage: Stellen Sie die Lautstärke eintage at which the load reconnects.
Refer to the "Specifications" section for default and adjustable ranges for each parameter.
6. Schutzfunktionen

Image: A circular diagram illustrating the eight electronic protection features of the PowMr SL03-30A Solar Charge Controller, including power off memory, short-circuit, over-charging, open-circuit, over-load, under-voltage discharge, over-heat, and dual MOSFET reverse current protection.
The PowMr SL03-30A controller incorporates multiple protection mechanisms to ensure the safety and longevity of your solar system:
- Überladeschutz: Verhindert Batterieschäden durch Überladung.
- Überentladungsschutz: Disconnects the load when battery voltage sinkt unter einen sicheren Wert.
- Kurzschlussschutz: Schaltet sich bei einem Kurzschluss automatisch ab.
- Open-circuit Protection: Protects the system if the solar panel circuit is open.
- Verpolungsschutz: Prevents damage from incorrect battery or solar panel connections.
- Überspannungschutz: Disconnects the load if current exceeds the rated limit.
- Überhitzungsschutz: Reduces power or shuts down if the controller's internal temperature is too high.
- Speicher ausschalten: Die Einstellungen bleiben auch nach einem Stromausfall erhalten.
7. Spezifikationen

Image: A comprehensive table detailing the specifications for PowMr SL03-10A, SL03-20A, SL03-30A, and SL03-40A models, including normal battery voltage, charge/discharge current, battery type, system recognize range, charging regulation, maximum PV open circuit voltage, and various protection parameters.
| Parameter | Value (SL03-30A) |
|---|---|
| Normale Batterielautstärketage | 12V / 24V Auto |
| Ladestrom | 30 A |
| Entladestrom | 30 A |
| Akku-Typ | Lead-Acid Battery (Flooded, AGM, Gel, Calcium), LiFePO4 (Lithium) |
| System Recognize Range | Lead-Acid Battery: 8V-15V(12V System), 18V-30V(24V System) LiFePO4: 8V-15V(12V), 18V-30V(24V) |
| Charging Regulation | Bulk, Absorption, Float, Equalization |
| max. PV Leerlauf Voltage (Gesang) | <= 50 V. |
| Max. PV Input Wattage (12 V/24 V) | 360W/720W |
| Stop-charge Voltage | Default 14.4V (12V), 28.8V (24V) (adjustable) |
| Float-charge Voltage | Default 13.6V (12V), 27.2V (24V) (adjustable) |
| Niedrige Lautstärketage Reconnected | Default 12.4V (12V), 24.8V (24V) (adjustable) |
| Niedrige Lautstärketage Trennung | Default 10.8V (12V), 21.6V (24V) (adjustable) |
| No Load Losses | <10 mA |
| Batterietemperaturkompensation | Automatic with optional NTC thermal probe (adjustable) |
| Betriebstemperatur | -20°C bis +60°C |
| Outline Size (L*W*H) | 143*77*40 mm |
| Abstand der Montagebohrungen | 134 x 55 mm |
| Gewicht | 260g |
8. Fehlerbehebung
This section provides solutions to common issues you might encounter with your PowMr SL03-30A Solar Charge Controller.
| Problem | Mögliche Ursache | Lösung |
|---|---|---|
| Die Controlleranzeige ist aus. | Keine Batterie angeschlossen oder Batteriespannungtage zu niedrig. | Connect the battery correctly. Ensure battery voltage ist über 8 V. |
| "LLL" or "HHH" displayed on screen. | No PV input or PV voltage zu niedrig/zu hoch. | Ensure solar panels are connected and receiving sunlight. Check PV voltage. |
| Akku lädt nicht. | Solarpanel nicht angeschlossen, unzureichendes Sonnenlicht oder falsche Verkabelung. | Check solar panel connections and ensure adequate sunlight. Verify wiring polarity. |
| Das Laden funktioniert nicht. | Load disconnected, battery voltage too low (over-discharge protection), or load control settings. | Check load connections. Charge battery. Adjust load control timer (e.g., set to 24H for continuous). |
| Überhitzung des Controllers. | Poor ventilation or excessive load/charging current. | Ensure proper ventilation around the controller. Reduce load or charging current if consistently overheating. |
9. Wartung
Regular maintenance ensures optimal performance and extends the lifespan of your solar charge controller.
- Sauberkeit: Halten Sie den Controller sauber und frei von Staub und Schmutz. Verwenden Sie zum Reinigen ein trockenes Tuch.
- Verbindungen: Überprüfen Sie regelmäßig alle Kabelverbindungen auf festen Sitz und Korrosion. Lose Verbindungen können zu Überhitzung und Leistungseinbußen führen.
- Belüftung: Um eine ordnungsgemäße Wärmeabfuhr zu gewährleisten, muss sichergestellt werden, dass die Lüftungsöffnungen nicht blockiert sind.
- Batteriezustand: Batterievol überwachentage and health regularly. Replace batteries as needed.
- Umgebungsbedingungen: Stellen Sie sicher, dass der Regler innerhalb der spezifizierten Temperatur- und Feuchtigkeitsbereiche arbeitet.
10. Garantie und Support
For warranty information, technical support, or service inquiries, please contact PowMr customer service through the retailer where the product was purchased or visit the official PowMr website. Please have your model number (SL03-30A) and purchase date available when contacting support.
Weitere Informationen finden Sie im PowMr Store.
Ask a question about this manual
Ask about setup, troubleshooting, compatibility, parts, safety, or missing instructions. Manuals+ will review the question and use this page’s manual context to help answer it.