
1. Einleitung
This manual provides detailed instructions for setting up and operating your NETVIP 300Mbps WiFi Extender. This device is designed to extend the coverage of your existing wireless network, eliminating Wi-Fi dead zones and improving signal strength in areas with weak reception. It supports both Repeater and Access Point (AP) modes, offering flexible solutions for your networking needs.
2. Produktüberschreitungview
Familiarize yourself with the components of your NETVIP WiFi Extender:
- LED-Anzeigen: Display the device's status, including power, Wi-Fi signal, and WPS activity.
- WPS-Taste: For quick and secure connection to your router using Wi-Fi Protected Setup.
- LAN-Anschluss: Used for connecting wired devices or for setting up the device in Access Point mode.
- Netzstecker: Zum Anschließen des Geräts an eine Steckdose.
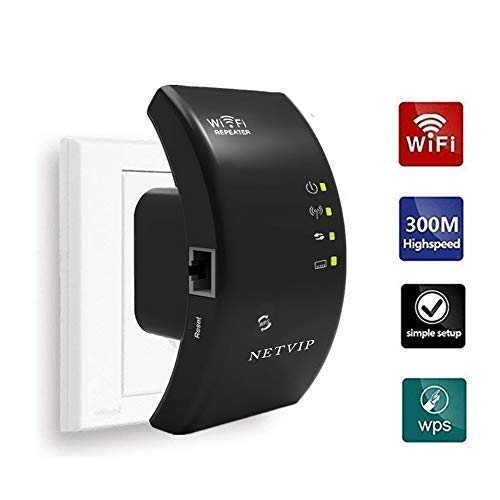
Bild 2.1: Vorderseite view of the NETVIP 300Mbps WiFi Extender, showing its compact design and key indicators.
3. Einrichtungsanweisungen
The NETVIP WiFi Extender can be configured in two main modes: Repeater Mode and Access Point (AP) Mode.
3.1. Repeater Mode (Extending Existing Wi-Fi)
Der Repeater-Modus erweitert die Reichweite Ihres bestehenden drahtlosen Netzwerks.
- Einschalten: Plug the extender into an electrical outlet near your main router. Wait for the Power LED to light up.
- Verbindung zum Extender herstellen: On your computer or mobile device, connect to the Wi-Fi network named "Wireless-N" (or similar, check the label on your device). No password is required initially.
- Zugriffseinrichtungsseite: Öffnen Sie ein web Browser und geben Sie die Standard-IP-Adresse ein (z. B. 192.168.10.1) oder Domänenname (z. B. repeater.net) in der Kurzanleitung bereitgestellt.
- Einloggen: Enter the default username and password (usually "admin" for both, check device label).
- Repeater-Modus auswählen: Wählen Sie auf der Einstellungsseite die Option „Repeater-Modus“.
- Nach Netzwerken suchen: Der Repeater sucht nach verfügbaren WLAN-Netzwerken. Wählen Sie Ihr Heim-WLAN-Netzwerk aus der Liste aus.
- Passwort eingeben: Enter the Wi-Fi password for your home network. You can also set a new SSID (network name) for the extended network or keep it the same.
- Einstellungen anwenden: Klicken Sie auf „Anwenden“ oder „Speichern“. Der Extender wird neu gestartet.
- Extender versetzen: Once restarted, unplug the extender and move it to a location halfway between your router and the Wi-Fi dead zone. Ensure the signal strength LED indicates a good connection to your main router.
- Geräte verbinden: Connect your devices to the new extended Wi-Fi network.
WPS Setup (Alternative for Repeater Mode)
- Einschalten: Schließen Sie den Repeater an eine Steckdose in der Nähe Ihres Hauptrouters an.
- Drücken Sie WPS am Router: Drücken Sie die WPS-Taste an Ihrem Hauptrouter.
- Drücken Sie WPS auf dem Extender: Within two minutes, press the WPS button on the NETVIP WiFi Extender.
- Warten auf Verbindung: The WPS LED on both devices should blink and then become solid, indicating a successful connection.
- Extender versetzen: Move the extender to an optimal location.
3.2. Access Point (AP) Mode (Creating a New Wi-Fi Network)
Der AP-Modus wandelt eine kabelgebundene Internetverbindung in ein drahtloses Netzwerk um.
- Einschalten: Stecken Sie den Extender in eine Steckdose.
- Über Ethernet verbinden: Connect an Ethernet cable from your main router's LAN port to the LAN port on the NETVIP WiFi Extender.
- Verbindung zum Extender herstellen: On your computer or mobile device, connect to the Wi-Fi network named "Wireless-N" (or similar).
- Zugriffseinrichtungsseite: Öffnen Sie ein web Im Browser die Standard-IP-Adresse oder den Domänennamen eingeben.
- Einloggen: Geben Sie den Standardbenutzernamen und das Standardkennwort ein.
- Wählen Sie den AP-Modus: On the setup page, choose "AP Mode".
- WLAN-Einstellungen konfigurieren: Set a new SSID (network name) and a strong Wi-Fi password for your new wireless network.
- Einstellungen anwenden: Klicken Sie auf „Anwenden“ oder „Speichern“. Der Extender wird neu gestartet.
- Geräte verbinden: Connect your devices to the newly created Wi-Fi network.
4. Bedienungsanleitung
Once configured, the NETVIP WiFi Extender operates automatically. Ensure it is plugged into a power outlet and the LED indicators show normal operation.
- Optimale Platzierung: For best performance in Repeater Mode, place the extender where it receives a strong signal from your main router (indicated by the signal LED) and can still provide coverage to the desired area. Avoid placing it near large metal objects, microwaves, or other sources of interference.
- LED-Status:
- Betriebs-LED: Solid indicates power on.
- WLAN-LED: Solid indicates Wi-Fi is active. Blinking indicates data transfer.
- WPS-LED: Solid indicates a successful WPS connection. Blinking indicates WPS pairing in progress.
- Kabelverbindung: In either mode, the LAN port can be used to connect a single wired device (e.g., a desktop computer, gaming console, or smart TV) to the network, providing a stable wired connection.
5. Wartung
Regelmäßige Wartung trägt dazu bei, eine optimale Leistung und Langlebigkeit Ihres Geräts zu gewährleisten.
- Reinigung: Wischen Sie das Gerät vorsichtig mit einem weichen, trockenen Tuch ab. Verwenden Sie keine flüssigen Reiniger oder Sprays.
- Firmware-Updates: Periodically check the NETVIP official website for any available firmware updates. Updating firmware can improve performance, add new features, or fix bugs. Follow the instructions provided with the firmware update carefully.
- Zurücksetzen des Geräts: If you encounter persistent issues or wish to reconfigure the device from scratch, you can perform a factory reset. Locate the reset button (usually a small pinhole) on the device, press and hold it for 5-10 seconds with a paperclip until the LEDs flash. This will restore the device to its factory default settings.
6. Fehlerbehebung
If you experience issues with your NETVIP WiFi Extender, refer to the following common problems and solutions:
- Cannot access the setup page (192.168.10.1 or repeater.net):
- Ensure your device is connected to the extender's default Wi-Fi network (e.g., "Wireless-N").
- Versuchen Sie eine andere web Browser.
- Löschen Sie den Cache und die Cookies Ihres Browsers.
- Restart the extender and your computer/mobile device.
- Perform a factory reset on the extender.
- Nach der Einrichtung kein Internetzugang:
- In Repeater Mode, ensure the extender is receiving a strong signal from your main router. Relocate it closer if necessary.
- Verify that the Wi-Fi password entered during setup for your main router is correct.
- In AP Mode, ensure the Ethernet cable is securely connected between the extender and your main router, and that your main router has internet access.
- Starten Sie sowohl Ihren Hauptrouter als auch den Repeater neu.
- Langsame Internetgeschwindigkeit:
- Optimal placement is crucial. The extender should be positioned where it can receive a good signal from the router and transmit effectively to your devices.
- Avoid interference from other electronic devices (microwaves, cordless phones).
- Stellen Sie sicher, dass Ihr Hauptrouter eine ausreichende Geschwindigkeit bietet.
- Prüfen Sie, ob Firmware-Updates für den Extender verfügbar sind.
- Die Verbindung bricht häufig ab:
- Check for signal interference or obstacles.
- Ensure the extender is not overheating.
- Try changing the Wi-Fi channel on your main router to avoid congestion.
- Führen Sie einen Werksreset durch und konfigurieren Sie den Extender neu.
7. Spezifikationen
| Marke | NETVIP |
| Drahtloser Kommunikationsstandard | 802.11b, 802.11g, 802.11n |
| Datenübertragungsrate | Bis zu 300 Mbit/s |
| Betriebsarten | Repeater, Zugangspunkt (AP) |
| Kompatible Geräte | Router, Alexa Devices |
| Besonderheit | WPS Function, LAN Port |
| Technische Daten | 4.33 x 2.36 x 2.76 Zoll |
| Artikelgewicht | 5.6 Unzen |
8. Garantie und Support
NETVIP products are designed for reliability and performance. For specific warranty information, please refer to the warranty card included with your product or visit the official NETVIP webWebsite.
If you require technical assistance or have questions not covered in this manual, please contact NETVIP customer support through their official webBitte kontaktieren Sie den Support über die Website oder die mit Ihrem Kauf erhaltenen Kontaktdaten. Halten Sie bitte Ihr Produktmodell und die Kaufdetails bereit, wenn Sie sich an den Support wenden.