
1. Einleitung
Thank you for choosing the XTUGA MRV122FX 12-Channel Audio Mixer. This professional mixing console is designed for high-quality audio performance in various settings, including live gigs, studio recording, and DJ events. It features an ultra-low noise design, advanced microphone preamplifiers, a built-in digital effects processor, Bluetooth connectivity, and USB playback/recording capabilities. This manual provides detailed instructions to help you set up, operate, and maintain your mixer for optimal performance.

Bild 1.1: Vorderseite view of the XTUGA MRV122FX 12-Channel Audio Mixer, showcasing all controls and input/output sections.
2. Hauptmerkmale
- Extrem geräuscharmes Design: Engineered for the highest possible headroom and minimal noise interference.
- Studio-Grade XDR2 Mic Preamps: Equipped with 6-16 Extended Dynamic Range mic preamplifiers, offering a 60dB gain range, 130dB dynamic range, and +22dBu line input handling.
- Phantomspeisung: +48V phantom power available for condenser microphones.
- Kanal-EQ: 4-band active EQ on mono channels (High, Mid-high, Mid-low, Low) and 2-band EQ on stereo channels. Includes an 18dB/octave, 75Hz Lo-Cut filter on mic channels.
- Built-in Digital Effects Processor: Features 16 high-quality 24-bit DSP effects with Tap Tempo functionality.
- Multi-format Play Support: Integrated Bluetooth for wireless audio streaming from mobile devices, and a digital display MP3 player with U-DISK input and recording (REC) function.
- Two-Way USB Function: Allows music playback via USB and connection to a computer for recording.
- Robuste Konstruktion: Ultra-fashion all-metal chassis design for durability and high-density dust resistance.
- Universelle Stromversorgung: Mehrbändtage power supply (100-240V) for worldwide use.
- Dual 7-Band Stereo Graphic Equalizer: For precise overall mix adjustment.
3. Einrichtung
3.1 Auspacken und Aufstellen
Carefully remove the mixer from its packaging. Inspect the unit for any signs of damage. Place the mixer on a stable, flat surface, ensuring adequate ventilation around the unit.
3.2 Stromanschluss
Connect the provided power cable to the mixer's power input and then to a suitable AC power outlet (100-240V). Ensure the power switch is in the OFF position before connecting. The mixer is designed with a multi-voltage power supply for global compatibility.

Image 3.1: Rear panel of the mixer showing the 100-240V power input and fuse holder.
3.3 Anschließen der Eingänge
The MRV122FX features 12 input channels, including 10 mono microphone/line inputs and 2 stereo line inputs (channels 9/10 and 11/12). Channels 1-8 are mono inputs with XLR and 1/4" TRS/TS jacks.
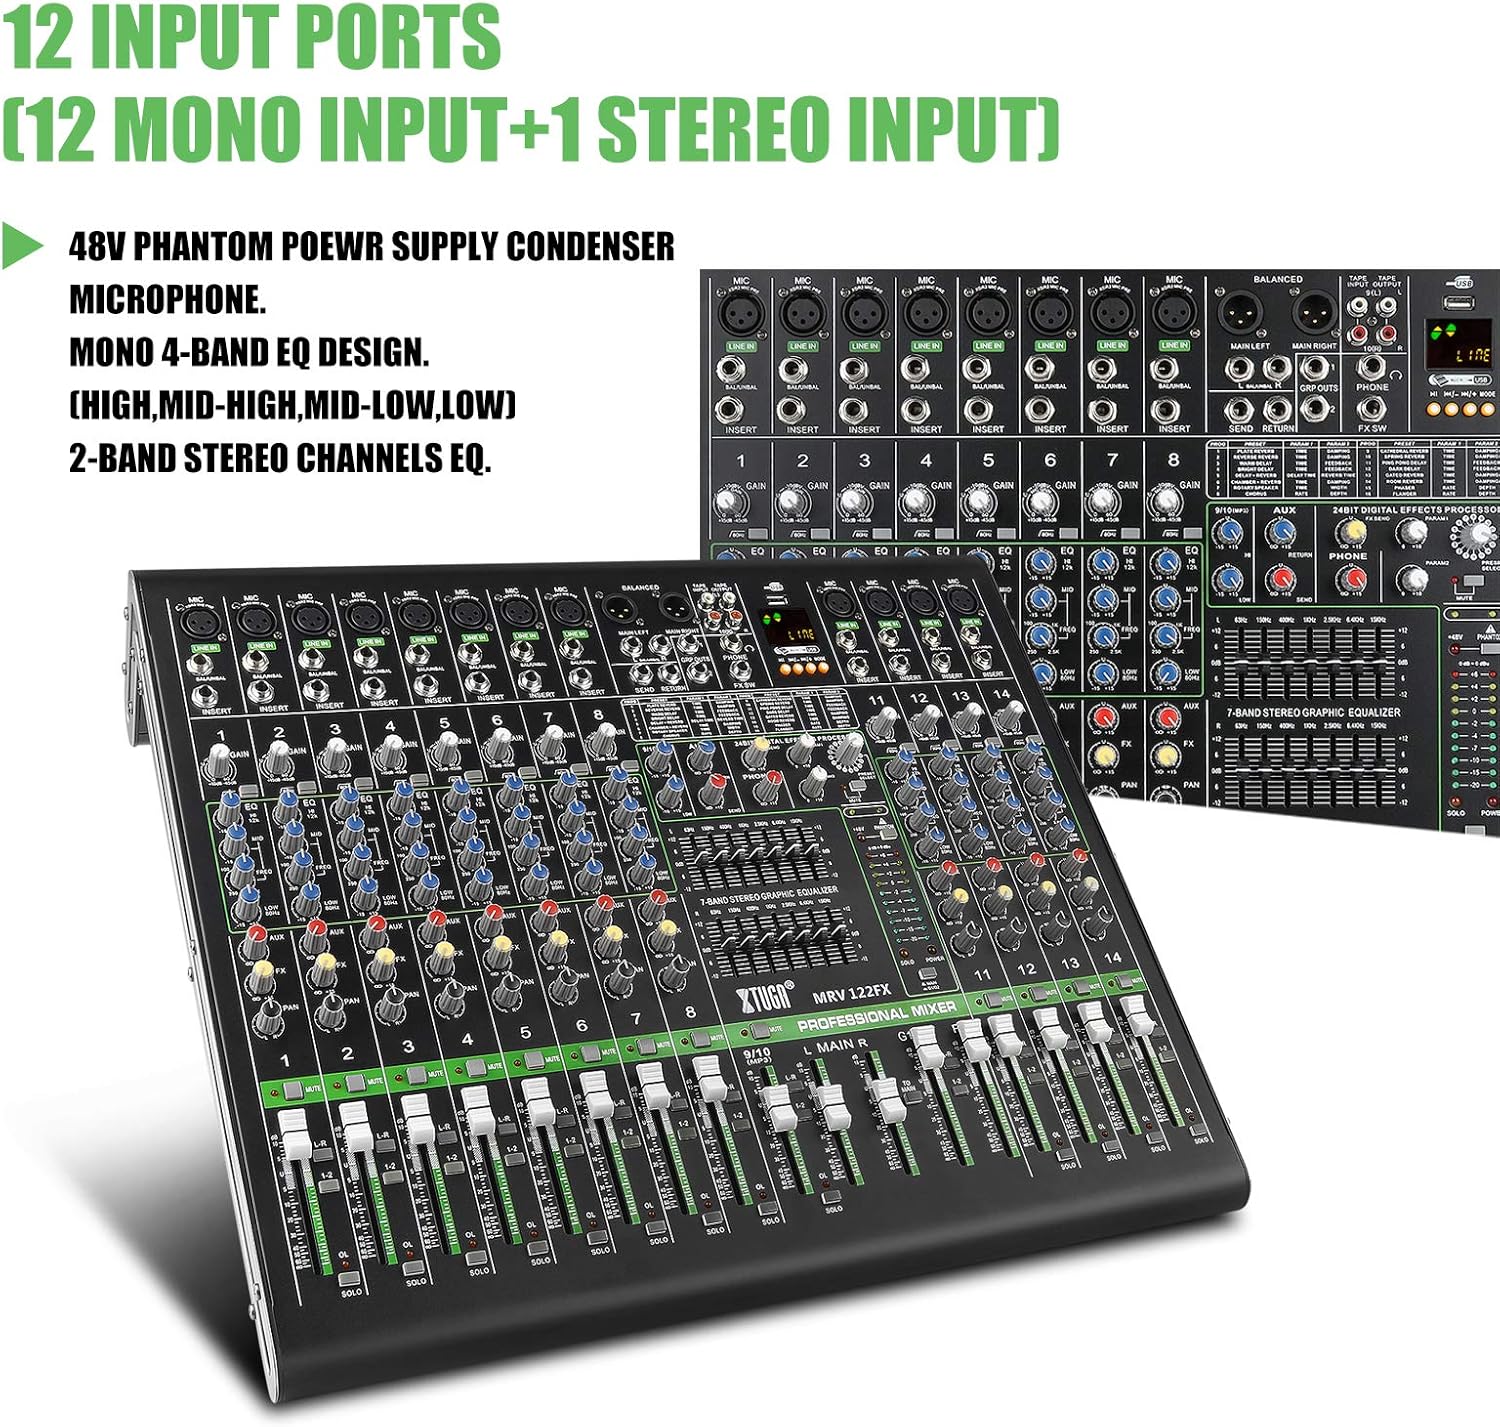
Image 3.2: Close-up of the mixer's input section, highlighting the 12 input ports (10 mono, 2 stereo).
- Mikrofone: Connect dynamic or condenser microphones to the XLR inputs (channels 1-8). For condenser microphones, activate the +48V phantom power switch located near the master section.
- Leitungspegelgeräte: Instrumente (Keyboards, Gitarren mit Vorverstärker) anschließenamps), media players, or other line-level devices to the 1/4" TRS/TS LINE IN jacks on mono channels or the stereo LINE IN jacks on channels 9/10 and 11/12.
- Punkte einfügen: Channels 1-8 include 1/4" TRS insert jacks for connecting external signal processors (e.g., compressors, gates) to individual channels.
3.4 Ausgänge anschließen
- Hauptausgänge: Connect your main PA system or recording interface to the MAIN L/R XLR or 1/4" TRS outputs.
- AUX-Send: Use the AUX SEND 1/4" output to connect to stage Monitore oder externe Effektprozessoren.
- Kopfhörer: Connect headphones to the PHONES 1/4" stereo jack for monitoring.
- USB-Ausgang: Connect the USB port to a computer for digital audio recording.
4. Bedienung des Mischpults
4.1 Channel Controls (Mono Channels 1-8)
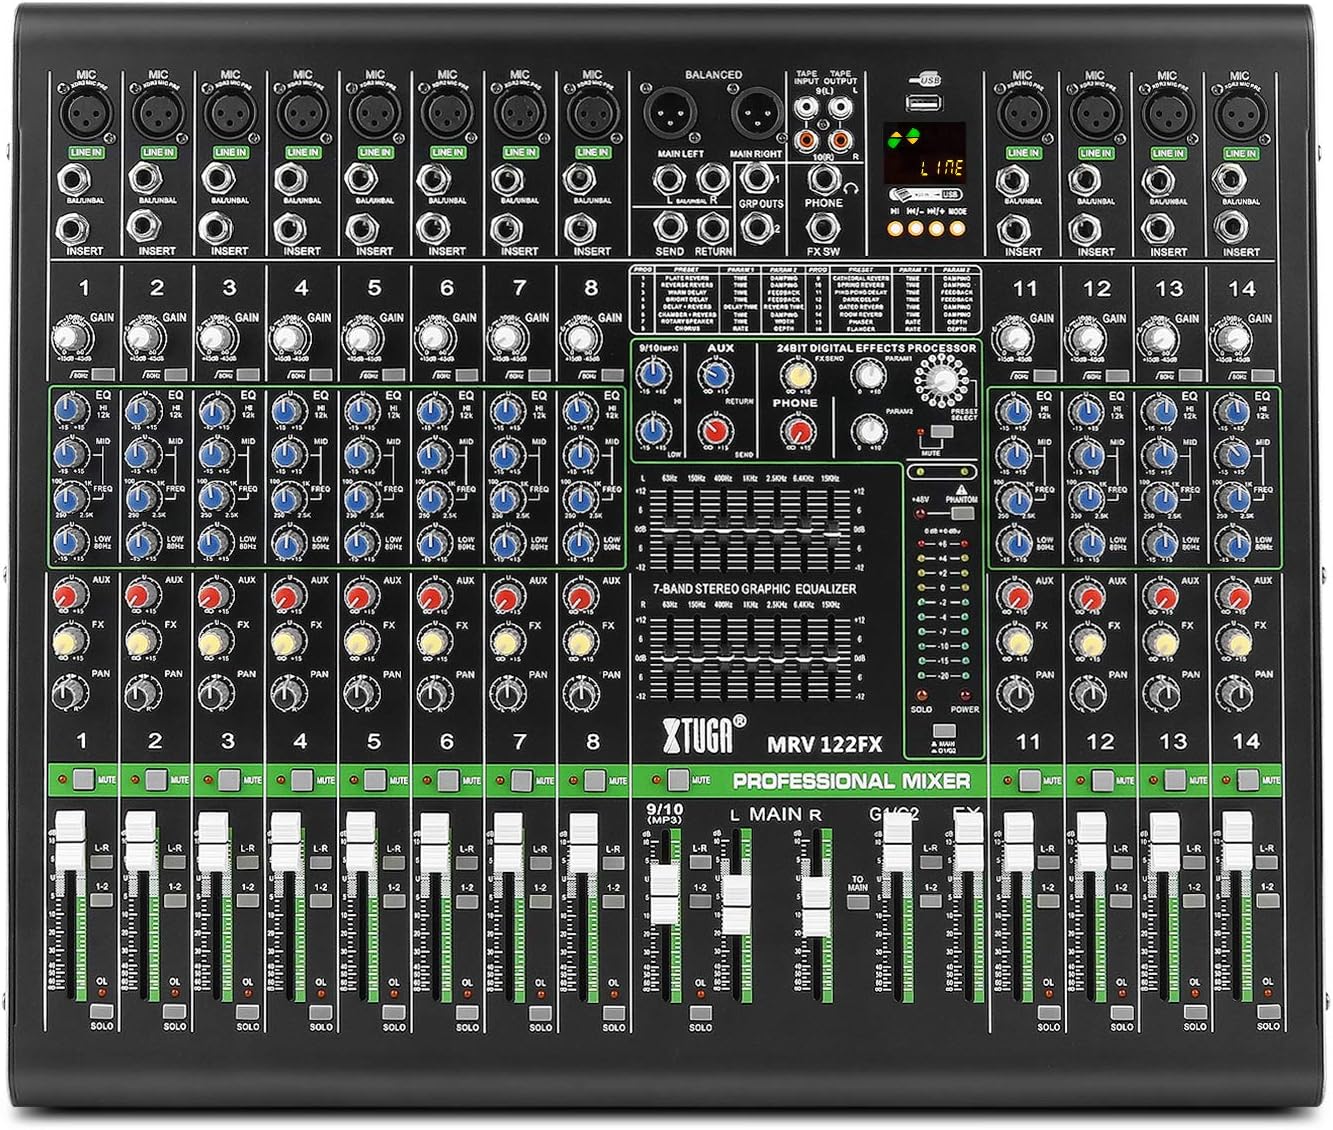
Abbildung 4.1: Detailansicht view of a single channel strip, showing Gain, EQ, Aux, FX, Pan, Mute, and Fader controls.
- DAZUGEWINNEN: Adjusts the input sensitivity for the microphone or line input. Set this to achieve a strong signal without clipping (the OL LED should flash only occasionally).
- EQ (High, Mid-high, Mid-low, Low): These four knobs allow you to shape the tone of the input signal. Adjust to enhance or cut specific frequencies.
- LO-CUT: Activates an 18dB/octave, 75Hz high-pass filter to remove unwanted low-frequency rumble.
- AUX: Controls the amount of channel signal sent to the AUX SEND output.
- FX: Controls the amount of channel signal sent to the internal effects processor.
- SCHWENKEN: Positioniert das Kanalsignal innerhalb des Stereofelds (von links nach rechts).
- STUMM: Schaltet den Kanal stumm.
- SOLO: Routes the channel signal to the headphones for isolated monitoring without affecting the main mix.
- Kanal-Fader: Adjusts the overall volume level of the channel in the main mix.
4.2 Stereo Channels (9/10 and 11/12)
These channels are designed for stereo line-level inputs. They typically feature 2-band EQ, AUX, FX, BALANCE (instead of PAN), MUTE, SOLO, and a channel fader.
4.3 Master-Sektionssteuerung
- HAUPT-L/R-Fader: Regelt die Gesamtlautstärke des Haupt-Stereomixes.
- AUX RETURN: Adjusts the level of the signal returning from an external effects processor connected to the AUX RETURN inputs.
- TELEFON-Level: Steuert die Lautstärke des Kopfhörerausgangs.
- 7-Band-Stereo-Grafik-Equalizer: This equalizer allows for fine-tuning the overall frequency response of the main mix. Adjust the sliders to boost or cut specific frequency bands.

Image 4.2: Close-up of the 7-band stereo graphic equalizer, showing frequency bands and boost/cut controls.
4.4 Digitaler Effektprozessor (DSP)

Image 4.3: Section of the mixer highlighting the 24-bit digital effects processor with 16 modes.
- PROGRAMM-Knopf: Rotate to select one of the 16 built-in DSP effects (e.g., Reverb, Delay, Chorus).
- PARAMETER-Knopf: Adjusts a specific parameter of the selected effect (e.g., decay time for reverb, delay time for delay).
- FX-Pegel: Controls the overall volume of the effects return into the main mix.
- TAP-TEMPO: For time-based effects like delay, press this button repeatedly to set the tempo.
4.5 Bluetooth, MP3/USB Playback and Recording

Image 4.4: Close-up of the digital display and multimedia control section, including USB and Bluetooth functionality.
- Bluetooth: Activate Bluetooth on your mobile device and search for the mixer. Pair with the device to stream audio wirelessly. Use the dedicated controls on the mixer to manage playback.
- MP3 (U-DISK) Playback: Insert a USB flash drive (U-DISK) containing MP3 files into the USB port. Use the digital display and control buttons to navigate and play tracks.
- REC-Funktion: The mixer supports recording directly to a USB flash drive. Refer to the digital display interface for recording options.
- USB-Computeranschluss: Connect the mixer to a computer via USB to use it as an audio interface for recording or playback.
5. Wartung
To ensure the longevity and optimal performance of your XTUGA MRV122FX mixer, follow these maintenance guidelines:
- Reinigung: Use a soft, dry cloth to clean the exterior of the mixer. Avoid using abrasive cleaners, solvents, or waxes, as these can damage the finish and controls.
- Staubschutz: Keep the mixer covered when not in use to prevent dust and debris from accumulating on the controls and inside the chassis.
- Umgebungsbedingungen: Das Mischgerät sollte in einer kühlen, trockenen Umgebung betrieben und gelagert werden, vor direkter Sonneneinstrahlung, extremen Temperaturen und hoher Luftfeuchtigkeit geschützt sein.
- Energiesicherheit: Always disconnect the power cable before cleaning or if the unit will be unused for an extended period.
6. Fehlerbehebung
If you encounter issues with your XTUGA MRV122FX mixer, refer to the following common problems and solutions:
- Keine Tonausgabe:
- Überprüfen Sie alle Stromanschlüsse und stellen Sie sicher, dass der Mixer eingeschaltet ist.
- Prüfen Sie, ob die Haupt- und Kanalfader hochgestellt sind.
- Ensure no MUTE buttons are active on channels or master.
- Überprüfen Sie die Verbindungen zu Ihrem ampVerstärker oder Aktivlautsprecher.
- Confirm input sources are active and sending a signal.
- Distortion or Unclear Sound:
- Reduce the GAIN on input channels if the OL (Overload) LED is constantly lit.
- Lower the main output faders if the main meters are consistently in the red.
- Check all cables for damage or improper connection.
- Phantomspeisung funktioniert nicht:
- Ensure the +48V phantom power switch is engaged.
- Verify that condenser microphones are connected via XLR cables.
- Probleme mit der Bluetooth-Konnektivität:
- Stellen Sie sicher, dass Bluetooth sowohl am Mischpult als auch an Ihrem Gerät aktiviert ist.
- Check that the mixer is in pairing mode.
- Move your device closer to the mixer to reduce interference.
- Digital Display Language (e.g., Chinese):
- Some units may default to a specific language. Check the digital display's menu options for a language setting. If no option is available, contact customer support for assistance.
7. Spezifikationen
| Besonderheit | Spezifikation |
|---|---|
| Modellnummer | MRV122FX |
| Anzahl der Kanäle | 12 |
| Artikelgewicht | 8.89 kg |
| Technische Daten | 60 x 56 x 24 cm |
| Konnektivitätstechnologie | XLR, USB, Bluetooth |
| Stromquelle | Kabelgebundenes Elektrogerät (100-240V) |
| Mic Input (Max) | 30 dBu |
| Line Input (Max) | 21 dBu |
| Mixer Rated Output (Main) | +4dBu |
| Frequency Response (Mic Input to Main Output) | +0-1 dB, <10Hz to 80KHz; +0-3 dB, <10Hz to 120KHz |
| EQ (each band) | ±15 dB |
| Digitaler Effektprozessor | 24-bit, 16 FX settings |
8. Garantie und Support
Informationen zur Garantie, zum technischen Support oder zu Serviceanfragen finden Sie in der mit Ihrem Kauf gelieferten Dokumentation oder wenden Sie sich an Ihren Händler. Bewahren Sie Ihren Kaufbeleg für eventuelle Garantieansprüche auf.