1. Einleitung
1.1 Produktüberschussview
The Necchi EX100 is a versatile sewing machine designed for various projects, including quilting, garment construction, and home decor. It features a user-friendly interface for direct stitch selection and enhanced visibility with wide-angle LED lighting. An included extension table provides ample workspace for larger projects.
Hauptmerkmale:
- 100 Built-in Stitches, including 6 Buttonholes
- Von oben zu ladende Spule mit vollem rotierendem Greifer
- Easy Convenience Buttons: Start/Stop, Reverse, Locking Stitch, Needle Up/Down, Automatic Thread Cutter
- Maximum Stitch Width: 7mm
- Included 16" x 11" Extension Table and Optic Magnifier

Figure 1.1: The Necchi EX100 Sewing Machine with its extension table attached, showcasing seine Konstruktion und Hauptkomponenten.
2. Einrichtung
2.1 Auspacken
Carefully remove the sewing machine and all accessories from the packaging. Retain the original packaging for future storage or transport. Ensure all components listed in the packing list are present.
2.2 Stromanschluss
Connect the AC adapter to the machine's power input jack, then plug the adapter into a standard electrical outlet. Ensure the power switch is in the 'OFF' position before connecting.
2.3 Anbringen des Erweiterungstisches
To attach the extension table, slide its mounting tabs into the corresponding slots on the free arm of the sewing machine until it clicks securely into place. This provides a larger, flat work surface.

Figure 2.1: The Necchi EX100 with the extension table properly installed, expanding the work area.
2.4 Aufwickeln der Spule
- Setzen Sie eine Garnrolle auf den Garnrollenstift.
- Führen Sie den Faden durch die obere Fadenführung und um die Spulenwickel-Spannscheibe.
- Setzen Sie eine leere Spule auf die Spulenwickelspindel.
- Wrap the thread clockwise around the bobbin a few times.
- Schieben Sie die Spulerspindel nach rechts.
- Press the Start/Stop button to begin winding. The machine will stop automatically when the bobbin is full.
- Den Faden abschneiden und die Spulenwickelspindel wieder nach links schieben.
2.5 Einfädeln der Maschine
- Heben Sie den Nähfuß und die Nadel in die höchste Position.
- Setzen Sie eine Garnrolle auf den Garnrollenstift.
- Folgen Sie dem auf der Maschine angezeigten nummerierten Einfädelweg und achten Sie darauf, dass der Faden durch alle Führungen und den Fadenhebel geführt wird.
- Use the automatic needle threader for easy needle threading, or thread manually from front to back.
- Setzen Sie die aufgewickelte Spule in das Spulengehäuse unter der Nadelplatte ein und achten Sie darauf, dass der Faden korrekt zugeführt wird.

Abbildung 2.2: Eine detaillierte view of the Necchi EX100's control panel and the upper threading path, highlighting key operational areas.
3. Bedienungsanleitung
3.1 Grundlegende Bedienelemente
- Start/Stopp-Taste: Initiates and halts sewing without the foot controller.
- Rückwärtstaste: Sews in reverse to secure stitches at the beginning and end of seams.
- Locking Stitch Button: Creates a neat, secure locking stitch at the end of a seam.
- Nadel-Auf/Ab-Taste: Positions the needle either fully up or fully down, useful for pivoting fabric.
- Automatic Thread Cutter: Trims both upper and bobbin threads with a single press.

Figure 3.1: Close-up of the Necchi EX100's convenience buttons, including Start/Stop, Reverse, Locking Stitch, Needle Up/Down, and Automatic Thread Cutter.
3.2 Stichauswahl
The EX100 offers 100 built-in stitches, including 6 types of buttonholes. Use the direct stitch selection interface on the machine's front panel to choose your desired stitch. Refer to the stitch chart for visual guidance.
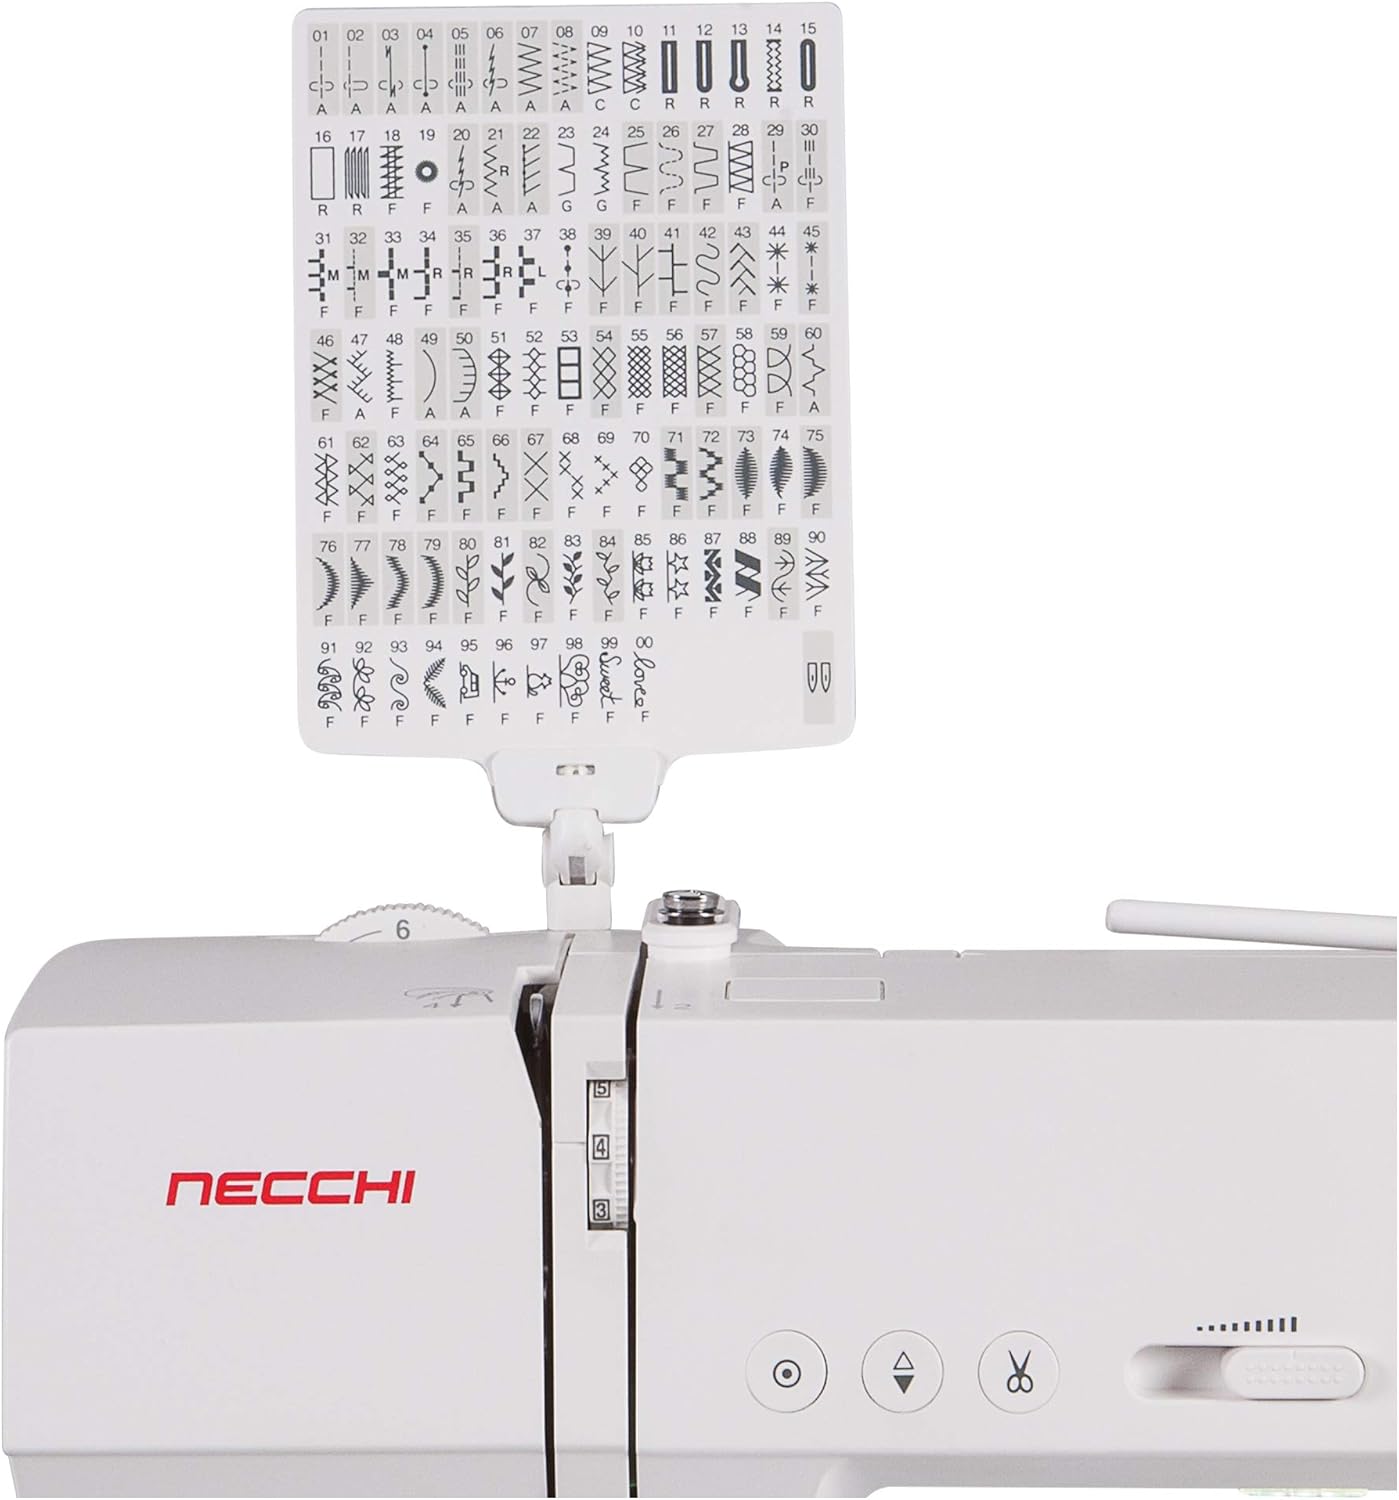
Figure 3.2: The comprehensive stitch chart for the Necchi EX100, displaying all 100 built-in stitch patterns and their corresponding numbers.
3.3 Anpassen der Sticheinstellungen
The machine allows adjustment of stitch length and width. The maximum stitch width is 7mm. Consult the display panel and your manual for specific instructions on modifying these settings for different stitch types and fabric requirements.
3.4 Using the Optic Magnifier
The included optic magnifier can be attached to the machine to provide enhanced visibility for intricate sewing tasks or for users with vision challenges. Position it directly over the needle area for optimal viewing.
4. Wartung
4.1 Reinigung
Regularly clean the bobbin area, feed dogs, and needle plate to remove lint and thread buildup. Use a small brush and avoid compressed air, which can push debris further into the machine. Ensure the machine is unplugged before cleaning.
4.2 Nadelwechsel
Change the needle frequently, especially after 8-10 hours of sewing or if it becomes bent or dull. Use the correct needle type and size for your fabric. Loosen the needle clamp Schraube lösen, alte Nadel entfernen, neue Nadel mit der flachen Seite nach hinten einsetzen und die Schraube fest anziehen.
5. Fehlerbehebung
This section addresses common issues you might encounter during operation. For more complex problems, refer to the full service manual or contact customer support.
| Problem | Mögliche Ursache | Lösung |
|---|---|---|
| Übersprungene Stiche | Falsche Nadel, verbogene Nadel, falsch eingefädelt. | Replace needle with correct type/size, re-thread machine, ensure needle is fully inserted. |
| Fadenbruch | Improper threading, incorrect tension, damaged needle, poor quality thread. | Re-thread machine, adjust tension, replace needle, use good quality thread. |
| Ungleichmäßige Stiche | Incorrect tension, wrong needle for fabric, lint in bobbin case. | Adjust tension, change needle, clean bobbin case. |
| Maschine startet nicht | Power cord not connected, power switch off, bobbin winder engaged. | Check power connections, turn power switch on, disengage bobbin winder. |
6. Spezifikationen
| Besonderheit | Detail |
|---|---|
| Marke | Necchi |
| Modellnummer | EX100 |
| Farbe | Weiß |
| Material | Metall, Kunststoff |
| Artikelgewicht | 23.79 Pfund |
| Stromquelle | Netzteil |
| Integrierte Stiche | 100 (including 6 buttonholes) |
| Maximale Stichbreite | 7 mm |
| Anschiebetisch | Included (16" x 11") |
| Besondere Merkmale | Optic Magnifier, Automatic Thread Cutter, Needle Up/Down, Start/Stop Button |
7. Garantie und Support
7.1 Garantieinformationen
The Necchi EX100 Sewing Machine comes with the following warranty:
- 1 year labor
- 25 year housing/casting
- 5 year electronics
Bitte bewahren Sie Ihren Kaufbeleg für Garantieansprüche auf.
7.2 Kundendienst
For technical assistance, troubleshooting beyond this manual, or warranty service, please contact Necchi customer support. Refer to the contact information provided with your product packaging or visit the official Necchi webWebsite für aktuelle Supportinformationen.